Databricks Integration Steps
Okera provides seamless integration with the Databricks Analytics Platform. Databricks end users will continue to have the same experience they are used to, specifically:
- Authentication to Okera is transparent. Databricks users continue to logon with their SSO provider and the user identity is used to authenticate against Okera APIs. No steps are needed to log in to Okera.
- Okera authorizes the policy via a Spark driver integration done at planning time. This means Databricks advanced auto scaling, cluster management, and query optimizations are unchanged.
- There is no change to query execution and Databricks performs all I/O and query processing, allowing you to use all Databricks functionality such as Delta Lake.
- The integration applies to Notebooks, Jobs and the Data explorer UI in exactly the same way.
- You can grant access to Databricks internal views without the need to grant access to the underlying tables.
Performance Tip: Connecting to Databricks Using ODBC and JDBC Drivers
When using JDBC to connect to Databricks, Okera recommends that you use the jdbc:databricks scheme to improve performance instead of the legacy jdbc:spark scheme. This will greatly improve performance.
Setup Steps
Note: The following setup should be completed by a Databricks admin.
The following is a brief overview of the steps needed to integrate the systems. These are all run in the Databricks cluster creation UI:
- Configure the cluster to start with Okera's init script.
- Configure the Databricks cluster for Okera.
- Configure the required Okera cluster connection environment variables.
- Set up cluster authentication using cluster environment variables.
- Optionally enable Okera file access control (OkeraEnsemble), as needed in your environment.
- Optionally support Databricks single-tenant clusters, as needed in your environment.
- Verify connectivity with a simple notebook query.
- Create a cluster policy to simplify cluster setup.
1. Configure the Okera Init Script
This integration is done using Databricks' built-in support for init scripts and standard cluster configurations options.
The init scripts perform the following steps:
- They download the Okera libraries into the appropriate locations in DBFS.
- They update Spark and metastore cluster configurations to enable the Okera integration.
Note: The configuration state is not persisted across cluster restarts, making it easy to update values.
Okera provides the init script as part of the Okera release.
For example:
s3://okera-release-uswest/2.18.1/dbx/init-okera.sh
Init Script on Amazon S3
Set up your cluster instance profile to have read permissions on the Amazon S3 location and to include the getObjectAcl permission. See the databricks user guide for information on how to set up the cluster instance profile.
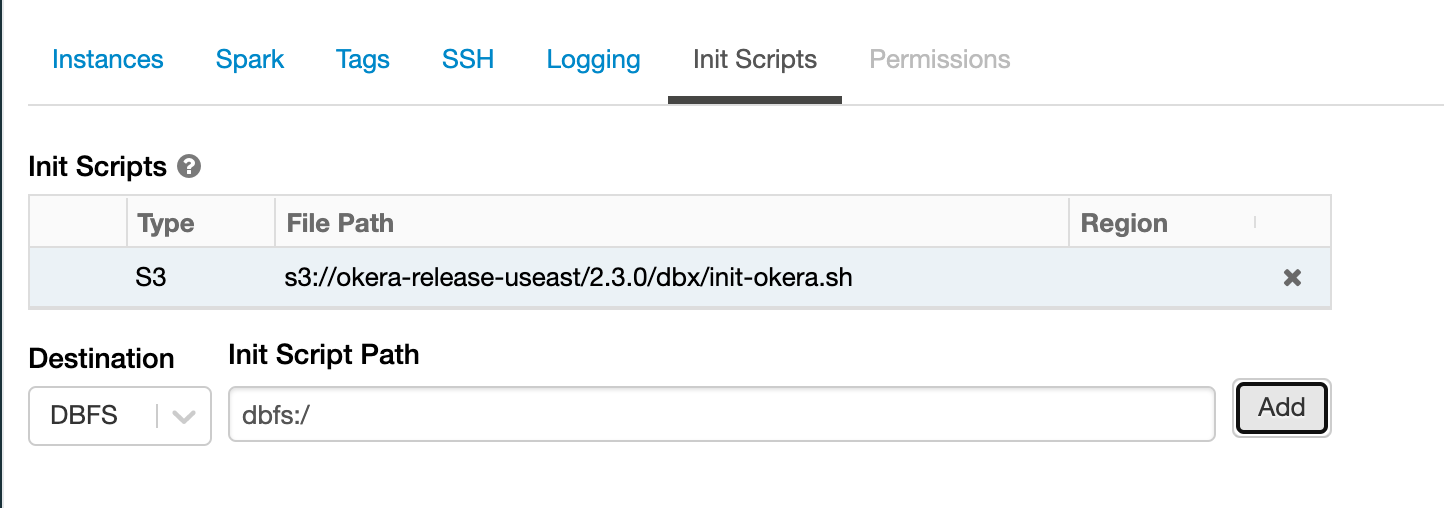
Important
The cluster must have an AWS instance profile to read from the Amazon S3 destination.
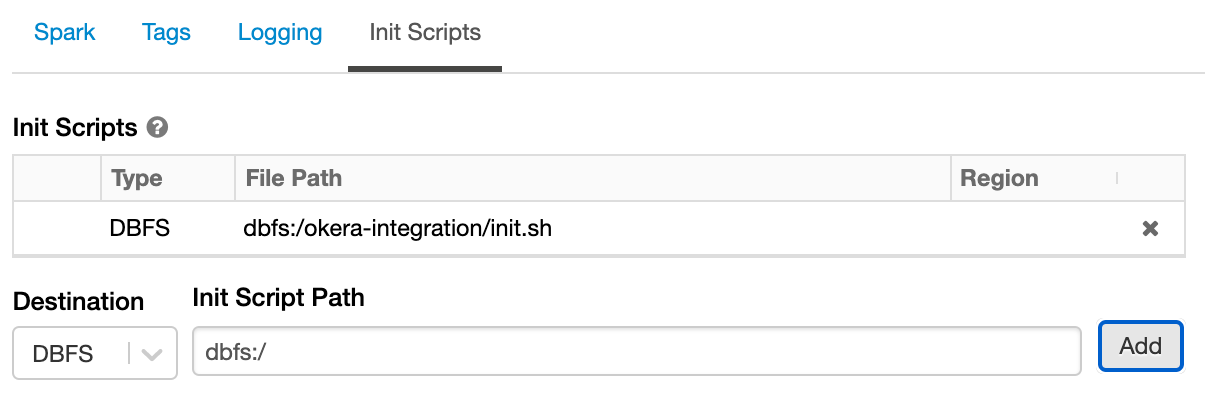
Init Script on DBFS
You must do this for Azure deployments, since ADLS is not supported for init scripts.
If you're familiar with the DBFS CLI and have configured it with your access token, you can upload the downloaded init script.
- Create a directory on DBFS that will contain the
initscript.dbfs mkdirs dbfs:/okera-integration - Upload the downloaded script to the new directory.
dbfs cp \ /path/to/local/init-okera.sh \ dbfs:/okera-integration - Verify the file was successfully uploaded by running the following command:
The output should be:
dbfs ls -l dbfs:/okera-integrationfile 1234 init-okera.sh
Once you've uploaded the init script to DBFS, you can link it in the cluster config.
2. Configure the Cluster
Supported Configurations
Okera supports all types of Databricks clusters:
- High Concurrency
- Standard
- Single Node
However, for clusters that are meant to be simultaneously used by multiple users, Okera strongly recommends using High Concurrency clusters to leverage the stronger security guarantees provided by this cluster type.
When using a Standard or Single Node cluster, Okera recommends you dedicate the cluster to a single user, to avoid user interaction with activity by other users. This recommendation is consistent with the Databricks guidance in their documentation.
Supported Versions
Okera supports Databricks 8.3, 8.4, 9.0, 9.1, 10.0 through 10.5, and 11.0 runtime versions (support is tested against Databricks LTS/Extended Support releases).
Note: In Databricks 8.x integrations that use Spark 3 or later, client-side compression is not currently supported.
Catalog Integration
Okera supports all of the metastore integrations supported by Databricks.
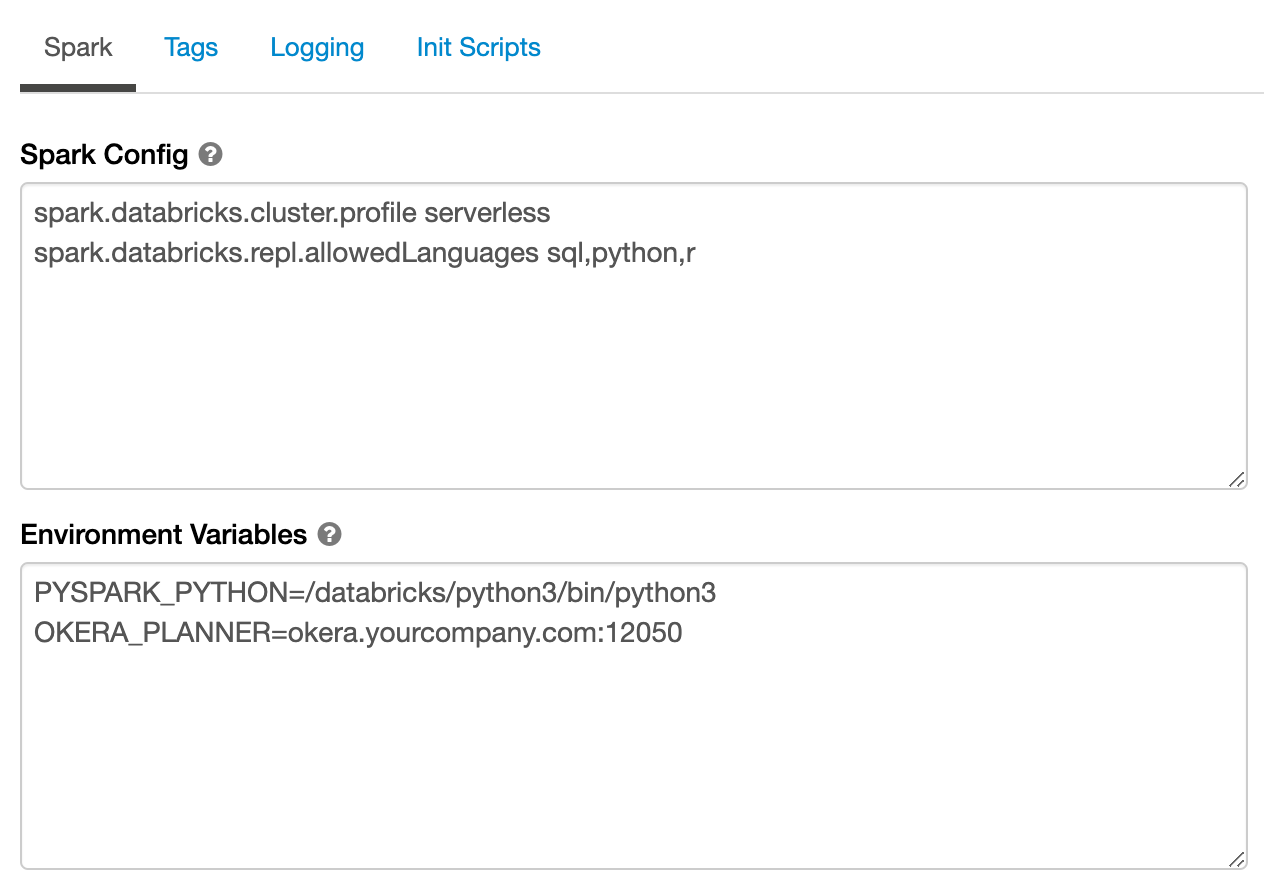
3. Specify Okera Cluster Connection Environment Variables
Specify the host and port of your Okera cluster in the OKERA_PLANNER environment variable. You can find the host and port information on the System tab in the Okera UI.
OKERA_PLANNER=<okera.yourcompanyhostname.com>:<port>
The default port number is 12050.
If the location of Okera's user-defined functions (UDFs) has been altered from the default of okera_udfs, specify the OKERA_BUILTINS_DB environment variable in Databricks. The value of this environment variable must match the setting of the EXTERNAL_OKERA_SECURE_POLICY_DB configuration parameter as specified in Okera's configuration file. If the EXTERNAL_OKERA_SECURE_POLICY_DB configuration parameter is not specified in the configuration file, the default is assumed and you do not need to specify OKERA_BUILTINS_DB.
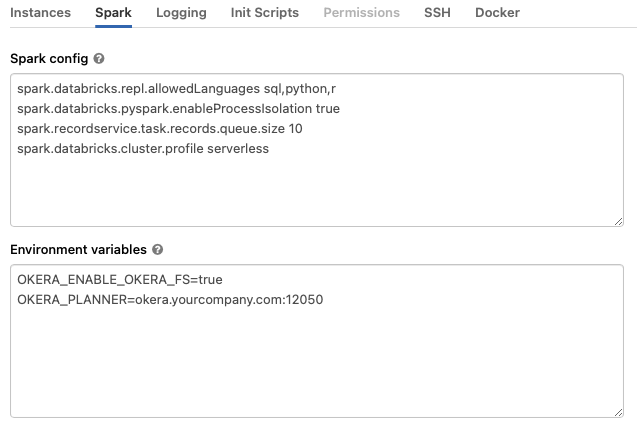
Note: Okera Databricks environment variables should be added in the
Environment Variablessection underClusters -> Advanced Options -> Spark.All other normal Spark configurations are supported.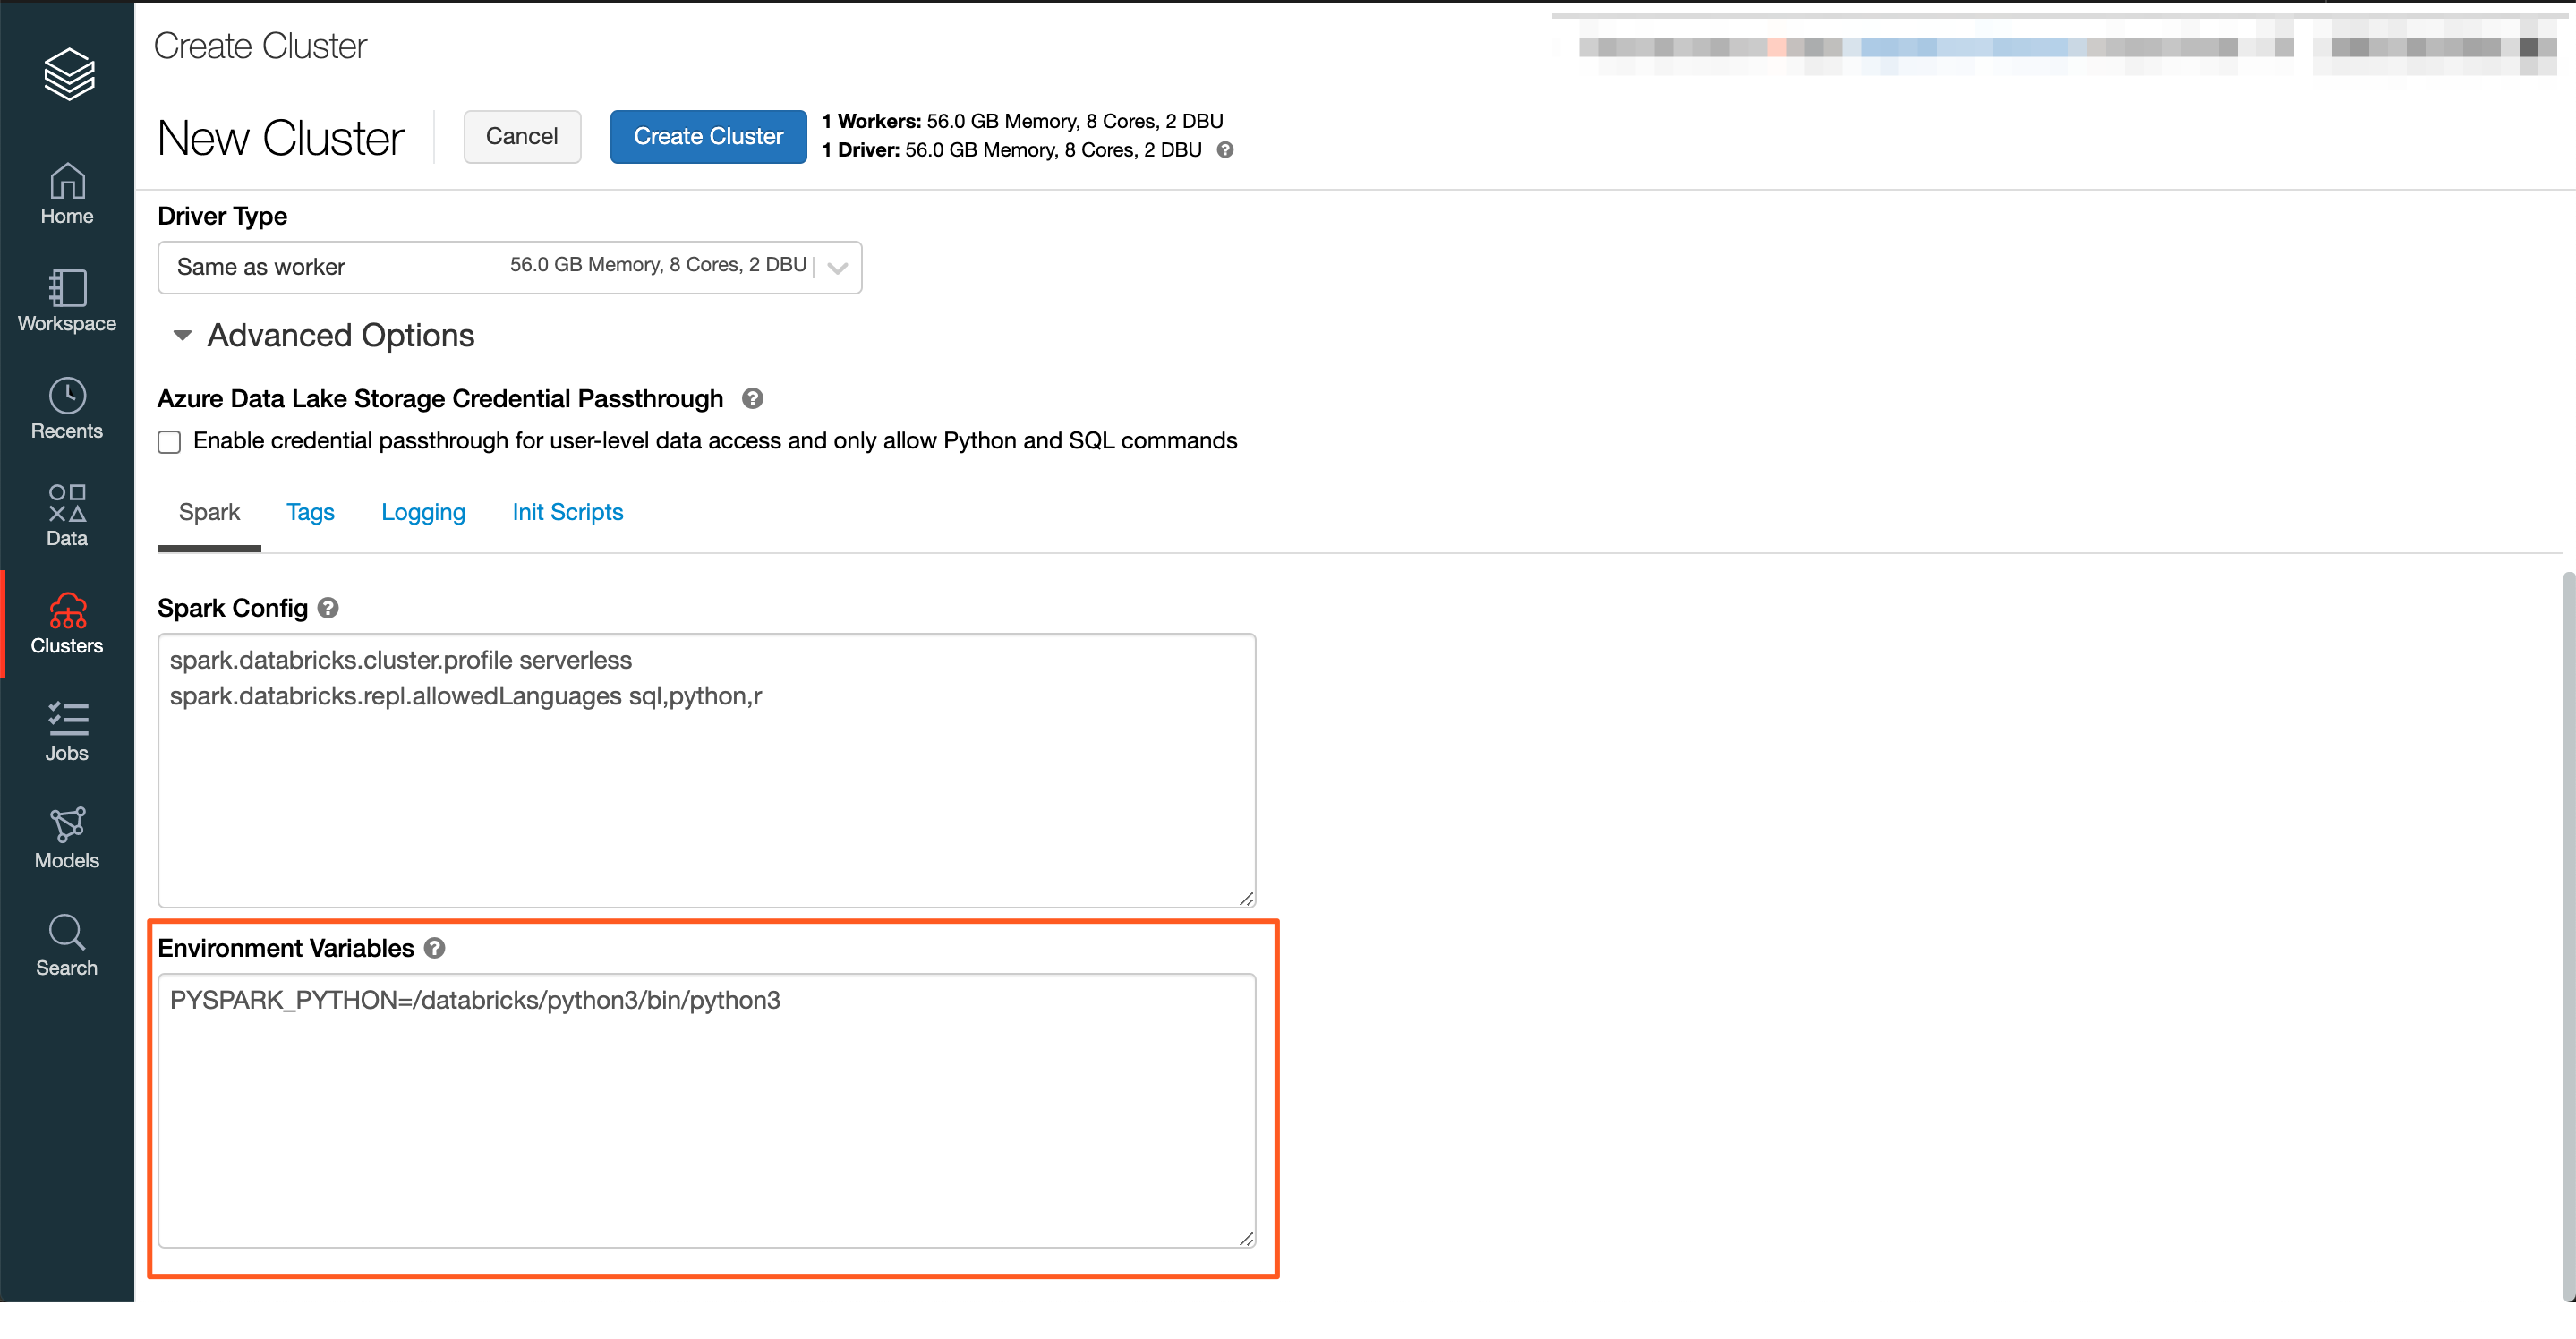
For example:
4. Configure Authentication
Okera provides a few options for configuring transparent authentication, so users logged into Databricks can be seamlessly authenticated with Okera. While all options provide user authentication, depending on the Databricks cluster mode, some authentication options are recommended. Okera works in conjunction with the Databricks cluster mode security properties to ensure proper authentication.
In all cases, Okera uses JSON Web Tokens (JWTs) to communicate credentials.
At a high level, Okera provides three authentication options:
- Provide a signing key that is shared between the Databricks cluster(s) and the Okera cluster. This is recommended for High Concurrency Clusters.
- Provide a per-cluster-specific JSON Web Token (JWT) at cluster creation time. All users on the cluster will have the same credentials. This is recommended for Standard and Single Node clusters.
- Allow the Okera client library to self-sign the JWT. This should not be used in production because a malicious user can impersonate others. This is suitable for proof of concept instances and tests.
Each option requires you to specify appropriate environment variables, as described in the rest of this section.
High Concurrency Clusters
For High Concurrency clusters, configure the Databricks cluster with a private key that will be used to sign JWTs. Okera recommends you use a dedicated public/private key pair, which can be generated and configured using the instructions in JSON Web Tokens.
Okera highly recommends you use Databricks Secrets to store the private key and avoid having it in clear text in the Databricks configuration UI. The rest of this documentation assumes that Databricks Secrets are being used.
For High Concurrency clusters, add this value in the Environment Variables section under Clusters -> Advanced Options -> Spark:
A full configuration for a High Concurrency cluster might look like this:
Standard and Single Node Concurrency Clusters
For Standard and Single Node clusters, users are not sufficiently isolated from each other, and Okera recommends these cluster types be used by a single user. Configure the Databricks cluster with a token specifically for the user who will be using it. This token will be used when communicating with Okera and authorizing the user's actions.
Okera highly recommends you use Databricks Secrets to store the token and avoid having it in clear text in the Databricks configuration UI. The rest of this documentation assumes that Databricks Secrets are being used.
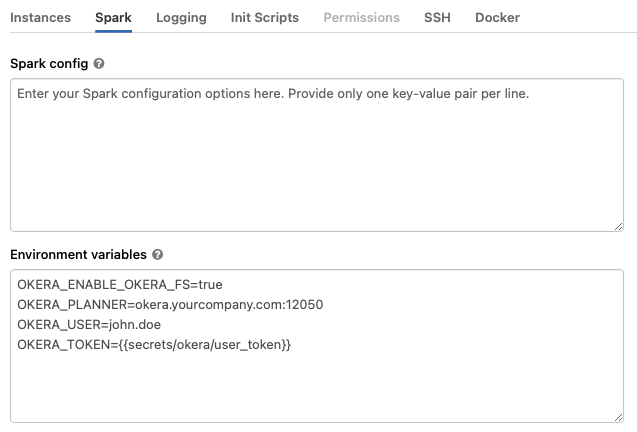
For Standard and Single Node clusters, add this value in the Environment Variables section under Clusters -> Advanced Options -> Spark:
OKERA_USER=john.doe
OKERA_TOKEN={{secrets/okera/user_token}}
A full configuration for a Standard or Single Node cluster might look like this:
Self-Signed JWTs (POC Quickstart)
For test and proof-of-concept clusters, you can configure the cluster in an insecure quickstart mode. This still provides per-user authentication, but a sophisticated user can impersonate other users.
Warning
This option is only suitable for testing, and should not be used in production.
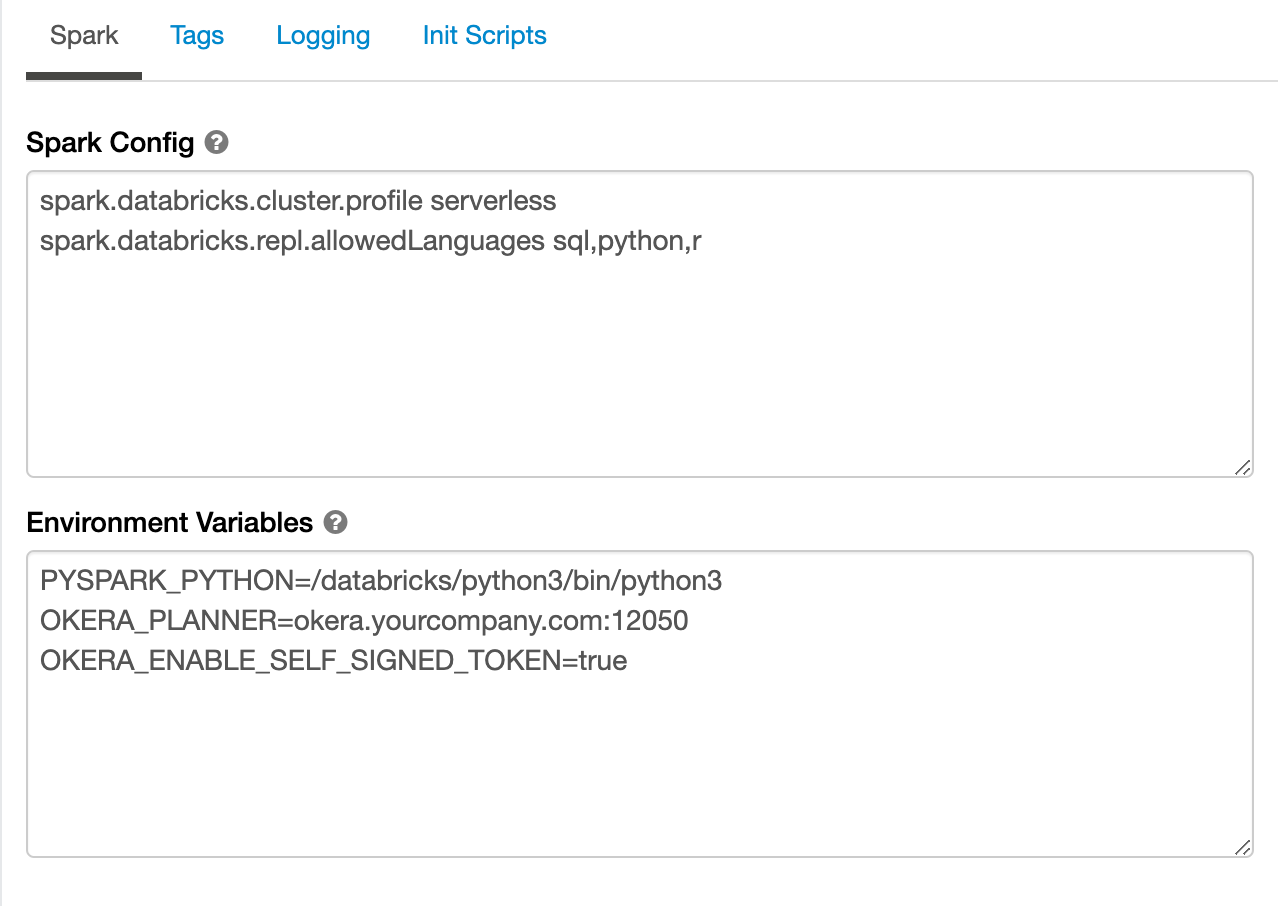
For test and proof-of-concept clusters, add this value in the Environment Variables section under Clusters -> Advanced Options -> Spark:
OKERA_ENABLE_SELF_SIGNED_TOKEN=true
A full configuration for a self-signed cluster (POC only) might look like this:
5. (Optional) Enable Okera File Access Control (OkeraEnsemble)
Okera provides an authorization layer that intercepts Databricks data requests to Amazon S3 to determine whether users have access to the file and data in the request. If they do, the request is passed to Amazon S3 for processing. If they do not have access to the file, the request is rejected and returned. For information on how to enable OkeraEnsemble support for Databricks on Amazon S3, see OkeraEnsemble Deployment on Databricks.
6. (Optional) Support Databricks Single-Tenant Clusters
If you need to use Okera with single-tenant Databricks clusters, add the OKERA_TOKEN environment variable to your Databricks settings (in the Environment Variables section under Clusters -> Advanced Options -> Spark). Set this environment variable to the token for a connected Databricks user. If you use a service account, specify the token of the service account.
OKERA_TOKEN=<token>
7. Verify the Integration
After you've completed the above setup, start your cluster.
After the cluster has started, you can verify connectivity to Okera by selecting from the okera_sample.whoami table in a Databricks notebook.
This can be done using any of the Spark languages, for example:
%sql
SELECT * FROM okera_sample.whoami
This returns the single sign-on information for the Databricks user.

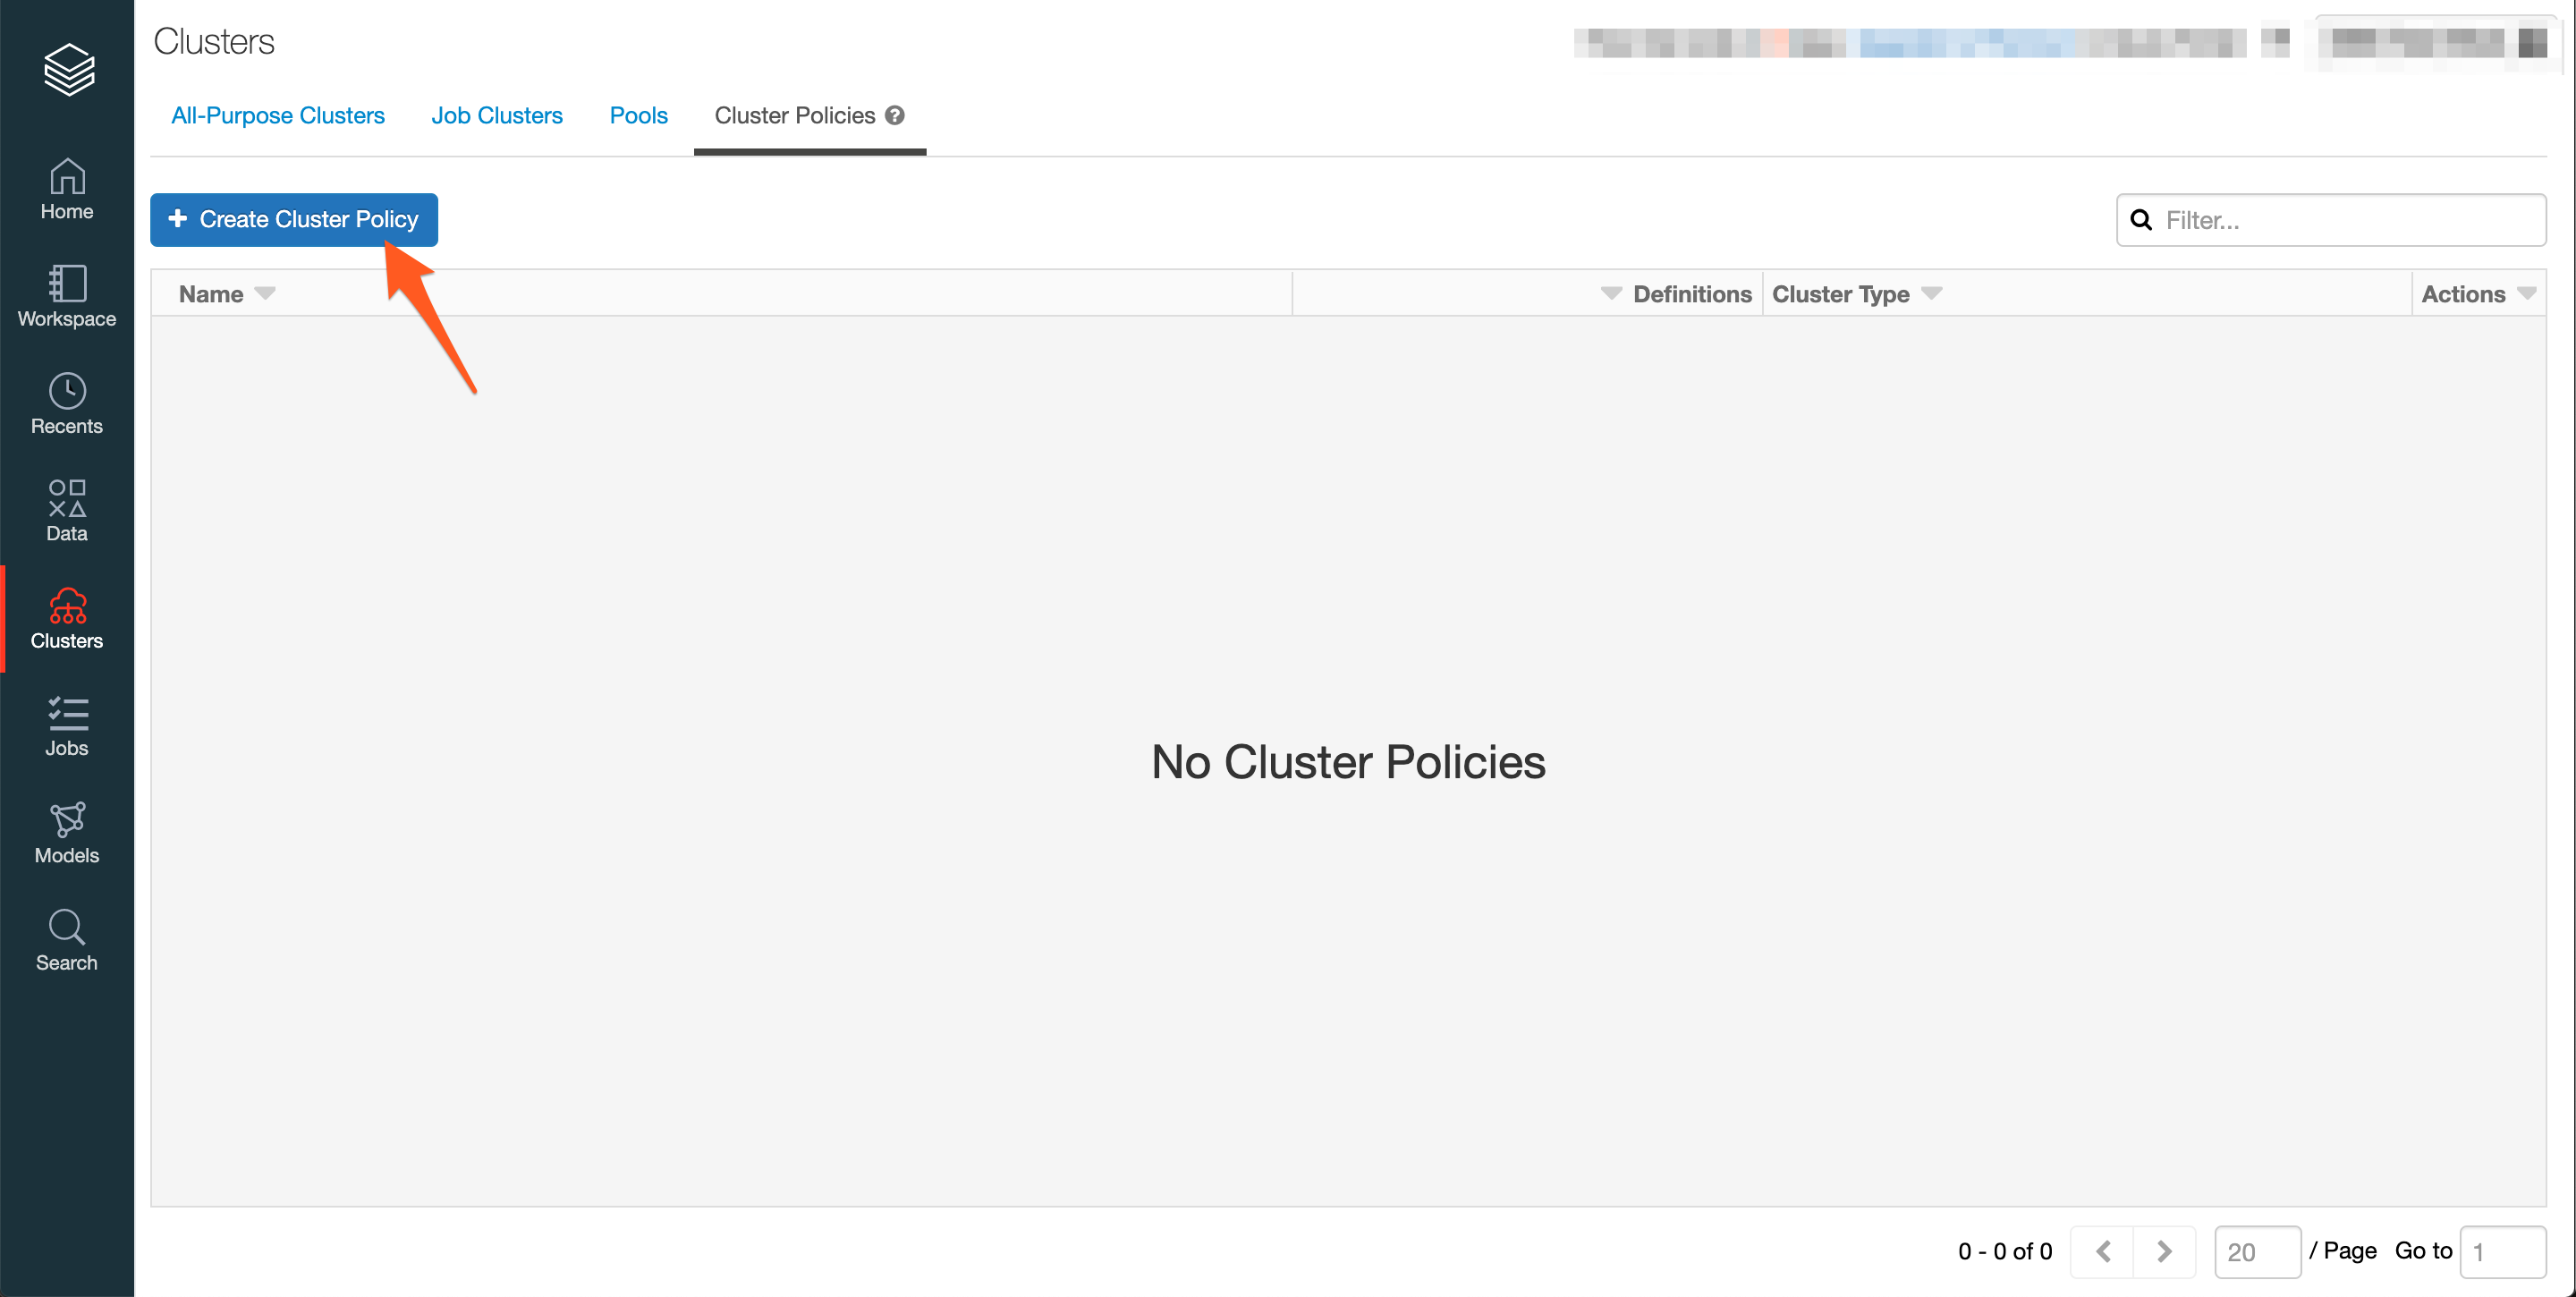
8. Simplify Setup Using Cluster Policies
After you've completed the end-to-end setup, add the Okera configuration to a new or existing cluster policy template.
Create a new cluster policy. The following example shows a cluster policy for high-concurrency clusters, with the init script in Amazon S3.
Make the following updates:
- Ensure the correct environment variable and value is set for your authentication method (the below example is for High Concurrency clusters)
- Update
OKERA_PLANNERwith your Okera host and port number. - If you want to enable file access control, set the
OKERA_ENABLE_OKERA_FSenvironment variable totrue. - Update
init_scripts.s3.destinationwith the location of your Amazon S3initscript. Change this toinit_scripts.dbfs.destinationif you are using DBFS. - Only include
aws_attributes.instance_profile_arnif your init script is in Amazon S3.
{

    "spark_env_vars.OKERA_PLANNER": {
        "type": "fixed",
        "value": "<okera.yourcompany.com:12050>"
    },
    "spark_env_vars.OKERA_ENABLE_OKERA_FS": {
        "type": "fixed",
        "value": "true"
    },
    "init_scripts.*.s3.destination": {
        "type": "fixed",
        "value": "s3://okera-release-uswest/{{ okera_version }}/dbx/init-okera.sh"
    },
    "aws_attributes.instance_profile_arn": {
        "type": "fixed",
        "value": "arn:aws:iam::335456599346:instance-profile/dbx-role"
    }

}
Troubleshooting
This section describes how to troubleshoot some common Databricks integration problems.
Problem 1: Connecting to the Databricks Internal HMS
Suppose that, after integrating Okera with Databricks, you receive a Hive metastore (HMS) error message that reads like this when you try to start up Databricks with Okera for the first time:
Caused by: org.apache.hadoop.hive.ql.metadata.HiveException: org.apache.hadoop.hive.ql.metadata.HiveException: MetaException(message:Hive metastore database is not initialized. Please use schematool (e.g. ./schematool -initSchema -dbType ...) to create the schema. If needed, don't forget to include the option to auto-create the underlying database in your JDBC connection string (e.g. ?createDatabaseIfNotExist=true for mysql))
This error indicates that there was a problem connecting to the Databricks internal HMS, possibly caused by the fact that your environment uses external metastores. Here is a workaround for this problem:
-
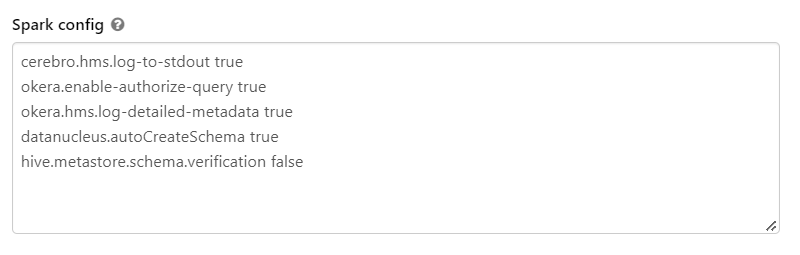
Add the following settings to the Spark configuration settings for the Databricks cluster the first time you start the cluster (after integrating with Okera):
datanucleus.autoCreateSchema true
hive.metastore.schema.verification false
For example:
-
Start the Databricks cluster, with its integration to Okera. The two settings you added should set up the Databricks HMS correctly and establish Okera's ability to connect to it.
-
Return to the Spark configuration settings and remove the settings you just added in step 1 from the Databricks cluster. They are only needed the first time the Databricks cluster starts. Thereafter, they are not needed as the HMS has already been established. Leaving the settings in place might make your Databricks cluster more vulnerable to attack, so Okera recommends that you remove them.
Problem 2: Partitioned Temporary Tables Generated Cannot Be Accessed 
You may encounter this problem if you are using Databricks 10.4 or higher. With Okera's support for earlier versions of Databricks, Okera used the Databricks commandContext for the session ID. However, this does not work with Databricks 10.4 or later.
The workaround for this problem is to add the following environment variable to your Databricks 10.4 or later environments:
OKERA_PREFER_ACTIVE_SESSION_FOR_ID=true
When set to true, the client is forced to use the Spark JobGroupID as the session ID. When set to false (the default), the client uses the Databricks commandContext for the session ID.
Note: In Okera 2.13.0, the default is
truefor this Databricks environment variable.
Problem 3: Temporary Table Not Found Error Encountered
In the unlikely event that your Databricks environment is running an extremely high load, some users may receive a temp table not found error. The workaround is to add the authorize_query_client_max_sessions option to the RS_ARGS configuration property in the configuration YAML file (default file name values.yaml) for your Okera cluster. This option specifies the maximum number of query client sessions that Okera should maintain. The default for this parameter is 1024 client sessions, but to resolve this problem, you will want to increase this value. Okera has tested a value of 131072, which resolved this problem with no noticable performance ramifications.