Tutorial: Obtaining SailPoint User Attributes in Okera ( Preview Feature)
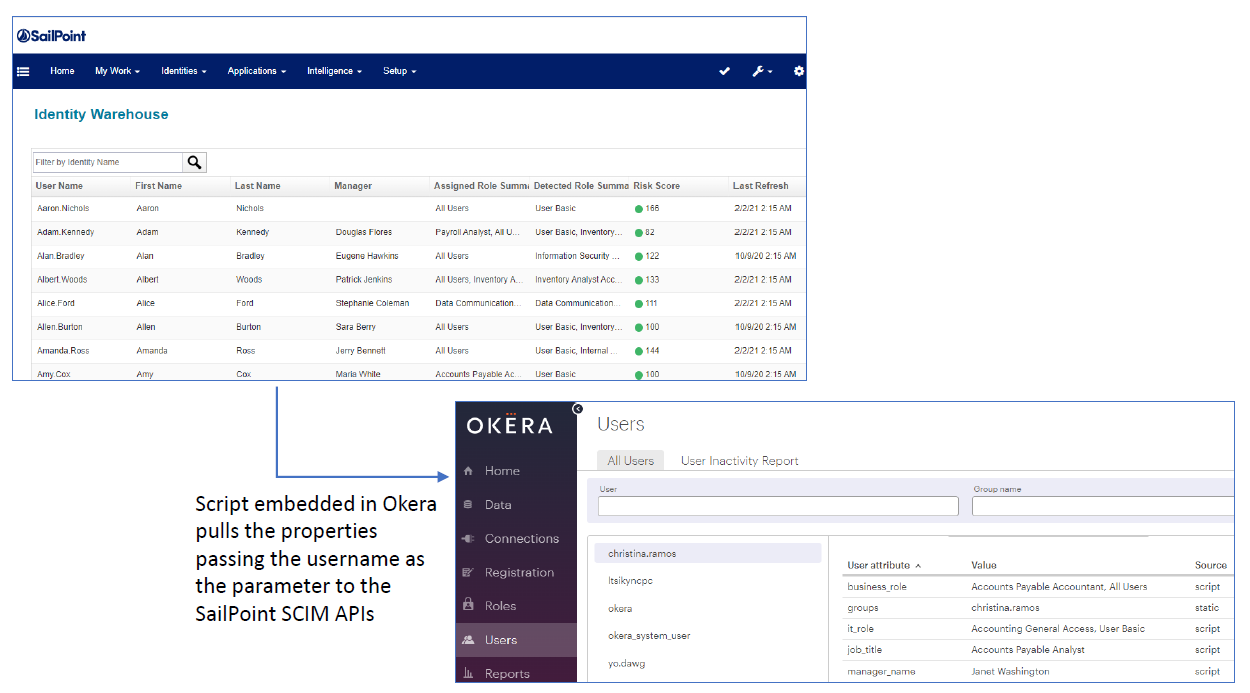
The integration between SailPoint and Okera uses SailPoint cross-domain identity management (SCIM) APIs to pull and add enhanced user properties for Okera users. The properties pulled from SailPoint into Okera can be configured. After they are applied to the Okera users, the additional properties appear on the Users page in the Okera UI. These properties can then be used to configure access permissions in Okera.
A Python-based script, configured in Okera, passes the Okera usernames as parameters to the SailPoint APIs and fetches the requested properties. The properties to be fetched are configured in an Okera yaml file using JSONPath queries and attribute names that map to the SCIM API.
The following diagram depicts this workflow:
Prerequisites
The following prerequisites must be met before SailPoint integration can occur.
- The script must be written in Python 3.9.5 or later.
- Only SailPoint SCIM API (on IdentityIQ platform) 8.1 or later is supported.
- Only Okera 2.10.0 or later is supported.
- The users for whom you are obtaining SailPoint attributes must be preauthenticated in Okera.
Integration Steps
To integrate SailPoint with Okera, complete the following steps.
-
Move the
sailpoint_user_attributes.pypython script to the Okera EC2 instance folder:/home/ec2-user/sailpoint. -
Update the Okera configuration file. Make the following changes:
-
Add
/home/ec2-user/sailpoint/sailpoint_user_attributes.pyto theUSER_ATTRIBUTES_SCRIPTconfiguration parameter. If the configuration parameter is not in Okera's configuration file, add it:USER_ATTRIBUTES_SCRIPT: /home/ec2-user/sailpoint/sailpoint_user_attributes.py -
Add the following SailPoint integration configuration parameters to Okera's
yamlconfiguration file:SAILPOINT_SERVICE_PROTOCOL: http SAILPOINT_SERVICE_HOST: <sailpoint-host-address> SAILPOINT_SERVICE_PORT: <sailpoint-port-number> SAILPOINT_SERVICE_AWS_SECRET_URI: <AWS secret key> AWS_DEFAULT_REGION: "<region>"The secret key specified by the
SAILPOINT_SERVICE_AWS_SECRET_URIconfiguration parameter should contain the username and password required to access the SailPoint host.
Note: The current Okera-SailPoint integration only supports a single instance of IdentityIQ.
-
-
Update the Okera cluster using the Okera Helm chart. See Update a Helm-Deployed Cluster.
-
Test that the user attribute script correctly fetches user attribute data for the users available in your SailPoint application. Log in to Okera as a user available in SailPoint. The user attributes should be fetched and displayed on the Okera UI Home page.
The following example shows Okera and SailPoint user
yo.dawg's user attributes in Okera after the attributes were fetched from SailPoint.The following example shows Okera and SailPoint user
yo.dawg's user attributes in Okera after the attributes were fetched from SailPoint.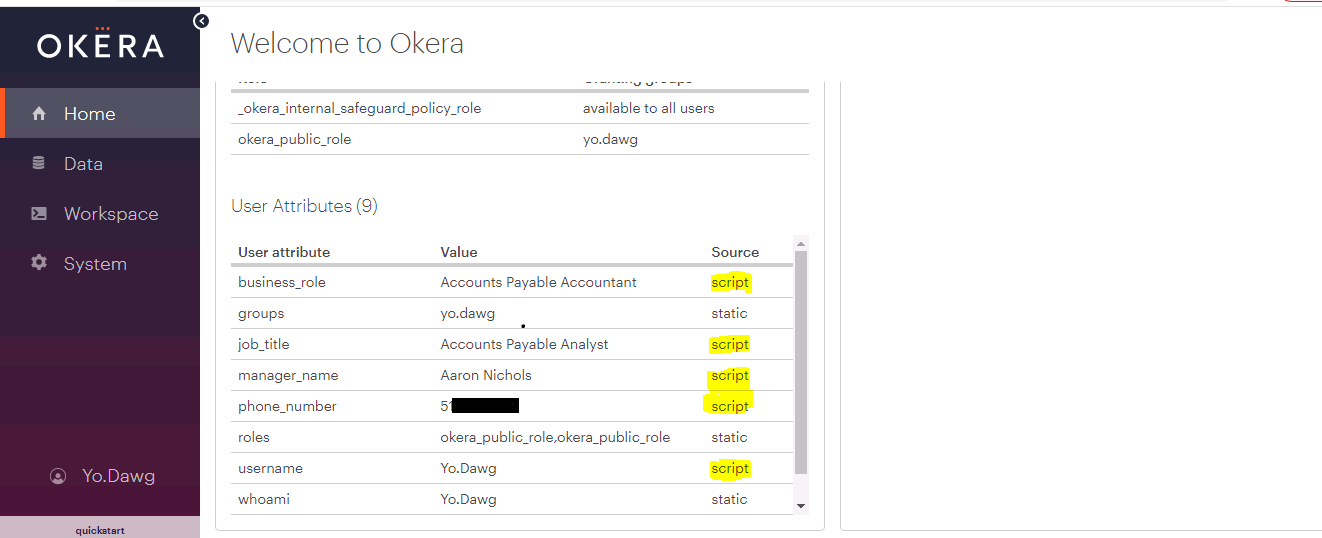
Updating the Python Script
The SailPoint user properties that can be exposed in Okera are described in the table below.
| Key | Description |
|---|---|
username |
Returns the username of the requested user. |
work_email |
Returns the work email of the user. |
job_title |
Returns the job title of the user. |
phone_number |
Returns the phone number of the user. |
manager_name |
Returns the display name of the user's manager. |
business_role |
Returns the business role name of the user. |
it_role |
Returns the IT role name of the user. |
Okera maps the attributes configured in the inline yaml file with attributes from the mapping in the sailpoint_user_attributes.py Python script.
Here is sample mapping in the Python script.
mapping:
   username:
      attribute_name: userName
      jsonPath: ".userName"
   work_email:
      attribute_name: emails
      jsonPath: ".emails[?(@.type == 'work')].value"
   job_title:
      attribute_name: jobTitle
      jsonPath: ".jobTitle"
   phone_number:
      attribute_name: phone
      jsonPath: ".phone"
   manager_name:
      attribute_name: manager
      jsonPath: ".manager.displayName"
   business_role:
      attribute_name: roles
      jsonPath: ".roles[?(@.type == 'business')].display"
   it_role:
      attribute_name: roles
      jsonPath: ".roles[?(@.type == 'it')].display"
The jsonPath specified in the Python mapping must be formatted as described here: https://github.com/h2non/jsonpath-ng.
jsonPath Examples
In the following example, the emails attribute is a multivalued attribute. To filter the emails attribute by work type, specify jsonPath as jsonPath: ".emails[?(@.type == 'work')].value". To obtain the first JSON value, specify jsonPath as jsonPath: ".emails.[0].value".
"emails": [
        {
            "type": "work",
            "value": "Christina.Ramos@sailpointdemo.com",
            "primary": true
        }
 ]
manager attribute is a key-value attribute. If we need the displayName, specify jsonPath as jsonPath: ".manager.displayName".
"manager": {
    "displayName": "Janet Washington",
    "value": "8a8080824df45873014df45bd000008f",
    "$ref": "http://services-us-virginia-m-1.skytap.com:12775/identityiq/scim/v2/Users/8a8080824df45873014 df45bd000008f"
}