Configure Autotagging
Automated tagging, or autotagging, can reduce the manual work of tagging by detecting when a column of data is likely to contain a certain type of formatted data, such as a phone number, and then applying the relevant tag to that column. If autotagging is enabled on the Okera cluster, autotags are applied on newly discovered datasets containing data that matches the specified autotag rules. After the dataset has been registered to the Okera catalog, you you can see that the tags are applied to the data.
This page describes all of the necessary information needed to configure and verify the autotagging feature in Okera.
- Configure Autotagging
- What is Autotagging?
- Enable Autotagging
- Create Autotagging Rules
- Verify Autotagging
- Delete an Autotag
- Troubleshoot Autotagging
What is Autotagging?
Autotagging provides the ability to automate the tagging of columns based on the data inside them. At a high level, Okera samples the data as it's crawled and suggests tags that are appropriate based on the evaluation of a set of rules. These rules can be configured to tag dataset columns containing sensitive data such as Phone Numbers, Social Security Numbers or other PII.
Enable Autotagging
Autotagging is configured using the AUTOTAGGER_CONFIGURATION cluster configuration setting (it is enabled by default on clusters that leverage the quickstart configuration). The valid setting for this is the path to a JSON file that contains the rules for autotagging. Okera is distributed with an autotagging JSON file automatically at /opt/okera/data/autotagger-config-wellknowns.json.
Once enabled, Okera's out-of-the-box autotagging rules will run when a new crawler is run on the data registration page.
Create Autotagging Rules
Okera has several out of the box autotagging rules that appear under the pii namespace.
These tagging rules cannot be edited, however custom user-defined regex-based autotagging rules can be created on the tags page in the UI.
A rule contains the criteria for when to automatically set a tag on a dataset column.
Autotagging samples a number of rows from the dataset and evaluates each rule's expression to determine whether it matches or not.
After sampling all rows, if the percentage of matches is greater than the rule's minimumMatchRate, then the tag is set for the dataset column.
To create an autotag rule:
-
Log into the Okera UI as a user with permissions to create and manage tags.
-
Select Tags on the UI side menu. A list of the tags defined in Okera appears on the Tags page.
-
Select an existing tag from the list. The right side of the page shows details about the tag. (See Create a Tag for information about creating a tag.)
-
Select
 on the right side of the page. The Create auto tagging rule dialog appears.
 -
Each rule contains the following fields. Supply values for the fields as described below:
- Tag: The name of the tag that is set when the rule is evaluated is provided.
- Apply rule to: Select whether the rule should match only cell content or also on metadata such as column names and comments.
- Rule name: Supply a unique name for the autotagging rule.
- Description: Supply a description of the rule.
- Expression: Specify a Java-compatible regular expression that is encoded as a JSON string.
- Test expression: Use this box to specify a value to use to test your expression.
- Row minimum: Specify the minimum number of rows to sample before enabling this rule for evaluation; if dataset does not contain this number of rows, the tag is never set.
- Row test maximum: Specify the maximum number of rows to sample; this limits the number of dataset rows sampled.
- Match rate: Specify the percentage (expressed as a number between 0.0 and 1.0) of expression matches that a dataset column requires to warrant setting the tag.
Here is an example of an autotagging rule:
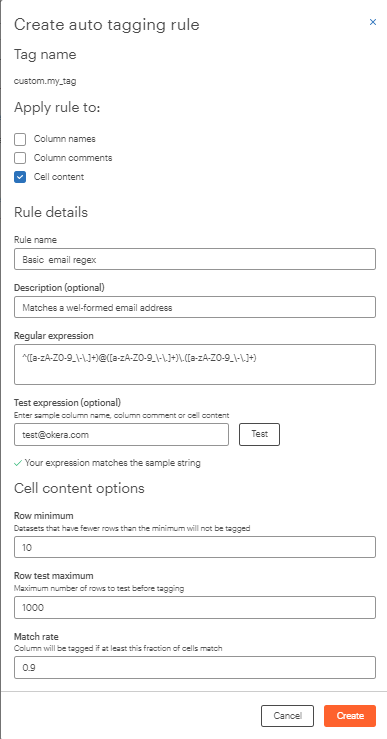
In this example, autotagging will set the
custom:my_tagtag on each column in a dataset when that dataset has at least 10 rows of data and the expression evaluates to true for 90% of the sampled rows. A maximum of 1000 rows of data will be sampled from the dataset to evaluate this rule.
Verify Autotagging
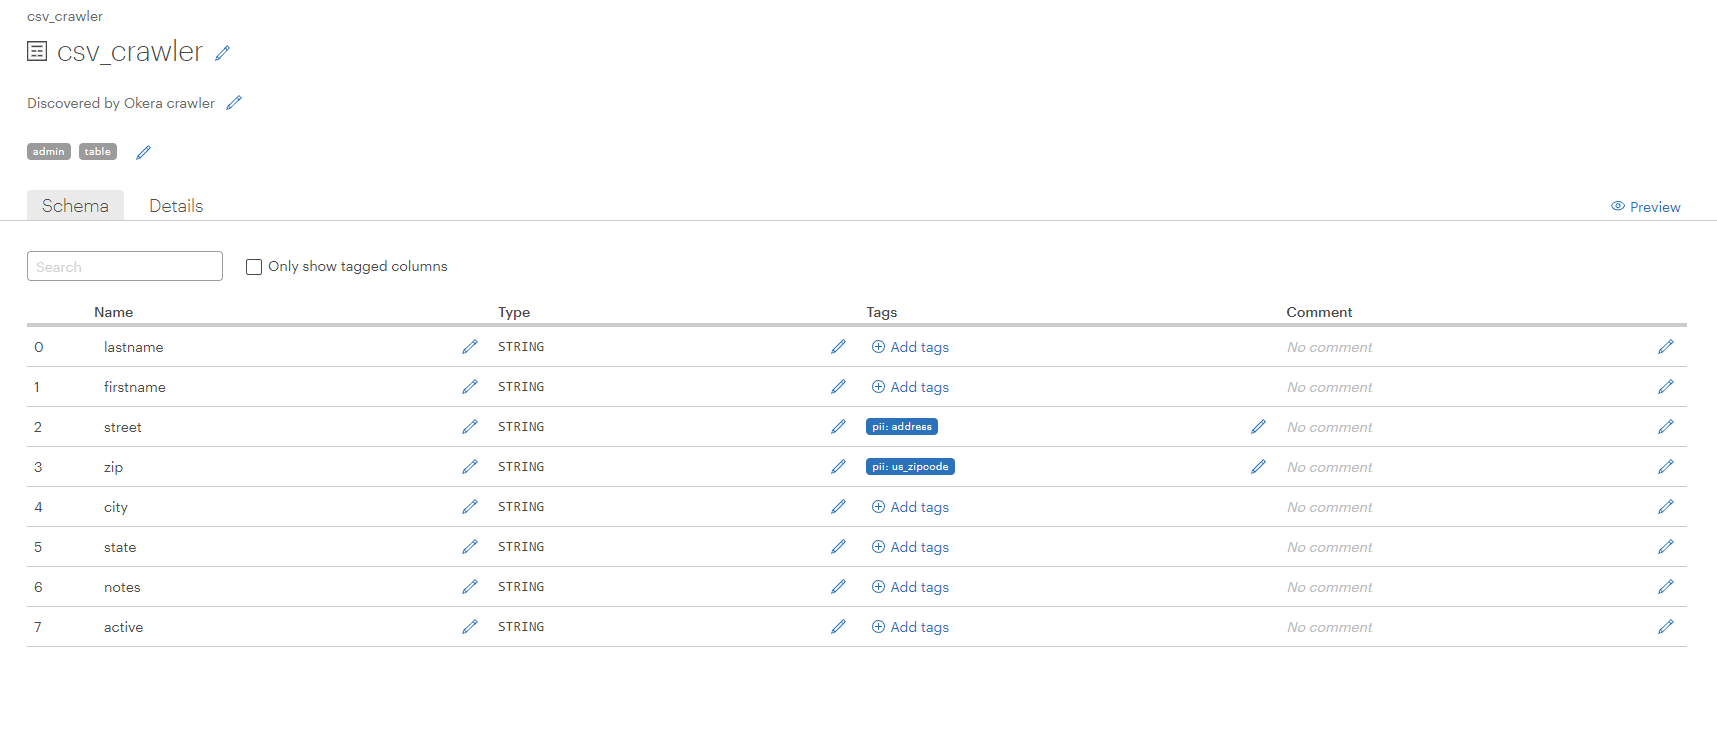
When a crawler has finished crawling and is marked Crawl complete, it is a good idea to verify the autotags in the data.
-
Select the crawler on the Registration page to view its unregistered datasets.
-
Select the dataset name of any unregistered dataset to view its schema. If autotagging has detected data it determines needs tagging, the columns will be tagged. In the example below, the street address and zip code have been autotagged.
Delete an Autotag
To delete an autotag that has been applied to a column, select the edit icon (![]() ) to the right of the tag. Then select the x next to any tags you want to delete and select the checkmark to save your changes.
) to the right of the tag. Then select the x next to any tags you want to delete and select the checkmark to save your changes.
Troubleshoot Autotagging
Autotagging runs automatically on datasets discovered by a crawler if the AUTOTAGGER_CONFIGURATION environment variable has been set. The suggested tags are visible on the Registration page (select Edit Schema). If you find that the tags have not been set as expected, first create a crawler and verify that it has discovered datasets to which you expect autotagging to be applied. Then do the following:
-
Check that Policy Engine (planner) logs contain the string
Started executing MaintenanceTask: AutotaggerMaintenanceTask: Database.Name. If this is missing from the logs, verify that theAUTOTAGGER_CONFIGURATIONconfiguration parameter exists in the configuration file for the Okera environment. -
Check that the Policy Engine (planner) logs do not contain the string
Failure in RegexAutotagger loading configuration. If this string appears, it means that Okera cannot access the JSON configuration file or the JSON file is not well-formed JSON in the expected format. -
Check that the Policy Engine (planner) logs contain the following string:
Finished executing MaintenanceTask: AutotaggerMaintenanceTask: Database.Name. If you find this string for the expected dataset, your rule expression and metrics details need to be reevaluated for correctness.