OkeraEnsemble Default Mode Deployment
The following diagram depicts the processing flow for OkeraEnsemble with Amazon S3.
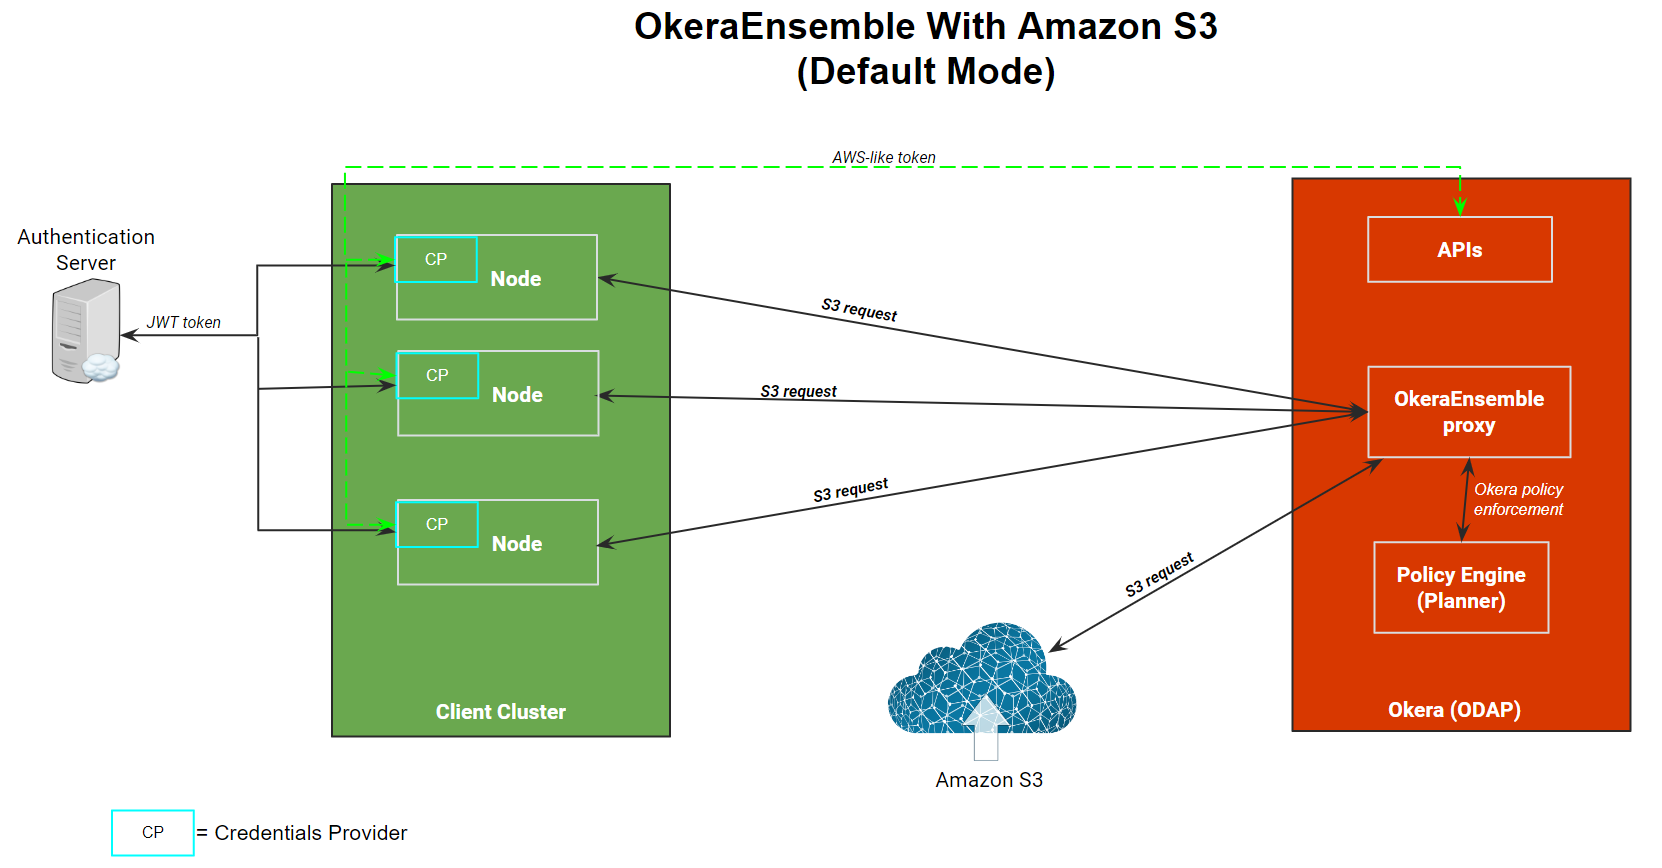
The OkeraEnsemble access proxy:
- Services a request from an Amazon S3 client that is bound for Amazon S3.
- Validates the user's permission against Okera's policies to access the data requested.
- If permission is validated, it modifies the request and resigns the Amazon S3 authorization header using Okera's AWS credentials.
The OkeraEnsemble access proxy service is deployed in the Okera cluster using the Okera cluster system token specified in the SYSTEM_TOKEN configuration parameter. This token enables it to authenticate to the Okera cluster and authorize its use of the object store.
Credential Processing
The AWS CLI requires a JSON web token (JWT) specified in one of the following ways:
-
Specify the JWT in the token field of
~/.aws/config. -
Specify
token_source = authserverin~/.aws/configto indicate that an authentication server will be used. -
Specify the JWT in the user's
$HOME/.okera/tokensetting.
The following sequence of events occur:
-
When the CLI starts, it calls the refresh function (
refresh()) for the Okera credentials provider. This uses the user name to obtain the user’s JWT from the authentication server (or looks for the token in~/.aws/config). -
After the JWT is obtained, the credentials provider connects to the Okera REST server and retrieves an AWS-like access key and secret key. These are not valid AWS credentials, but are automatically generated by Okera. They are unique to the user and conform to the alphanumeric syntax required to run the Amazon S3 CLI.
The credentials provider returns the AWS-like credentials to the AWS CLI.
-
The Amazon S3 command or request is then routed to Amazon S3 using the Okera access proxy.
-
The access proxy uses the AWS-like credentials to authenticate the user with Okera and verifies (using the Okera Policy Engine) that the user is authorized to issue their command or request.
-
If the user is authorized, the access proxy re-signs the command or request using the Okera system credentials (so the user has the permissions they need) and then sends the command or request to Amazon S3 for processing.
Installation Steps
During installation:
-
AWS CLI client hosts are updated with a plugin to the AWS CLI, a configuration in
~/.aws/config, and the plugin onPYTHONPATH. -
Amazon EMR hosts are updated with updates to Okera JAR files and new Hadoop (
/etc/hadoop/core-site.xml) and Spark (/usr/lib/spark/conf/spark-defaults.conf) configurations.
Note: After the installation, be sure to activate the access proxy and port. See Activate the Access Proxy and Port.
To upgrade an existing cluster, be sure to read Upgrade Okera first and then use the Okera Helm chart to upgrade the cluster. See Deploy Okera Using Helm Charts.
The following instructions explain how to provision Amazon EMR using Okera’s odas-emr-boostrap.sh provisioning script. To install using Okera’s odas-emr-bootstrap.sh script, you must make some modifications to the standard Amazon EMR provisioning steps described in Amazon Web Services (AWS) EMR Integration.
-
Follow the instructions for the Amazon EMR node bootstrap script.
-
Follow the instructions for Setting Up Spark, but add the following property to
spark-defaults:"spark.extraListeners":"com.okera.recordservice.spark.OkeraSparkListener" -
Add another map after the one representing
spark-defaults, but this one for Hadoop’score-site.xml:"Classification": "core-site", "Properties": { "fs.s3bfs.impl": "org.apache.hadoop.fs.s3.S3FileSystem", "fs.s3a.aws.credentials.provider": "com.okera.recordservice.hadoop.OkeraCredentialsProvider", "recordservice.token-provisioner": "https://<Okera REST server host>:8083", "fs.s3a.connection.ssl.enabled": "true", "fs.s3a.s3.client.factory.impl": "com.okera.recordservice.hadoop.OkeraS3ClientFactory", "okerafs.default.region": "us-west-2", "okerafs.<mybucket>.region": "us-east-1", "fs.s3a.endpoint": "https://<Okera REST Server Host:5010", "fs.s3a.path.style.access": "true" }Make a configuration
okerafs.mybucket.regionfor each<mybucket>that resides in a region different than the default. Propertyokerafs.default.regiondefines the default. When that configuration is not defined, the default will be the AWS defaultus-east-1. -
Follow the instructions in Step 3: Set your cluster name and bootstrap scripts, but append the following arguments in the Okera libraries bootstrap script:
--rest-server-hostports <Okera REST server host>:8083
--access-proxy-hostports <Okera REST server host>:5010
--aws-cli-autoconfig-omit-users <emr-username1>[,<emr-username2>]...
--use-access-proxy-aws-cli
The
aws-cli-autoconfig-omit-usersargument specifies a list of Amazon EMR host usernames for which the AWS CLI should not be configured to route through Okera for authorization. When this argument is not specified, only therootuser is included in this list. If you specify this argument, be sure to includerootin the list, if it is needed. Theaws-cli-autoconfig-omit-usersargument must be specified before theuse-access-proxy-aws-cliargument.When the
odas-emr-boostrap.shscript runs with the--use-access-proxy-aws-clisetting and these other parameter settings, it installs and configures the Okera AWS CLI plugin and creates the~/.aws/configfile changes necessary to integrate it with the Okera cluster. That file also provides information that the CLI needs to authenticate to Okera (see Credential Processing). If the--authserver <algorithm>arguments are passed toodas-emr-boostrap.sh, the AWS CLI sets thetoken_sourcevalue in its~/.aws/configconfigurations to beauthserver, and the AWS CLI usesauthserveras its source for the users’ JSON Web Tokens. Theodas-emr-boostrap.shalso sets up some/etc/profile.dscripts that configure the Okera plugin and AWS CLI automatically for new users of a multitenant Amazon EMR cluster.
Manually Install the AWS CLI on an Amazon EMR Instance
To install and configure the AWS CLI on an Amazon EMR instance manually, use the code in the following sections.
In AWS CLI V1 and Python 3.6+
-
Install a Python 3 virtual environment and a new AWS CLI V1.
sudo amazon-linux-extras install python3 sudo yum groupinstall -y "Development Tools" sudo yum install -y python3-devel curl "https://s3.amazonaws.com/aws-cli/awscli-bundle.zip" -o "awscli-bundle.zip" sudo unzip awscli-bundle.zip PYTHON3="/usr/bin/env python3" sudo $PYTHON3 ./awscli-bundle/install -i $AWS_CLI_INSTALL -b /usr/local/bin/aws -
Install the Okera plugin.
INSTALLATION=/usr/lib/okera/python27/site-packages/ sudo mkdir -p $INSTALLATION sudo aws s3 cp s3://okera-release-useast/<version>/client/awscli/awscli_plugin.tar/tmp/awscli_plugin.tar/tmp/awscli_plugin.tar sudo tar xvf /tmp/awscli_plugin.tar -C $INSTALLATION sudo echo "export PYTHONPATH=$PYTHONPATH:$INSTALLATION" > /tmp/0_okera_cli_setup.sh sudo mv /tmp/0_okera_cli_setup.sh /etc/profile.d/0_okera_cli_setup.sh -
Install PyOkera and its dependencies.
PIP="sudo $AWS_CLI_INSTALL/bin/pip"
$PIP install -r $INSTALLATION/requirements.txt
Configure the AWS CLI Plug-In Manually
If you install the AWS CLI plug-in manually (rather than on Amazon EMR using the bootstrapping script), you need to configure the AWS CLI to use the plug-in by adding the following to the $HOME/.aws/config for any users who use it. The token_source property indicates whether the user’s token should be retrieved from the Okera authserver if that is set up on the host.
# add to ~/.aws/config
[profile okera]
okera =
    proxy = https://<Okera REST server host>:5010
    rest = https://<Okera REST server host>:8083
    token_source = <'authserver' or empty>
    token = <user’s JWT token if token_source is not ‘authserver’>
[plugins]
okera = okera_fs_aws
# example, AWS CLI retrieves token from authserver: [profile okera]
okera =
    proxy = https://10.1.10.99:5010
    rest = https://10.1.10.99:8083
    token_source = authserver
[plugins]
okera = okera_fs_aws
# example, using explicit token:
[profile okera]
okera =
    proxy = https://10.1.10.99:5010
    rest = https://10.1.10.99:8083
    token = eyJhbGciOiJIUzI1NiIsInR5cCI6IkpXVCJ9.eyJzdWIiOiIxMjM0NTY3ODkwIiwibmFtZ (etc)
[plugins]
okera = okera_fs_aws
Setting AWS_PROFILE=okera causes the AWS CLI to use OkeraEnsemble, by default. Otherwise, AWS CLI commands will need --profile okera to activate those features.
Activate the Access Proxy and Port (Required)
After OkeraEnsemble is installed, the access proxy must be activated and port 5010 must be opened on the REST server.
-
Add the following configuration parameter to the YAML configuration file for the cluster:
REST_SERVER_ENABLE_ACCESS_PROXY: true -
Update the cluster using the Okera Helm chart. See Update a Helm-Deployed Cluster.
-
Patch the REST server container to open port 5010:
NEW_PORT='{ "metadata": { "managedFields": [ { "fields": { "f:spec": { "f:ports": { "k:{\"port\":5010,\"protocol\":\"TCP\"}": { ".": null, "f:name": null, "f:nodePort": null, "f:port": null, "f:protocol": null, "f:targetPort": null } } } } } ] } }'

kubectl patch svc cdas-rest-server --patch "$NEW_PORT"

kubectl patch svc cdas-rest-server --type='json' -p='[{"op": "add", "path": "/spec/ports/-", "value":{ "name": "access", "nodePort": 5010, "port": 5010, "protocol": "TCP", "targetPort": 5010 }}]'
Amazon S3 Example
This section provides an Amazon S3 example.
Grant Access to an Amazon S3 URI
DROP ROLE IF EXISTS emr_user_role;
CREATE ROLE emr_user_role;
GRANT ROLE emr_user_role TO GROUP hadoop;
GRANT SHOW ON URI ‘s3://mybucket/mypath’ TO ROLE emr_user_role;
For file access control, the permissions assignable to an Amazon S3 URI are:
-
SELECT - read permission allows
copy-fromorspark.read -
SHOW - list permission which allows
aws s3 ls -
DELETE - delete permission
-
INSERT - write permission
Use the Roles tab in the Okera UI to configure OkeraEnsemble permissions.
AWS CLI Command Example
aws s3 ls s3://mybucket/mypath/
aws s3 ls s3://mybucket/anotherpath/  # will fail with Access Denied
Grant Access in Okera
Grant user_a access to s3a://mybucket/user_a_data.
sudo su - user_a                          # on Amazon EMR host
aws s3 ls s3://mybucket/user_a_data/      # user_a access data
Spark Example
This section provides a Spark example.
1. Grant an Amazon EMR User Read Access
As an Okera admin, this example grants an Amazon EMR user read access to s3a://controlled_data, and write access to s3a://my_work_bucket. Then, as the Amazon EMR user, in Spark-shell, read from one object and write to another.
spark-shell
val df = spark.read.csv(“s3a://controlled_data/input.csv”);
df.show();
df.write.csv(“s3a://myworkbucket/input.csv”)
2. Grant a User Access
In this step, we grant user_b access to run a query against structured data, filtering and writing the result set to a new table. We also register some data in Okera (for example, s3://controlled_data/transactions) as table source.transactions. Then in the Okera Workspace, we grant user_b read access to some part of that table.
DROP ROLE IF EXISTS analysts;
CREATE ROLE analysts;
GRANT ROLE analysts TO GROUP user_b;
GRANT SELECT ON TABLE source.transactions TO ROLE analysts;
GRANT ALL ON URI 's3://experimental/workspaces/ TO ROLE analysts;
3. Create a Destination External Table for the Result Set
spark.sql("""CREATE EXTERNAL TABLE experiments.transaction_data (
tnxid INT,
tnxdate DATE,
amount DOUBLE,
userid STRING,
ip_address STRING,
address STRING,
country STRING,
region STRING )
STORED AS PARQUET LOCATION 's3://experimental/workspaces/transaction_data'""")
4. Select Structured Data From the Source Table With a Filter
val df = spark.sql("select tnxid, tnxdate, amount, userid, ip_address, address, country, region from source.transactions where amount < 800")
5. Write to the Table With the Dataframe
df.write.mode("overwrite").parquet("s3a://experimental/workspaces/transaction_data")