Prerequisites
VPC and Subnet Prerequisites
Okera will run within a VPC and subnet that you configure in your AWS account. It is not required to create a dedicated VPC and subnet for Okera, but it can be helpful to isolate access. If you do create a dedicated VPC and subnet, you should follow your normal AWS procedures and guidelines for doing so.
Amazon S3 Prerequisites
Okera requires at least one Amazon S3 location (bucket) where it can store audit and server logs, e.g. s3://company/okera. One or two buckets can be created: one to hold both audit and server logs or one to hold the audit log and one to hold the server log. We'll refer to these as Okera Amazon S3 log buckets.
Note: For production use cases, we recommend enabling encryption and versioning on these locations to prevent accidental deletion of data or data leaks.
If you already have Amazon S3 buckets created, you can simply supply their Amazon S3 paths and Okera will leverage them. If you do not already have buckets created, you can create them using the Amazon S3 UI. See Creating a bucket.
IAM Prerequisites
Okera requires an AWS IAM policy for three resources:
- Access to the data in your data lake.
- The Okera Amazon S3 log bucket or buckets you created in Amazon S3 Prerequisites.
- Your Aws Key Management Service (KMS) key or keys. These are used only when you have server-side encryption configured for your Amazon S3 buckets. You can use a single master key for all buckets or use different keys for different buckets.
For information about using secrets in IAM policies, review the IAM policy examples for secrets in AWS Secrets Manager.
Create an IAM policy by navigating to the Create Policy Wizard page (you must have an AWS account to access this link).
- Select the JSON tab.
-
Copy and paste the following policy on the JSON tab, making the following replacements:
- Replace
<data-lake-storage>with the path or paths to your data lake storage. - Replace
<okera-s3-log-bucket>with the location of the log bucket or buckets you created in Amazon S3 Prerequisites. - Replace
<okera-aws-kms-key>with your AWS Key Management Service (KMS) key or keys.
 {
    "Version": "2012-10-17",
    "Statement": [
        {
            "Action": [
                "s3:ListBucket"
            ],
            "Resource": [
                "arn:aws:s3:::<data-lake-storage-1>"[,
                  "arn:aws:s3:::<data-lake-storage-2>",
                   ...
                  "arn:aws:s3:::<data-lake-storage-n>"]
                "arn:aws:s3:::<okera-s3-log-bucket-1>"[,
                  "arn:aws:s3:::<okera-s3-log-bucket-2>"]
            ],
            "Effect": "Allow",
            "Sid": "S3ListObjectsInBucketRestricted"
        },
        {
            "Action": [
                "s3:GetObject"
            ],
            "Resource": [
                "arn:aws:s3:::<data-lake-storage-1>/*"[,
                  "arn:aws:s3:::<data-lake-storage-2>/*",
                   ...
                  "arn:aws:s3:::<data-lake-storage-n>/*"]
                "arn:aws:s3:::<okera-s3-log-bucket-1>/*"[,
                  "arn:aws:s3:::<okera-s3-log-bucket-2>/*"]
            ],
            "Effect": "Allow",
            "Sid": "S3ReadObjectRestricted"
        },
        {
            "Action": [
                "s3:PutObject"
            ],
            "Resource": [
                "arn:aws:s3:::<okera-s3-log-bucket-1>/*"[,
                  "arn:aws:s3:::<okera-s3-log-bucket-2>/*"]
            ],
            "Effect": "Allow",
            "Sid": "S3WriteObjectRestricted"
        },
        {
            "Action": [
                "secretsmanager:GetSecretValue"
            ],
            "Resource": [
                "arn:aws:secretsmanager:<okera-aws-kms-key-1>"[,
                  "arn:aws:secretsmanager:<okera-aws-kms-key-2>",
                   ...
                  "arn:aws:secretsmanager:<okear-aws-kms-key-n>"]
            ],
            "Effect": "Allow",
            "Sid": "S3GetSecretValueRestricted"
        }
    ]
}
- Replace
-
Select Next:Tags. Optionally add metadata in key-value pairs.
- Select Next:Review, supply a name (for example,
okera-iam-policy) and an optional description, review the policy summary, and select Create Policy to save the policy.
For more information about this procedure, see Creating policies on the JSON tab.
After your policy is created, navigate to the IAM Role Wizard to create an IAM role:
- Select AWS Service as your trusted entity type and EKS as the service that will use this role. Then select Next: Permissions.
- Select the IAM policy you created (e.g.
okera-iam-policy) from the list of policies and select Next: Tags. - Add any tags you need for this instance and select Next: Review.
- Give your role a name, like
okera-iam-roleand select Create Role.
Note: The IAM permissions above follow the AWS IAM best practices for least privilege. Please also consult the IAM guide as well. vpc Note: Okera does not need to be installed in the root account. Please refer to the AWS best practices for root accounts.
Security Group Prerequisites
You should create a dedicated security group for Okera, which will be used to control who can access the Okera cluster.
For outgoing connections, it should allow all connections for both TCP and UDP.
For incoming connections, it should have the following definitions:
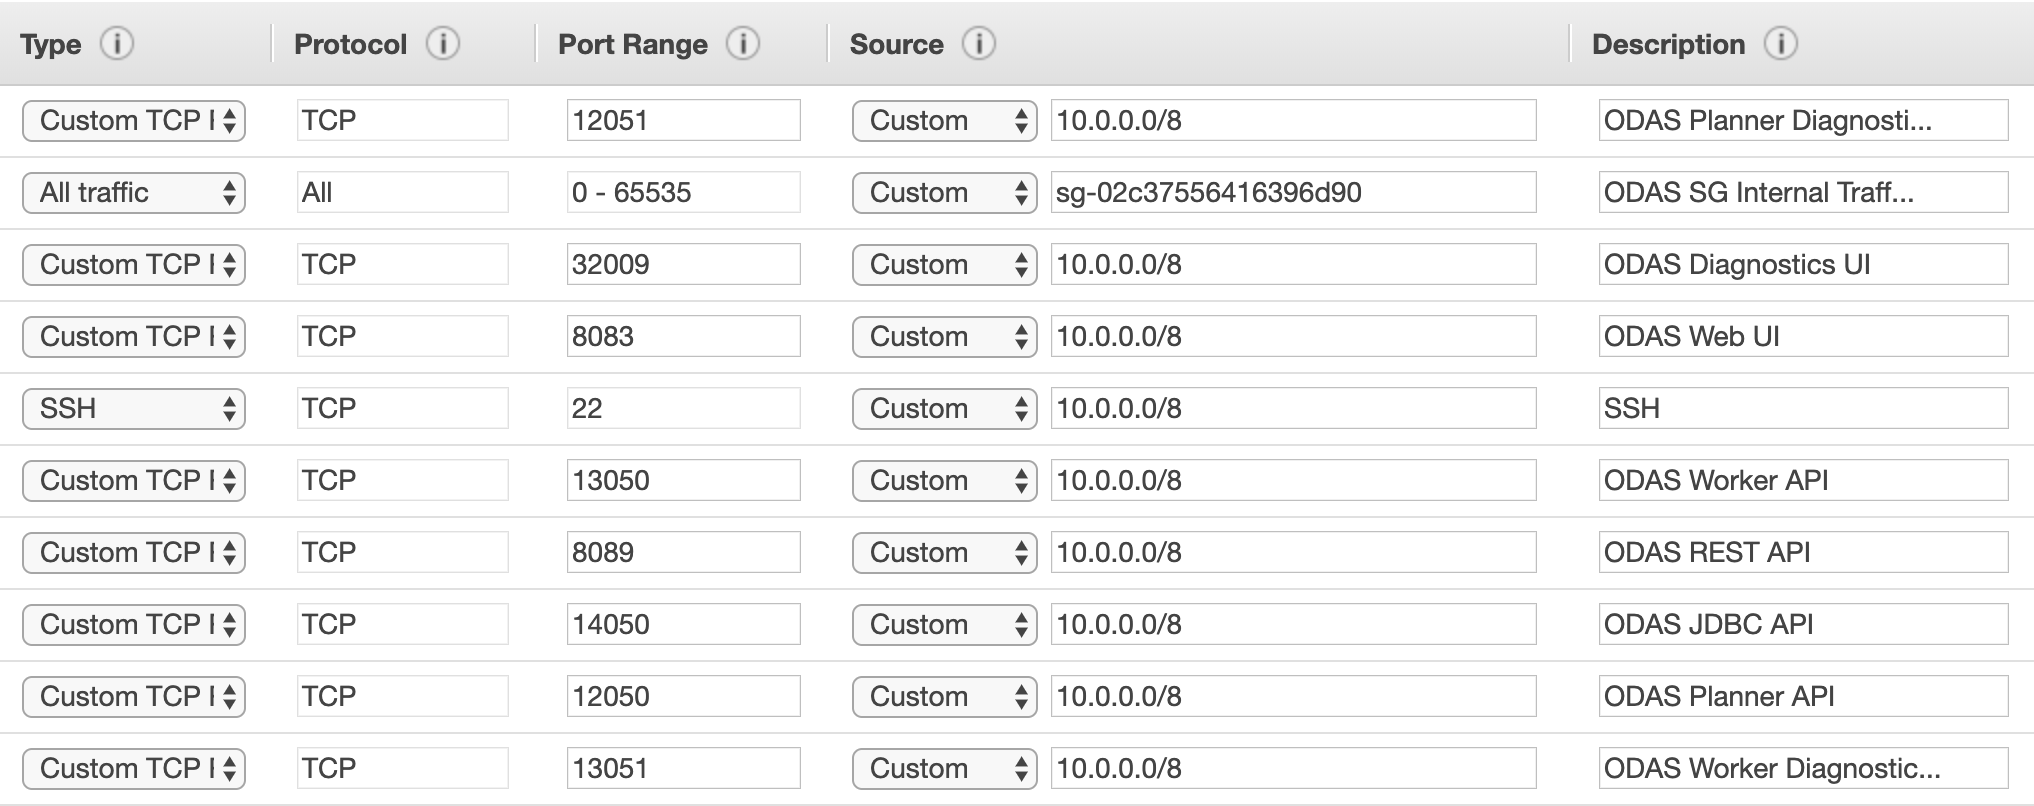
| Type | Protocol | Port Range | Source | Description |
|---|---|---|---|---|
| Custom TCP Rule | TCP | 8083 | Okera Web | |
| Custom TCP Rule | TCP | 8089 | Okera REST API | |
| Custom TCP Rule | TCP | 12050 | Okera Policy Engine (planner) API | |
| Custom TCP Rule | TCP | 13050 | Okera Enforcement Fleet worker API | |
| Custom TCP Rule | TCP | 14050 | Okera Presto/JDBC API | |
| SSH | TCP | 22 | SSH | |
| Custom TCP Rule | TCP | 12051 | Okera Policy Engine (planner) diagnostics (optional) | |
| Custom TCP Rule | TCP | 13051 | Okera Enforcement Fleet worker diagnostics (optional) | |
| Custom TCP Rule | TCP | 32009 | Okera diagnostics (optional) | |
| All traffic | All | All | okera-sg) |
Okera SG internal traffic |
Note: The ports listed above are all configurable in Okera (e.g. you can expose the Web UI on port
6000), and will require a corresponding change in the security group definition (e.g. you will need to update the security group to allow access on port6000). You can read more about this in the Ports page.Note:
<vpc cidr>refers to the CIDR range that your Okera cluster should be accessible from. This should encompass all users of the web UI and any client (such as Amazon EMR, Databricks, etc) that will need to access Okera.<admin cidr>refers to the CIDR range that administrative functions should be accessible from, typically via a browser. In many cases, these can be the same.
Here is an example of a security group definition:
To create this security group, follow the general steps to create a security group, as outlined in the AWS Documentation:
- Open the Amazon VPC console at https://console.aws.amazon.com/vpc/home/. (You must have an Amazon account to access this link.)
- In the navigation pane, select Security Groups.
- Select Create security group.
- Enter a name of the security group, such as
okera-sgand provide a description of your choice. - Select the ID of your VPC from the "VPC" menu.
- In the Inbound rules section, select Add Rule to add the inbound rules above that pertain to machines outside of the security group. Replace
<vpc cidr>and<admin cidr>with the appropriate values (e.g.10.0.0.0/8). - Select Create security group.
Database (RDS) Recommendations
Okera is backed by a relational database, and we strongly recommend using RDS. Okera supports MySQL 5.6 and 5.7, in either normal RDS or Aurora RDS configurations.
The RDS instance type should be of at least db.t3.medium.
Note: RDS limits the number of connections to the DB based on the instance type. If you have a large Okera cluster you may need to increase your DB instance type.
Elastic Kubernetes Service (EKS) Requirements
EKS is not required to run Okera in AWS, but if you do choose to use EKS to run a Kubernetes cluster, there are a few requirements to keep in mind:
- The security group for the cluster should be the same as described in the Security Group Prerequisites section above.
- The IAM role for the cluster should be the same as described in the IAM Prerequisites section above.
- EKS clusters are often created in dedicated VPCs/subnets, and as such, you should ensure that the EKS cluster nodes have access to your RDS cluster as well.
Key Management Requirements
Okera requires secrets and keys. These are managed in a running environment as Kubernetes secrets which can be managed using your deployment Helm chart. In AWS it is recommended to manage the credentials using:
- AWS Systems Manager Parameter Store.
- As a local file on the deployment/bastion node.
When the keys need to be updated or rotated, the services will need to restarted which can be done using your deployment Helm chart.
As an example of how to manage this for SSL certificates, see SSL Configuration.
For information about using secrets in IAM policies, review the IAM policy examples for secrets in AWS Secrets Manager.
AWS Cost and Limit Quotas
All required AWS resources (EKS VMs, RDS, and Amazon S3 log buckets) are run in the customer environment and account. Consult the AWS service quotas as part of your deployment planning.