Amazon Web Services (AWS) EMR Integration
This document describes how to use Okera for Amazon EMR (Amazon Elastic MapReduce) and how to configure each of the supported Amazon EMR services. It assumes that the Okera cluster is already running.
As part of the Amazon EMR setup, we will specify the following:
-
A bootstrap action to download the Okera client libraries on the Amazon EMR cluster nodes
-
A bootstrap script to set the appropriate user account permissions on the Amazon EMR cluster
-
A configuration to set the client libraries to use the existing Okera installation
This is optional for some components, but required for Hive, Spark, and Presto. An Amazon EMR cluster that is using multiple components should apply each configuration.
Notes: Amazon EMR versions 5.2.4 through 5.30.0 as well as Amazon EMR 6.1 are supported by the latest bootstrap scripts.PrestoDB support is enabled starting in Amazon EMR 5.19.0.PrestoSQL support is enabled starting in Amazon EMR 6.1.
Bootstrap Scripts
The following subsections discuss the mentioned bootstrap scripts provided for Okera. These scripts can be run on an existing Amazon EMR cluster or specified as part of the bootstrap actions when creating an Amazon EMR cluster using the AWS web-based UI. The subsections show the interactive usage of the scripts, while the end-to-end example shows their use in the AWS UI.
Amazon EMR Node Bootstrap
The first bootstrap action places the client jars in the /usr/lib/okera directory and creates links into component-specific library paths. To configure an Amazon EMR cluster, run the script, and specify the version and components you have installed. The script downloads the component libraries from the useast region. To use the uswest region, set the environment variable OKERA_BITS_REGION to uswest (export OKERA_BITS_REGION=uswest) in the initScript specified with --init option below.
The bootstrap script is located at:
s3://okera-release-useast/2.18.1/emr/odas-emr-bootstrap.sh
Note: Okera ships version-specific bootstrap scripts starting with version 2.3.0. For legacy reasons, the older bootstrap scripts are still located at
s3://okera-release-useast/utils/emr/.
Script Usage
odas-emr-bootstrap.sh <okera_version> [options] <list_of_components>
Options
--planner-hostports <hostports>-- The link to thecerebro_planner:plannerendpoint.--init <initScript>-- The s3 path init script to be run as part of the bootstrap procedure. This is useful to set environment variables such as HTTP_PROXY, OKERA_BITS_REGION.
See Client Integration for information on the <hostports> parameter.
For example, to bootstrap a Spark 2 cluster from the Okera 2.2.0 release, provide the arguments 2.2.0 spark-2.x (the --planner-hostports and other parameters are omitted for the sake of brevity).
If running Amazon EMR with Spark 2 and Hive, provide 2.2.0 spark-2.x hive.
The complete list of supported components for Amazon EMR 5.x are:
- Apache Spark 2 (
spark-2.x) - Apache Hive (
hive) - Presto (
presto)
The complete list of supported components for Amazon EMR 6.1.x are:
- Apache Spark 3 (
spark3) - Apache Hive 3 (
hive3) - PrestoDB (
presto) - PrestoSQL (
prestosql)
Non-compute components can also be used and do not require any Okera-related steps.
These include:
- Ganglia
- Apache Hue
User Setup Bootstrap
For the second bootstrap action, the following script is used to configure one or more users:
s3://okera-release-useast/2.18.1/emr/bootstrap-users.sh
Run this script for at least one user (likely the default Amazon EMR user, hadoop).
Script Usage
bootstrap-users.sh <list_of_users>
The <list_of_users> is delimited by spaces.
Example: Setting up an Amazon EMR cluster for users alice and bob:
bootstrap-users.sh alice bob
This script
- creates the group
okera; - creates a background script in
/tmp/for each service account (that is,hive,presto,spark, andyarn), waiting for the given account to exist; - adds the account to the
okeragroup; - sets the expected permissions on both the given user's home directory and the
.okeradirectory within their home directory.
The preceding steps result in the Amazon EMR service users having permission to read (and possibly write) a user's token, because of their membership in the okera group.
Group membership enables the Okera client libraries to authenticate the user by passing the user's token to the Okera cluster with each call.
End-to-End Operational Steps
As an end-to-end operational example, we will start up a multi-tenant Amazon EMR cluster running Spark 2.x, Hive, and Presto, configured to run against an existing Okera Policy Engine (planner) running at odas-planner-1.internal.net:12050.
Note: Multi-tenant here means that each Amazon EMR user is assigned their own authentication token. This is the default and the recommended way of configuring the cluster.
Prerequisites
Follow these initial steps to start with the cluster setup:
- Start at the AWS UI with the Amazon EMR service selected.
- Click on the blue "Create cluster" button and wait for the next page to open.
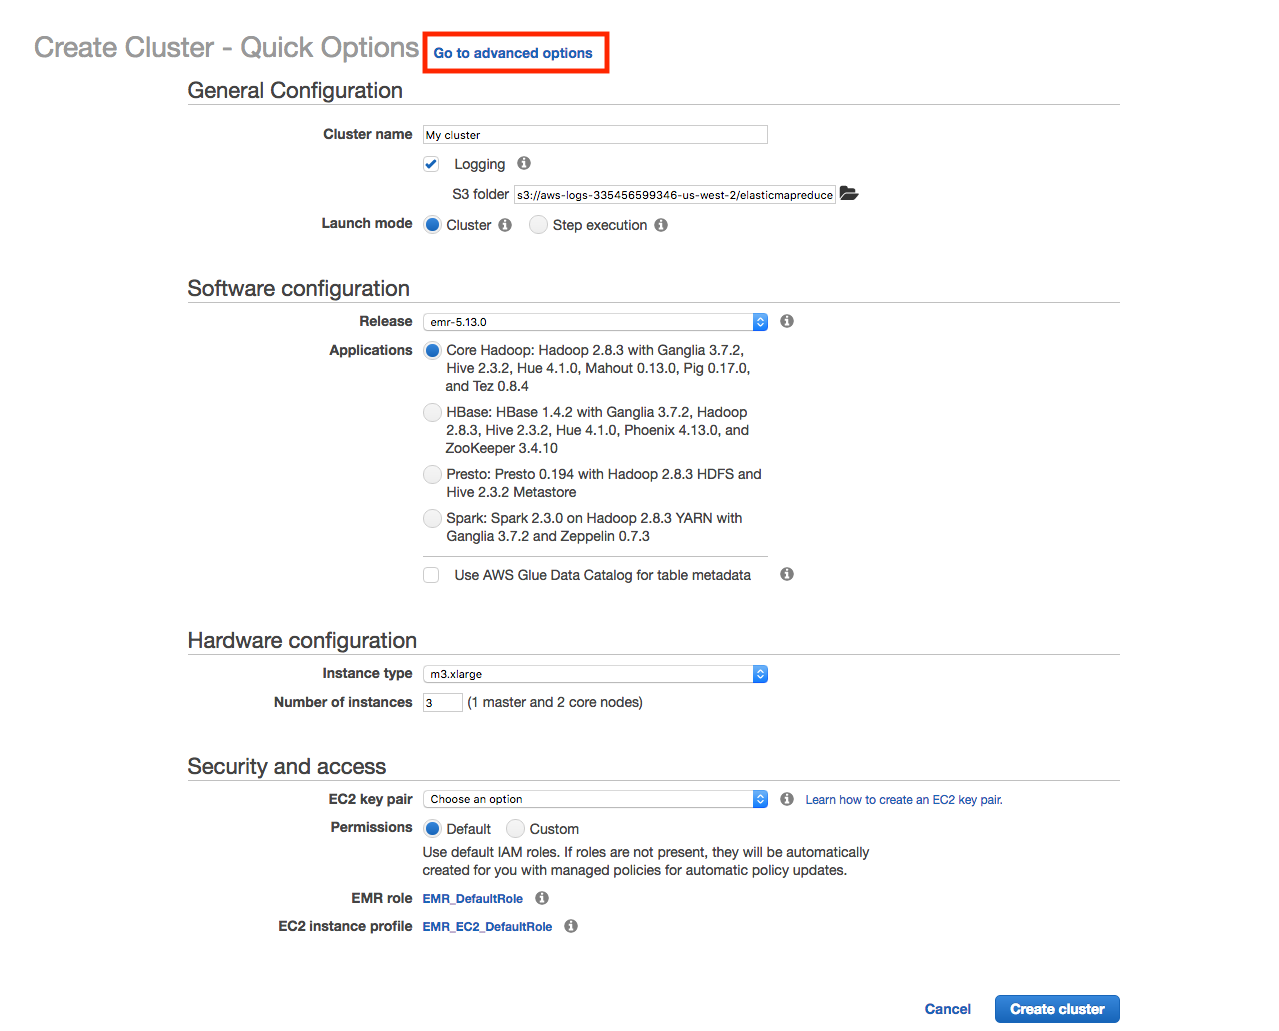
- Select "Go to advanced options" at the top of the "Create Cluster" screen:
You are now ready to perform the UI-based cluster creation process, explained next.
Step 1: Choose your components.
Pick Spark, Hive, and Presto from the list of Amazon EMR components.
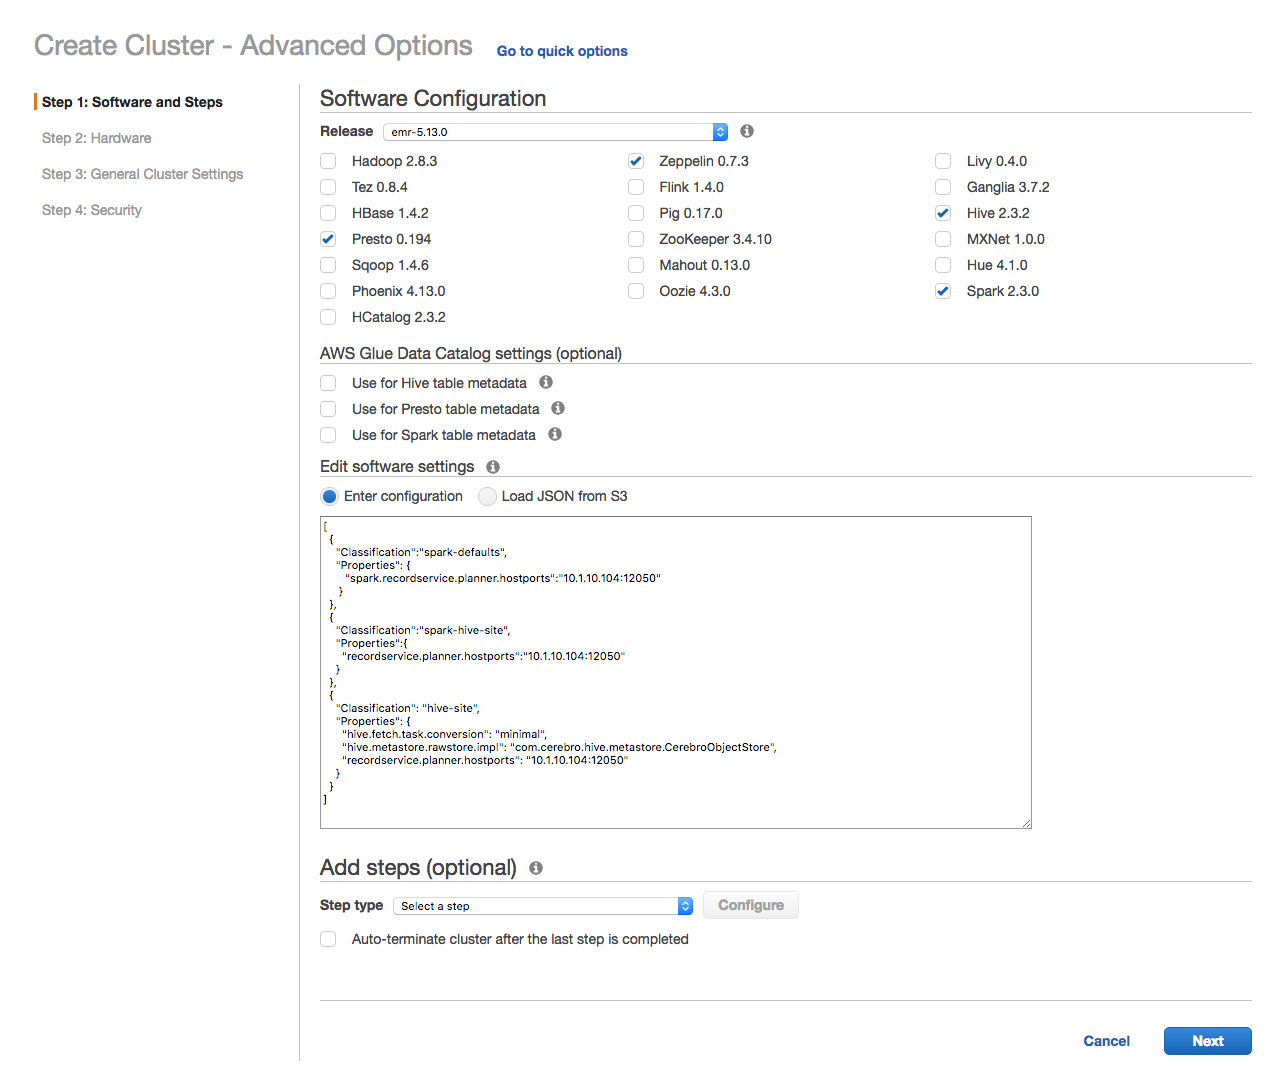
Set the Spark- and Hive-specific configuration options, by copy and pasting the following JSON:
[
  {
    "Classification":"spark-defaults",
    "Properties": {
       "spark.recordservice.planner.hostports":"odas-planner-1.internal.net:12050"
     }
  },
  {
    "Classification":"spark-hive-site",
    "Properties":{
      "recordservice.planner.hostports":"odas-planner-1.internal.net:12050"
    }
  },
  {
    "Classification": "hive-site",
    "Properties": {
      "hive.fetch.task.conversion": "minimal",
      "hive.metastore.rawstore.impl": "com.cerebro.hive.metastore.CerebroObjectStore",
      "hive.exec.pre.hooks": "com.okera.recordservice.hive.SetTokenPreExecute",
      "recordservice.planner.hostports": "odas-planner-1.internal.net:12050"
    }
  }
]
If you follow this example with a different Okera Policy Engine endpoint, adjust the address and port to match your setup.
Additional configuration examples are found in the program-specific sections below.
Optionally, pick, for example, Hue and Zeppelin as components that do not require Okera-related configuration options.
* The hive.exec.pre.hooks is available and required for versions starting with 1.0.1.
For versions prior, simply omit the config.
Step 2: Use your preferred Amazon EMR hardware setup.
Ensure that you assign the proper VPC and EC2 Subnet to the cluster, which includes the requirement of the Okera and Amazon EMR cluster being able to communicate with each other. All the other options, regarding the instance types and EBS volume size, are based on your needs and can be selected as you see fit.
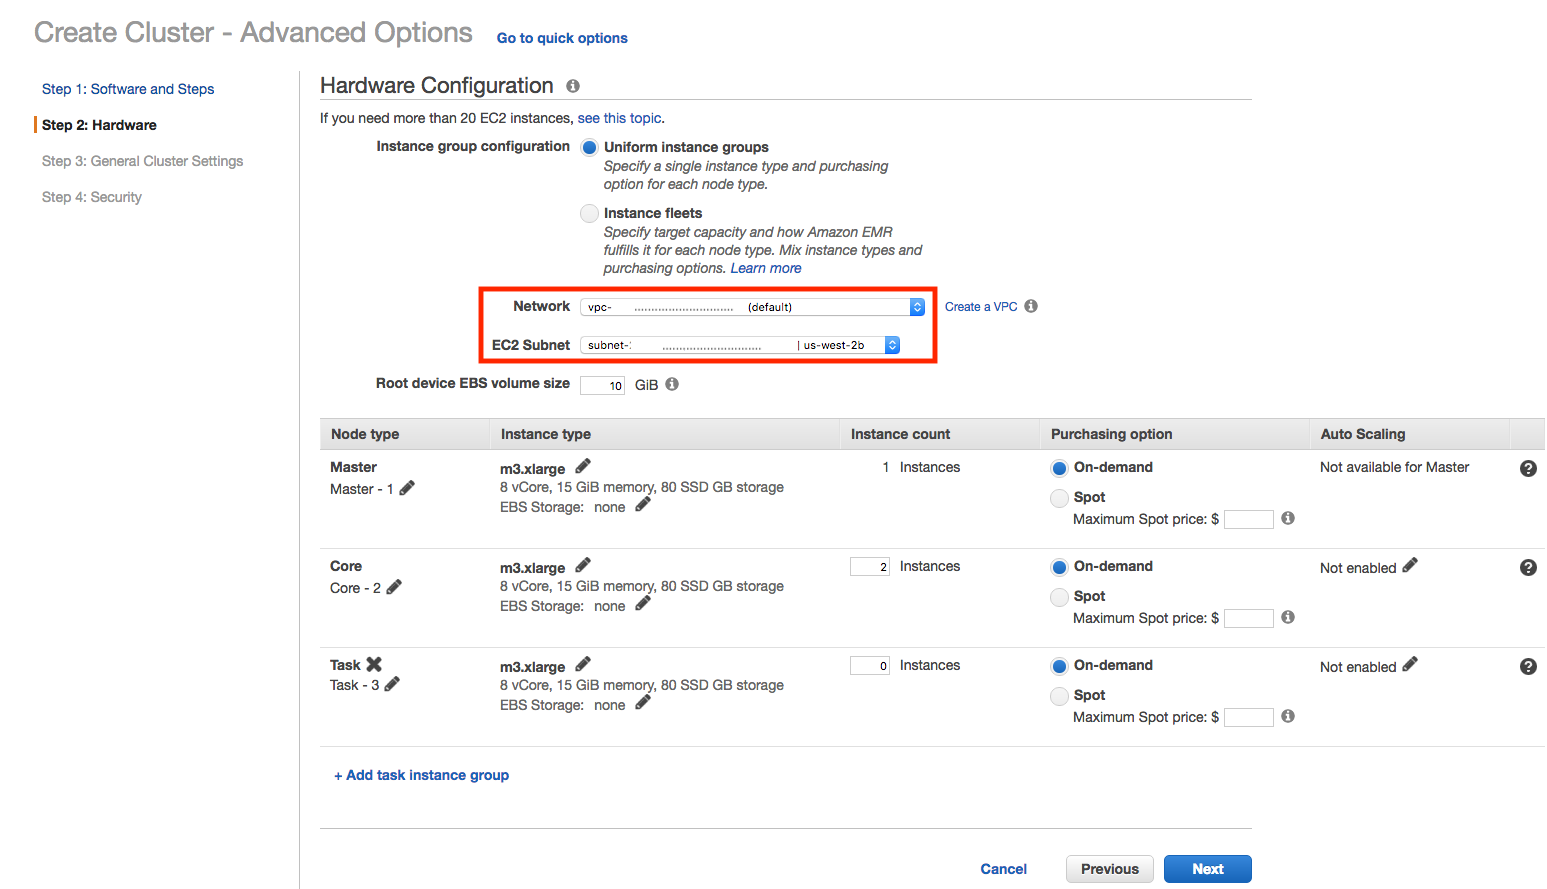
Note: You typically only need the "Master" and "Core" node types, as the "Task" nodes are optional.
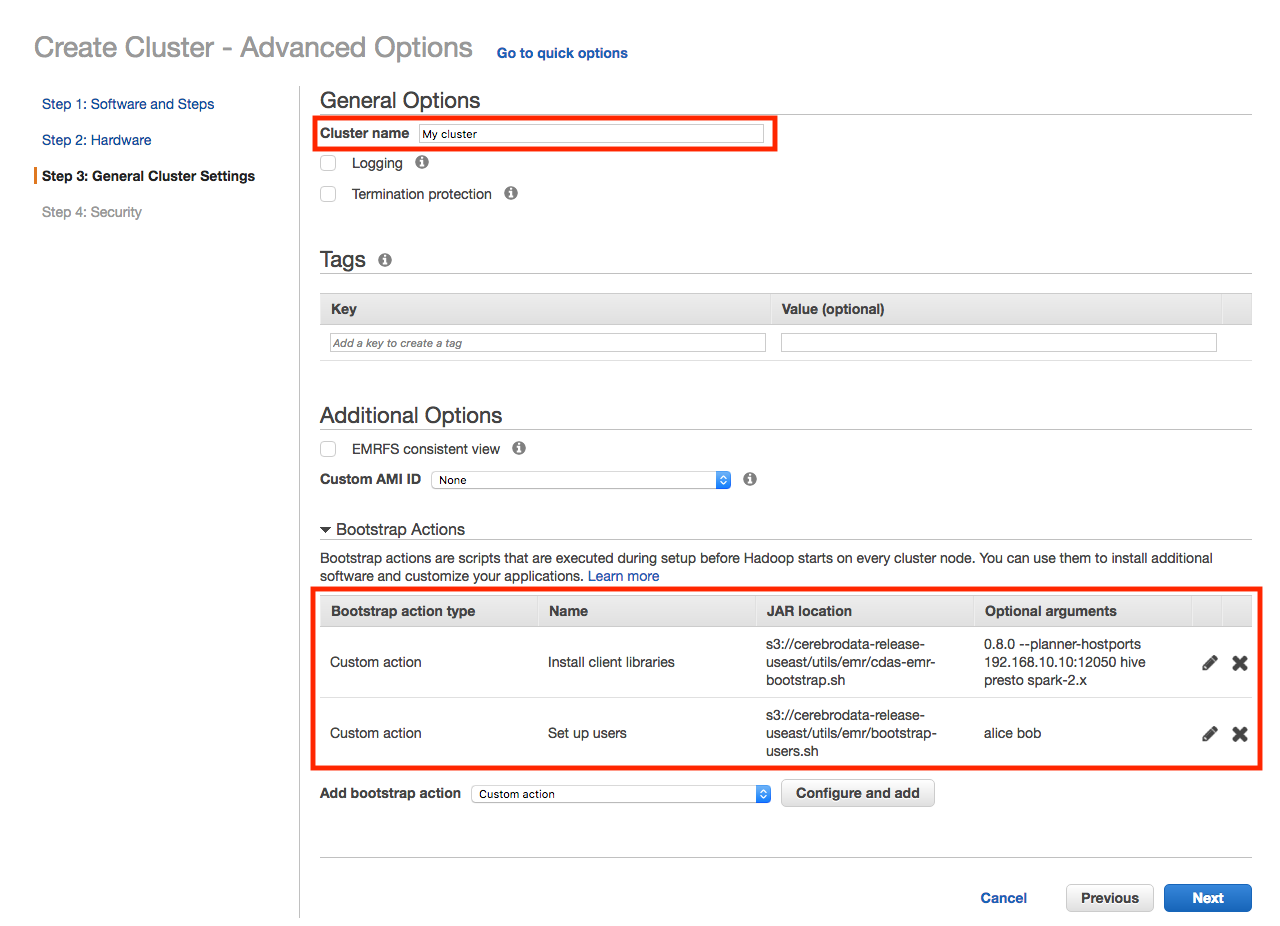
Step 3: Set your cluster name and bootstrap scripts.
First, name your cluster something other than the default.
Second, configure the Amazon EMR cluster to use the Okera bootstrap scripts.
Make the following changes for the Okera libraries script:
-
Add a custom action under Bootstrap Actions.
-
Set the script/JAR path to
s3://okera-release-useast/utils/emr/odas-emr-bootstrap.sh. -
In the Optional arguments box enter (all in one line):
- The Okera version number this Amazon EMR is configured with.
- The
--planner-hostportsoption with the proper Okera Policy Engine (planner) endpoint. - The list of supported components.
Since we're starting with Hive, Presto and Spark, specify
hive,presto, andspark-2.x. For example, copy and paste this (and adjust as needed) into the Optional arguments box:<okera_version> --planner-hostports --jwt-private-key:<jwt-token> odas-planner-1.internal.net:12050 hive presto spark-2.x
Note: All options should be specified before the list of components.
Make the following changes for the user bootstrap script:
-
Add another custom action under Bootstrap Actions.
-
Set the script/JAR path to
s3://okera-release-useast/utils/emr/bootstrap-users.sh. -
In the Optional arguments box enter the space-separated list of users to the script options (all in one line). For example:
hadoop alice bob.
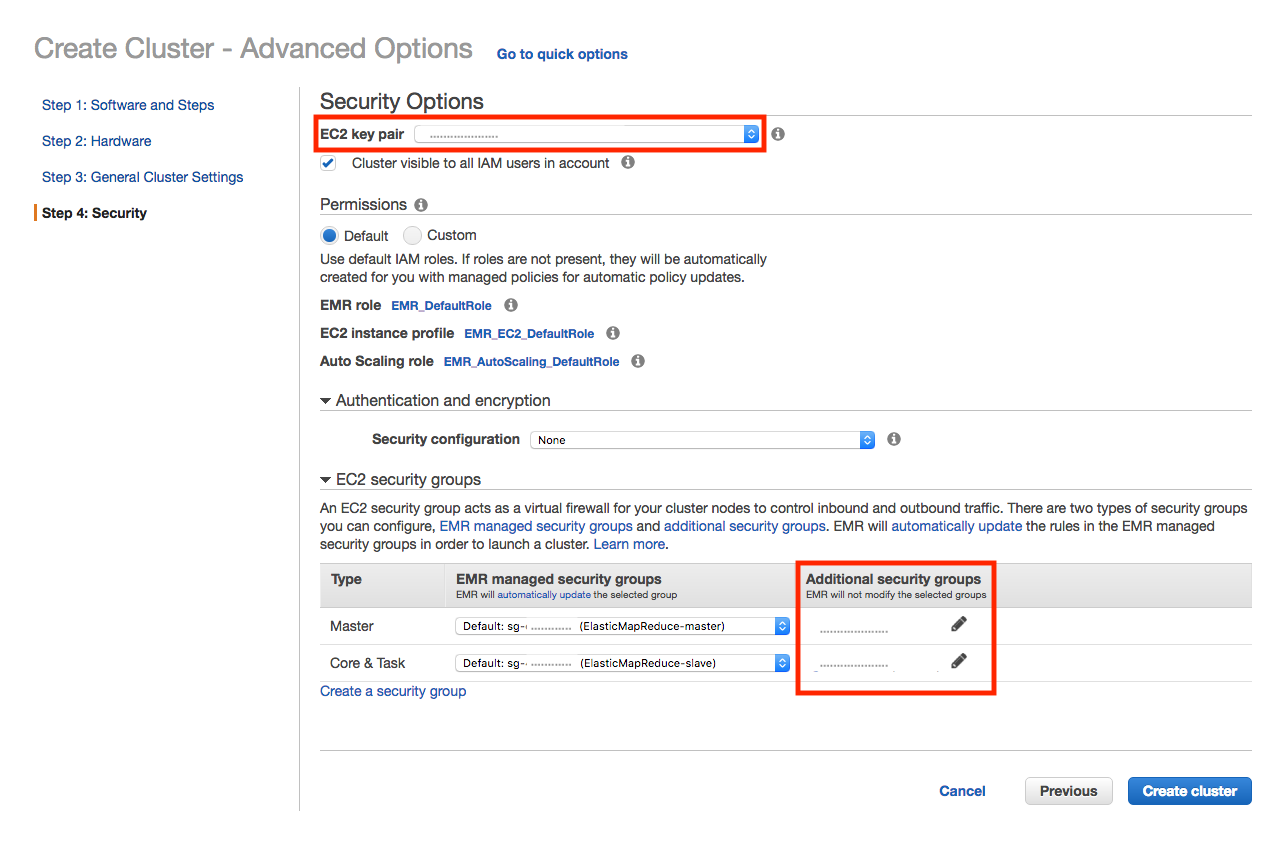
Step 4: Set up the security options.
Select an EC2 key pair to use for the Amazon EMR cluster. This is needed later to configure the cluster nodes with per-user tokens.
Also, specify additional security groups for the Amazon EMR cluster to communicate with the Okera cluster. Add whatever security groups you specified for the Okera hosts to the Master, Core, and, optionally, Task rows.
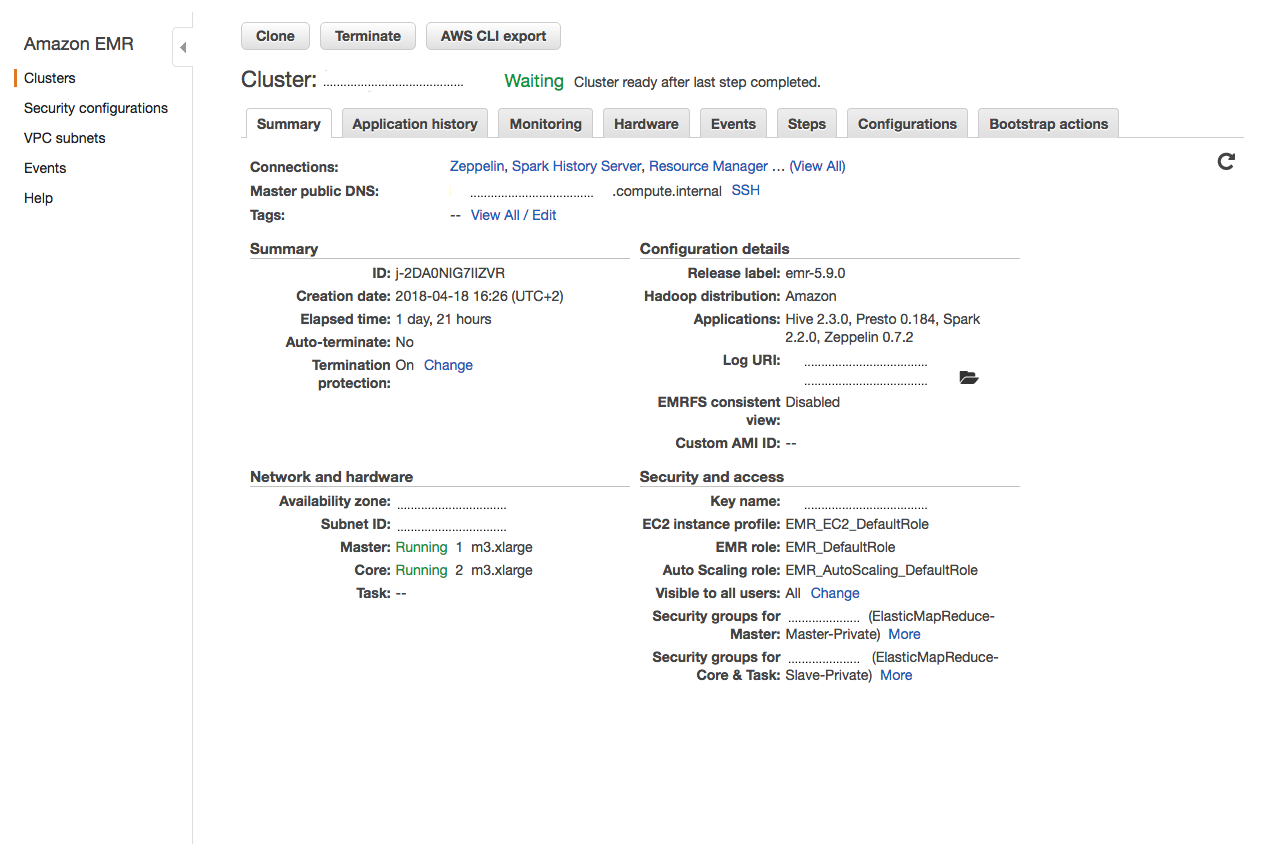
Step 5: Create the Amazon EMR cluster and wait for it to be ready.
The Okera components have been installed and configured when the cluster reports a ready status.
Since this is a multi-tenant cluster, care must be taken to manage users that have access to this cluster. Each user can authenticate to Okera with their own token, using access control, handled by Okera. When the user is authenticated, Okera uses the username specified in the token.
Note: The Amazon EMR username does not need to be the same as the subject in the user access token.
The token can be installed with the following commands:
echo "<longstringtoken>" > ~/.okera/token
The <longstringtoken> placeholder must be replaced with the user's string token.
These commands need to be executed on every instance in the Amazon EMR cluster.
The .okera directory is created by the bootstrap-users.sh.
It is highly recommended to use that script to create this directory as it ensures that permissions are set correctly.
Step 6: Querying data.
The user can now use the following Amazon EMR components to access data managed by Okera:
Example: Accessing data with Presto's CLI
$ presto-cli --server localhost:8889 --catalog hive --schema default
presto:default> show catalogs;
    Catalog
---------------
 hive
 recordservice
 system
(3 rows)

Query 20180421_102629_00002_fhhrx, FINISHED, 1 node
Splits: 1 total, 1 done (100.00%)
0:00 [0 rows, 0B] [0 rows/s, 0B/s]

presto> show tables in recordservice.okera_sample;
 Table
--------
 sample
 users
(2 rows)

Query 20180421_102722_00003_fhhrx, FINISHED, 2 nodes
Splits: 18 total, 18 done (100.00%)
0:00 [2 rows, 59B] [6 rows/s, 185B/s]

presto> select * from recordservice.okera_sample.sample;
             record
---------------------------------
 This is a sample test file.
 It should consist of two lines.
(2 rows)

Query 20180421_102742_00004_fhhrx, FINISHED, 1 node
Splits: 17 total, 17 done (100.00%)
0:00 [2 rows, 0B] [5 rows/s, 0B/s]
Example: Accessing data with Hive
$ hive
hive> show databases;
OK
default
okera_sample
demo
Time taken: 0.768 seconds, Fetched: 4 row(s)

hive> select * from okera_sample.sample;
OK
This is a sample test file.
It should consist of two lines.
Time taken: 2.292 seconds, Fetched: 2 row(s)
Example: Accessing data with Beeline
$ beeline -u jdbc:hive2://localhost:10000/default -n hadoop
beeline> show tables in okera_sample;
+-----------+
| tab_name  |
+-----------+
| sample    |
| users     |
+-----------+
2 rows selected (1.652 seconds)

beeline> select * from okera_sample.users limit 100;
+---------------------------------------+------------+---------------+----------------------+
|               users.uid               | users.dob  | users.gender  |      users.ccn       |
+---------------------------------------+------------+---------------+----------------------+
| 0001BDD9-EABF-4D0D-81BD-D9EABFCD0D7D  | 8-Apr-84   | F             | 3771-2680-8616-9487  |
| 00071AA7-86D2-4EB9-871A-A786D27EB9BA  | 7-Feb-88   | F             | 4539-9934-1924-5730  |
...
| 009C0C19-A239-4137-9C0C-19A2396137B5  | 12-Nov-76  | F             | 5231-8965-0777-9503  |
| 009D9636-58C3-46EA-8743-B6D5BC7D3057  | 21-Feb-72  | M             | 3409-4704-3840-6971  |
+---------------------------------------+------------+---------------+----------------------+
100 rows selected (2.854 seconds)
Example: Accessing data with Spark shell (Scala)
$ spark-shell
scala> val df = spark.sql("select * from okera_sample.sample")
df: org.apache.spark.sql.DataFrame = [record: string]

scala> df.show()
+--------------------+
|              record|
+--------------------+
|This is a sample ...|
|It should consist...|
+--------------------+
Access Token Management
Okera supports multi-tenant Amazon EMR clusters, as each Okera connection includes the caller's token. Requests by users on the same Amazon EMR cluster using different tokens are independently authorized by Okera's access controls. They potentially see different data.
It is the responsibility of the Amazon EMR cluster to make sure that it is not easy for users on the same cluster to access other users' tokens or data.
The token is never logged in its entirety by Okera, but the user needs to make sure that the token is not accidentally exposed through the OS.
For a secure multi-tenant cluster, Okera recommends users do not log in as the same user (for example, hadoop) and that the users logging in do not have root permissions.
Otherwise, the local cluster OS is not secure.
Similarly, not logging in as the same user, prevents users from viewing each other's intermediate files in HDFS.
Note: The Amazon EMR user does not have to match the token's subject, Okera authenticates the user using the token only.
Adding Users to a Running Cluster
To add a user to a running Amazon EMR cluster that has already been Okera bootstrapped, you can run /usr/lib/okera/add-users.sh.
Identical to bootstrap-users.sh, this takes a space-separated list of users. This script assumes that boostrap-users.sh has been run already and will only add additional users.
This script will create the user and the .okera home directory with the proper permissions.
In a common pattern, we expect system users such as hadoop to be bootstrapped at cluster creation time and additional users be added after.
Per-Component Configuration
The configurations required to configure each supported Amazon EMR component are detailed in this section.
You need to enter the JSON-based settings, listed below, while creating the Amazon EMR cluster, as shown in the end-to-end example. Otherwise, you will need to modify the appropriate configuration files manually and restart the service(s); this applies to all Amazon EMR cluster nodes.
With all components, Okera requires specifying the Okera Policy Engine (planner) hostport (for example, odas-planner-1.internal.net:12050, which is used throughout this document).
You also need to have configured the access token as explained in Access Token Management.
Warning
Previous versions of Okera included a single-tenant approach, which configured a shared, per-service token in the configuration files of each service. This approach is no longer recommended (due to its complexity) and should not be used. Instead, for single tenant clusters, simply bootstrap the Hadoop user and place the token in the user's home directory.
Spark
Setting Up Spark
Use the following JSON configuration properties to set up Spark with an existing Okera Policy Engine (planner):
[
  {
    "Classification":"spark-defaults",
    "Properties": {
       "spark.recordservice.planner.hostports":"odas-planner-1.internal.net:12050"
     }
  },
  {
    "Classification":"spark-hive-site",
    "Properties":{
      "recordservice.planner.hostports":"odas-planner-1.internal.net:12050"
    }
  }
]
If you have an existing Amazon EMR cluster or prefer to manually edit the configuration files for Spark, you will have to change the following two files by adding the above settings:
File /etc/spark/conf/spark-defaults.conf:
$ cat /etc/spark/conf/spark-defaults.conf
...
spark.recordservice.planner.hostports odas-planner-1.internal.net:12050
File /etc/spark/conf/hive-site.xml:
$ cat /etc/spark/conf/hive-site.xml
...
  <property>
    <name>recordservice.planner.hostports</name>
    <value>odas-planner-1.internal.net:12050</value>
  </property>
</configuration>
Using Spark
Once the cluster is set up, you can interact with the Spark shell as follows:
scala> val df = spark.sqlContext.read.format("com.cerebro.recordservice.spark").load("<DB.TABLE>")
scala> df.show()
See the end-to-end example for more.
Hive
Setting Up Hive
In addition to the Okera Policy Engine (planner) endpoint, Hive requires two to settings to integrate with the Okera catalog:
[
  {
    "Classification": "hive-site",
    "Properties": {
      "hive.fetch.task.conversion": "minimal",
      "hive.metastore.rawstore.impl": "com.cerebro.hive.metastore.CerebroObjectStore",
      "recordservice.planner.hostports": "odas-planner-1.internal.net:12050"
    }
  }
]
Note: Okera recommends adding
"hive.materializedview.rewriting": "false"to your hive-site classification for improved query performance.
If you have an existing Amazon EMR cluster or prefer to manually edit the configuration files for Hive, you will have to change the following file by adding the above settings:
File /etc/hive/conf/hive-site.xml:
$ cat /etc/hive/conf/hive-site.xml
...
  <property>
    <name>hive.fetch.task.conversion</name>
    <value>minimal</value>
  </property>
  <property>
    <name>recordservice.planner.hostports</name>
    <value>odas-planner-1.internal.net:12050</value>
  </property>
  <property>
    <name>hive.metastore.rawstore.impl</name>
    <value>com.cerebro.hive.metastore.CerebroObjectStore</value>
  </property>
</configuration>
Using Hive
Hive is operated through either the hive or beeline command as shown below.
$ hive
hive> show databases;
hive> select * from okera_sample.sample;
For Beeline, users must specify their local Unix user (for example, hadoop) at connection time:
$ beeline -u jdbc:hive2://localhost:10000/default -n hadoop
beeline> show tables in okera_sample;
beeline> select * from okera_sample.users limit 100;
See the end-to-end example for more.
Cluster-Local Databases
With the default install, the Hive Metastore (HMS) running on the cluster populates all its contents from the Okera Catalog.
In some cases, it could be useful to use HMS to register cluster-local (that is, temporary) tables, for example, for intermediate query results.
This can be done by configuring the set of databases that should only exist locally, either during bootstrap or by updating hive-site.xml and restarting the Amazon EMR HMS.
For example, the setup could be configured so that any Hive operation to the database localdb is cluster-local; this includes tables, views, and so forth.
This database is never reflected in Okera and access to data or metadata in these databases do not use Okera.
If Spark is included in the Amazon EMR cluster, the global_temp database is automatically setup to be cluster-local.
Local DBs are also useful in creating materialized views (caches of datasets from queries) for faster access.
An example would be to create a table in localdb using data from Okera datasets (using the CREATE TABLE AS SELECT statement).
Example: Creating a table in localdb
CREATE TABLE localdb.european_users AS SELECT * FROM users WHERE region = 'europe'
The location for these tables can be changed to an Amazon S3 bucket.
This can be set in hive-site.xml.
Example: Changing table locations to an Amazon S3 bucket
<property>
  <name>hive.metastore.warehouse.dir</name>
  <value>s3://okera/warehouse</value>
  <description>location of default database for the warehouse</description>
</property>
External storage location is supported for Amazon S3 buckets only.
In the case where the local database has the same name as an Okera database, the local database takes precedence, and the user is not able see the contents in that Okera database from Hive.
Example: Configuring local databases in hive-site.xml
<property>
  <name>cerebro.local.dbs</name>
  <value>localdb,testdb</value>
  <description>
    Comma-separate list of local database names. These don't need to already exist.
  </description>
</property>
Example: Configuring local databases using bootstrap script
{
  "Classification": "hive-site",
  "Properties": {
    "cerebro.local.dbs": "localdb,testdb"
  }
}
Note on local DBs
Any local database, and the datasets in it, are not accessible by Okera. The local database is ephemeral and is lost when the Amazon EMR cluster is shutdown. If the storage is externalized to Amazon S3, or shared HDFS, then a new external table definition, with location set to the Amazon S3 folder, could be used to access the dataset.
Known Incompatibilities
In the context of an Okera installation, Hive uses externalized metadata managed by Okera. As a result, it is not possible to alter the location of a table or partition to an Okera dataset by way of Hive. Instead, altering the location is done through a native Okera client like the Okera Workspace.
Hive treats external tables, created using Hive against Okera, as external, non-native types.
ALTER TABLE is not supported on external, non-native tables.
Example: Using Workspace to alter the table location
alter table okera.users set location 's3a://okera/correctedlocation'
Okera only supports using the cluster-local storage on a given Amazon EMR cluster.
Distributed file systems like EFS are not supported.
Using them, especially if mounted on multiple Amazon EMR clusters, can cause authentication issues preventing the use of Okera.
Limitations
Note: The Okera authorization is not currently supported from the Hive CLI. For example,
SHOW ROLESdoes not list the Okera roles.
SQL data manipulation (DML) statements such as INSERT are not supported in Hive.
PrestoDB / PrestoSQL
Setting Up PrestoDB
PrestoDB requires configurations to be passed as arguments to the Okera provided bootstrap script instead of providing them as configurations, but otherwise requires similar configs as the other components.
Note: The options must come before the list of components.
Example:
odas-emr-bootstrap.sh <okera_version> --planner-hostports odas-planner-1.internal.net:12050 presto
See the Amazon EMR Node Bootstrap section for more details.
Setting Up PrestoSQL
Note: Amazon EMR 6.1.0 adds support for PrestoSQL
PrestoSQL requires configurations to be passed as arguments to the Okera provided bootstrap script instead of providing them as configurations, but otherwise requires similar configs as the other components.
Note: The options must come before the list of components.
Example:
odas-emr-bootstrap.sh <okera_version> --planner-hostports odas-planner-1.internal.net:12050 prestosql
See the Amazon EMR Node Bootstrap section for more details.
Using PrestoDB / PrestoSQL
Once the Amazon EMR cluster is launched, and the token has been stored (if necessary) you can interact with the presto-cli as you typically would.
Example: Displaying catalogs using presto-cli
$ presto-cli
presto> show catalogs;
recordservice among others.
Example: Querying metadata and select from tables
presto> show tables in recordservice.okera_sample;
presto> select * from recordservice.okera_sample.sample;
Known Limitations
DDL and DML commands (besides select) are not supported in Presto.
Logging
On the Amazon EMR instances, the bootstrapping logs are in /var/log/bootstrap-actions/.
This is helpful if the cluster is not starting up and could indicate a misconfiguration of the bootstrap action.
Logging for PrestoDB
Amazon EMR precludes us from fully configuring logging for Presto.
To complete the configuration, edit the file located at /etc/presto/conf.dist/jvm.config, and add this line to its end (applies to all cluster nodes):
-Dlog4j.configuration=file:/etc/presto/conf/log4j.properties
For the Okera Presto plugin to log correctly, restart the Presto services on all the nodes in the cluster.
Configurations
Configurations are generally written to /etc/[component].
They should replicate the configurations that were specified during cluster creation.
Updating Okera Client Libraries
To update Okera client libraries on an existing Amazon EMR, run the following script:
s3://okera-release-useast/utils/emr/odas-emr-update.sh
Example: ./odas-emr-update.sh s3://okera-release-useast/2.18.1
nScale Enforcement
nScale enforcement is supported in Dataproc environments. For information, see nScale Enforcement Fleet Workers.