Use Snowflake Policy Synchronization
Suppose a company’s Snowflake database contains sales and credit card transaction data. The Sales team would like to analyze this data, but some of their access should be restricted, as described below.
-
Sam (user
sam_<tenant>) and Sally (usersally_<tenant>) are sales analysts. They would like to query the sales and credit card transaction data to analyze their customers’ purchasing behavior. They currently have no access at all to either sales or credit card transaction data. -
The sales director for the sales team, Danny (user
danny_<tenant>), already has access to the sales and credit card transaction data but can also see the data’s personally identifiable information (PII), so the PII data must be masked.
This section of the Okera test drive walks you through a series of exercises that create Okera permissions to enforce the desired access to the sales and credit card transaction data. Okera’s Snowflake policy synchronization enforcement is used.
Note: You must have completed the earlier sections of this Okera test drive because some of the infrastructure used for the Snowflake test drive exercises use Okera objects you created in the earlier sections.
Complete the exercises in this order:
- Use Snowflake Policy Synchronization
- Review the Snowflake Test Drive Environment
- Examine the Test Drive Snowflake Connection and Database
- Register the Snowflake Dataset
- Apply Tags to the Data
- Qualify Sales Director Access to Credit Card Data
- Grant Sales Analyst Access to Credit Card Data
The first four steps set up the environment so you can create the permissions necessary to restrict access to the sales and credit card transaction data.
Before you start, read about the Snowflake test drive environment we’ve provided.
Review the Snowflake Test Drive Environment
The Snowflake test drive environment includes a Snowflake database, Snowflake users, and Snowflake roles.
The Snowflake database is called OKERA_TRIAL_<tenant>. The database includes several schemas, but only the CREDIT_CARD and SALES schemas are used in the test drive.
Snowflake Users and Roles
The Snowflake users and their associated roles have been predefined in the test drive environment. The following table describes them.
Passwords for the test drive Okera and Snowflake user accounts are sent to you in a separate email. When you receive your test drive, <tenant> will be replaced with your company name. In images and videos in this test drive documentation, <tenant> is replaced with your_company.
Okera Username |
Snowflake Username |
Okera Group Membership |
Snowflake Assigned Roles |
|---|---|---|---|
admin_<tenant> |
TRIAL_ADMIN_<tenant> |
all |
TRIAL_ADMIN_<tenant>_ROLE*ADMIN_ROLE_<tenant> |
danny_<tenant> |
TRIAL_DANNY_<tenant> |
sales_director_group |
TRIAL_DANNY_<tenant>_ROLE*SALES_DIRECTOR_ROLE_<tenant> |
sally_<tenant> |
TRIAL_SALLY_<tenant> |
general_analyst_groupsales_analyst_group |
TRIAL_SALLY_<tenant>_ROLE*SALES_ANALYST_ROLE_<tenant> |
sam_<tenant> |
TRIAL_SAM_<tenant> |
general_analyst_groupsales_analyst_group |
TRIAL_SAM_<tenant>_ROLE* SALES_ANALYST_ROLE_<tenant> |
After syncing your Snowflake connection in these test drive exercises, be sure to use the Snowflake roles identified by a green asterisk (*) in the table above when testing Snowflake access in a Snowflake workspace.
Okera Instance Access
Access to the Okera test drive instance is provided in the email sent to you after the test drive environment was set up for you. A link in that email allows you to connect to the test drive environment. The usernames and passwords for your test drive are also provided in the email.
Snowflake Instance Access
Access to the test drive Snowflake instance can be achieved by clicking on the Open Snowflake button on the Okera UI Home page. Use the appropriate username and password, as described in this test drive documentation.
Examine the Test Drive Snowflake Connection and Database
Before you can create any Okera permissions for Snowflake data, Okera needs to:
-
Know how to connect to the Snowflake database
-
Understand the schemas and data contained within the Snowflake database.
To accomplish this, an Okera connection to the Snowflake database must be created that allows Okera to connect to the Snowflake database.
When you use policy synchronization enforcement for your Snowflake connections (as is done in this test drive), the Okera connection must regularly be synchronized with Snowflake itself to ensure that any permission changes associated with the connection are reflected in the Snowflake environment. This synchronization occurs automatically at a specified interval (30 minutes or 1800 seconds), but can also be instigated manually, as needed. In this test drive environment, automatic synchronization is enabled, but manual synchronization will also occur during the test drive.
Note: Be aware that policy synchronization may take a few moments to process. Consequently, changes in your Snowflake environment may not occur instantaneously. This is normal.
In this test drive, a connection to the test drive Snowflake database, OKERA_TRIAL_<TENANT>, is already created for you. The connection is called snowflake_datasource. Let’s review the connection and database. Complete the following steps.
Note: At the end of this section, a video of these steps is provided.
-
Log in to the Okera UI as the user named
admin_<tenant>. -
Select Connections on the left-side UI menu to access the Connections page.
-
Select the connection named
snowflake_datasource. Its connection details appear on the Connection Details tab.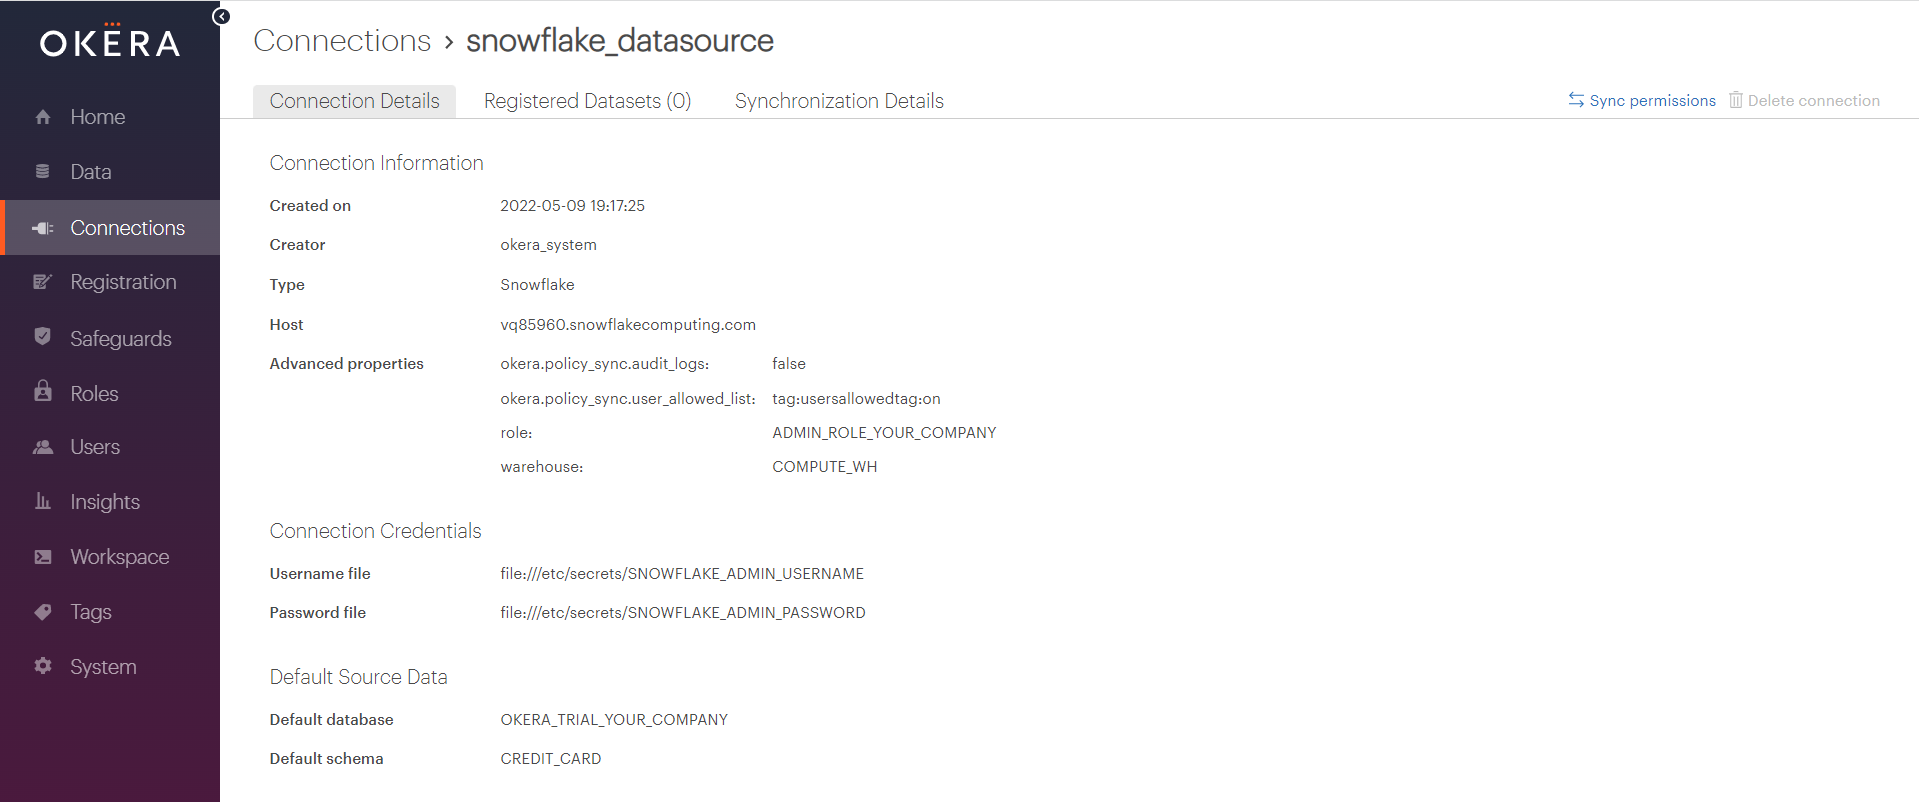
The following table describes the connection information.
Field Description Created on The date the connection definition was created. Creator The user who created the connection definition. Type The type of connection. This should say Snowflake. Host The host machine containing the Snowflake database. Port The port used to access the Snowflake database. Advanced properties Any advanced properties set up for this Snowflake connection. Username file The username file used to authenticate the connection. Password file The password file used to authenticate the connection. Default Database The database used for the connection. This will be the OKERA_TRIAL_ database. Default Schema The default schema in the database used for the connection. -
Now return to the Okera Home page (select Home in the left-side menu) and select the Open Snowflake button.
-
Log in to Snowflake using the
admin_<tenant>username and password provided in your test drive email. -
Locate your
OKERA_TRIAL_<TENANT>database on the left side of the Snowflake screen, where<TENANT>is the tenant name used for your test drive. It includes these schemas,CREDIT_CARD,INFORMATION_SCHEMA,PUBLIC, andSALES. TheCREDIT_CARDschema includes the table we will use in these exercises.
Here is a video of the steps above.
Register the Snowflake Dataset
Crawlers for the Snowflake data have already run. The dataset Okera created while crawling must be registered in Okera before access permissions can be processed for the data. This exercise registers the credit card transaction dataset.
To register the dataset, complete these steps.
Note: At the end of this section, a video of these steps is provided.
-
Log in to Okera as
admin_<tenant>. -
Select Data to view the list of databases in your environment.
-
Select the
creditcarddatabase from the list. Two datasets are currently registered in the database:credit_card_approvalsandcredit_card_customers. We will now register thetransactionsdataset. -
Select Registration in the left menu. The Registration page appears showing the Snowflake crawlers.

-
Locate the
snowflake_crawler_creditcardand verify that it has completed crawling. The status of the crawler should be Crawl Complete. -
Select the
snowflake_crawler_creditcardto see a list of the unregistered datasets found during the crawl on the Unregistered datasets tab.For the
snowflake_crawler_creditcardcrawler, there should be only one dataset found:transactions. -
On the Unregistered datasets tab, select (check) the checkbox next to the
transactionsdataset. -
Select
 . The Register selected datasets dialog appears.
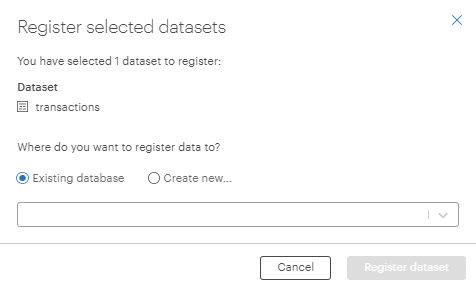
-
Select Existing database to select an existing database and then select the
creditcarddatabase from the list of databases in the drop-down menu. -
Select
 to register the credit card transaction dataset. The Datasets registered successfully dialog appears. (Select OK on this dialog.)
 -
Select Data to return to the list of databases and then select the
creditcarddatabase from the list. Notice that thetransactionsdataset is now registered to thecreditcarddatabase.
Here is a video of the steps above.
Now that the dataset is registered, let’s apply some Okera tags to classify the data in it.
Apply Tags to the Data
Okera uses tags to classify data in datasets. A tag is a form of "attribute" in Okera. You can assign tags to Okera objects based on the data they contain. For example, you may want to tag a dataset containing sales data as sales or a column with sensitive data as pii (personally identifiable information). Tags allow you to create attribute-based access permissions for the data you want to protect.
In the test drive data, the transactions dataset in the creditcard database contains personally identifiable information (PII) that must be protected. In this exercise, we apply tags to our test drive dataset fields to classify the data and allow us to limit access to that data using Okera permissions. Okera provides built-in tags that we can use.
Okera supports autotagging when a crawler runs. With autotagging, Okera samples the data while it is being crawled and suggests tags, based on its evaluation of the data. Some of the data in the transactions dataset was autotagged when the creditcard database was crawled. We will review the autotagged data in this exercise as well.
The fields that contain PII in the creditcard database are:
addressemailssn(social security number)ccn(credit card number)ip_addressfirst_namelast_name
Complete the following steps.
Note: At the end of this section, a video of these steps is provided.
-
Log in to Okera as
admin_<tenant>. -
Select Data in the left menu. The Data page appears showing the Okera databases in the test drive environment. This list should include the
creditcardandsalesdatabases. -
Select the
creditcarddatabase. A list of the registered datasets contained within the database appears. -
Select the
transactionsdataset. Details about the dataset appear. The Schema tab shows the schema for the fields in the dataset. This is also where you can apply tags to the data.Note: The
emailcolumn and theip_addresscolumns have been autotagged. Theemailcolumn is taggedpii:email_addressand theip_addresscolumn is taggedpii:ip_address. These tags were automatically applied to the data when thecreditcarddatabase was crawled. For more information about autotagging, see Configure Autotagging.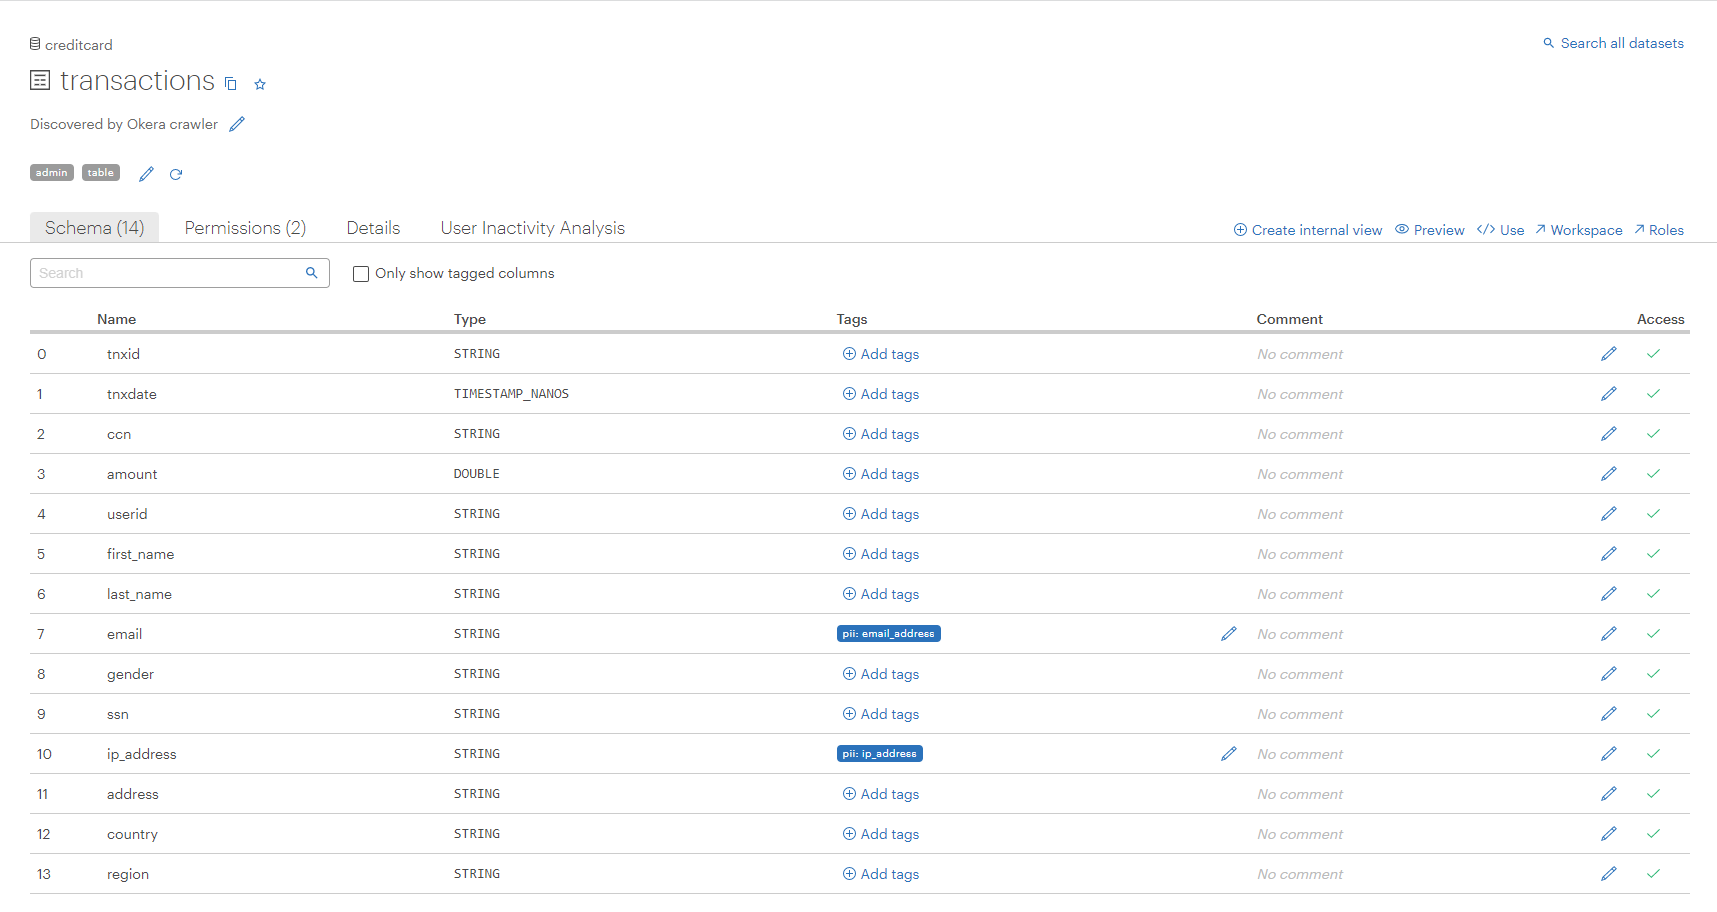
-
For each of the fields in the table below, apply the requested tag. To do this, select
 (in the Tags column) for each field and then select the appropriate tag from the drop-down menu.
Field Name Apply Tag addresspii: addressssnpii: us_ssnccnpii: credit_cardfirst_nameclassification:restrictedlast_nameclassification:restricted
When all tags have been applied, we can start creating and applying Okera permissions for the data.
Here is a video of the steps above.
Qualify Sales Director Access to Credit Card Data
The sales director for the sales team, danny_<tenant>, does not have access to the credit card transaction data. In addition, the PII fields in the transaction data need to be masked so danny_<tenant> cannot see it. In this exercise, we will give the Okera sales_director_role access to the credit card transaction data and mask the data. The specific PII fields we want to mask are:
addressemailssn(social security number)ccn(credit card number)ip_addressfirst_namelast_name
Complete the following steps.
Note: At the end of this section, a video of these steps is provided.
-
Log in to Okera as
admin_<tenant>. -
Select the Open Snowflake button on the Home page of the Okera UI and log in to Snowflake as
danny_<tenant>. -
Open a worksheet and run the following commands:
USE DATABASE OKERA_TRIAL_<tenant>;
SELECT * FROM CREDIT_CARD.TRANSACTIONS LIMIT 10;
An error occurs because
danny_<tenant>does not have access to the credit card transaction data. -
Return to the Okera UI and select Roles in the side menu. The Roles page appears.
-
Locate and select the
sales_director_role. You can use the search boxes at the top of the page to locate any role quickly. The groups and permissions assigned the role appear on the right side of the page. -
Select
 . The Add permission to role dialog appears, allowing you to create a new permission for sales directors.
 -
Supply values for the fields on the Add permission to role dialog as described in the following table.
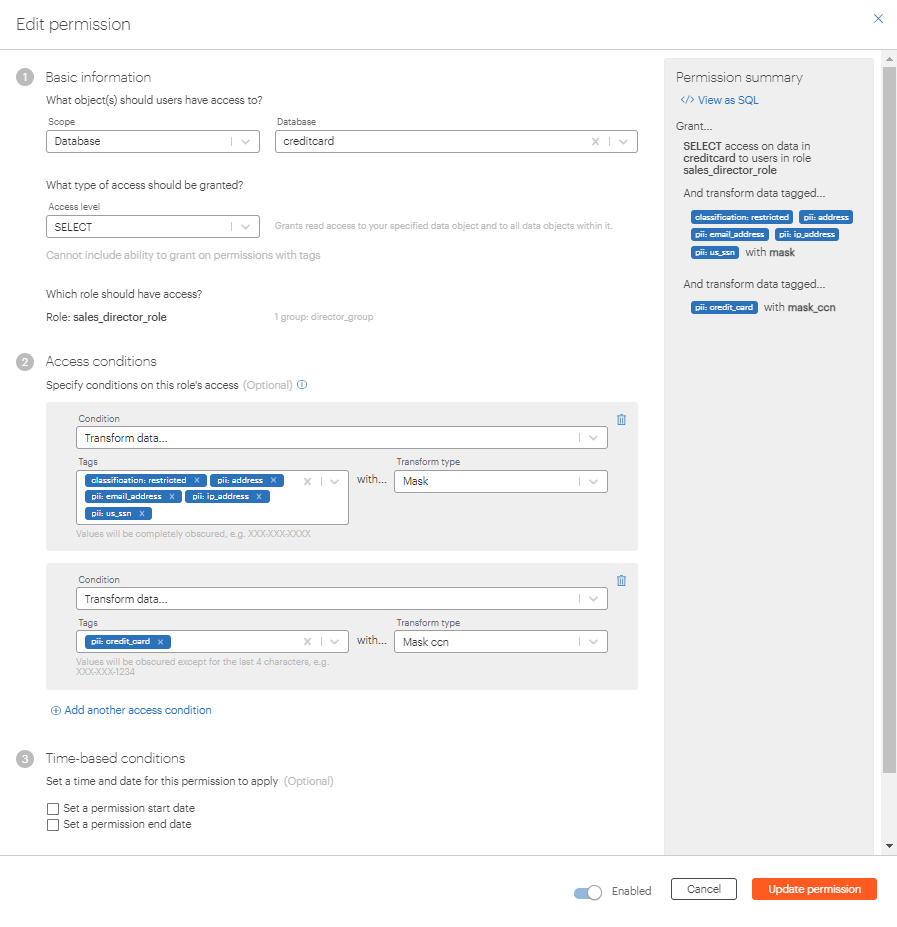
Field Value and Description Scope Select Databasein the drop-down menu.Database Select the creditcarddatabase in the drop-down menu.Access level Select SELECTfrom the drop-down menu. -
Select Add an access condition to expand an Access condition section of the dialog.
-
Select Transform data in the Condition field.
-
Select the following tags in the Tags field:
pii: address,pii: email_address,pii: ip_address,pii: us_ssn, andclassification_restricted. -
Select Mask in the Transform type field.
-
Select Add another access condition to expand another Access condition section of the dialog.
-
Select Transform data in the Condition field.
-
Select the following tags in the Tags field:
pii: credit_card. -
Select Mask ccn in the Transform type field. The dialog should look like this:
-
Select
 to add the permission to the
 sales_director_role. -
Now that the permissions have changed for the Snowflake data, we must resynchronize the Snowflake connection. Select Connections from the left menu to view the connections defined in this environment.
-
Select the connection called
snowflake_datasource. The connection details appear. -
Select
 in the upper right corner of the Connections page.
Note: Be aware that policy synchronization may take a few moments to process. Consequently, changes in your Snowflake environment may not occur instantaneously. This is normal.
-
Either select the Open Snowflake button on the Home page of the Okera UI and log in to Snowflake as
danny_<tenant>or return to the Snowflake page you already have open (withdanny_<tenant>logged in), and reload the page. The worksheet you were previously using should still be shown. -
Verify that the correct Snowflake warehouse is selected for
danny_<tenant>. The correct warehouse for this test drive isCOMPUTE_WH. To do this, locate the setting on the Snowflake worksheet title bar. This shows the selected warehouse. If the warehouse is not
 COMPUTE_WH, select the correct warehouse by clicking on the warehouse name and selecting the correct warehouse from the warehouse list.Note: The
COMPUTE_WHwarehouse might not be available until after you have synchronized the Okera connection the first time. -
Change the Snowflake role selected for
danny_<tenant>toOKERA_TRIAL_danny_<tenant>. To do this, locate the setting in the Snowflake worksheet title bar. This shows the selected role. If the role is not
 OKERA_TRIAL_danny_<tenant>, select the correct role by clicking on the role name and selecting the correct role from the list.The list of database objects on the left side of the Snowflake screen should now include the
OKERA_TRIAL_<tenant>database.Note: This Snowflake role is not available until after you have synchronized the Okera connection the first time. In fact, changes made in Okera policies will not be reflected in Snowflake until after you have synchronized the Okera connection.
-
On the worksheet run the following commands:
USE DATABASE OKERA_TRIAL_<tenant>;
SELECT * FROM CREDIT_CARD.TRANSACTIONS LIMIT 10;
The first ten records of credit card data appear. Note that the CCN, EMAIL, SSN, IP_ADDRESS, ADDRESS, FIRST_NAME, and LAST_NAME fields are all masked.
Here is a video of the steps above.
Grant Sales Analyst Access to Credit Card Data
Sales analysts, sam_<tenant> and sally_<tenant>, would also like to query the credit card transaction data, but they have no access it. In addition, the same PII field data that we masked for danny_<tenant> in our previous exercise should be masked for sam_<tenant> and sally_<tenant>. Finally, we would like the sales analysts to only see data appropriate for the region or country to which they are assigned.
This exercise demonstrates how to give sam_<tenant> and sally_<tenant> access to the data using the sales_analyst_role with the appropriate data masking applied.
Complete the following steps.
Note: At the end of this section, a video of these steps is provided.
-
Log in to Okera as
admin_<tenant>. -
Select Roles in the left menu to view the Roles page and then locate and select the
sales_analyst role. The groups and permissions assigned to the role appear on the right side of the page.Note that the Snowflake credit card transaction dataset,
transactions, is not listed in permissions for the role. -
Select Home in the left menu to return to the Okera Home page.
-
Select the Open Snowflake button on the Home page and log in to Snowflake as
sam_<tenant>. Then open a worksheet and run the following commands:USE DATABASE OKERA_TRIAL_<tenant>; SELECT * FROM CREDIT_CARD.TRANSACTIONS LIMIT 10;Because
sam_<tenant>does not have access to the credit card data, an authorization error occurs. -
Return to the Okera UI and select Roles in the left menu to view the Roles page.
-
Select the
sales_analyst_roleand then select on the right side of the page. The Add permission to role dialog appears, allowing you to create a new permission for sales analysts. -
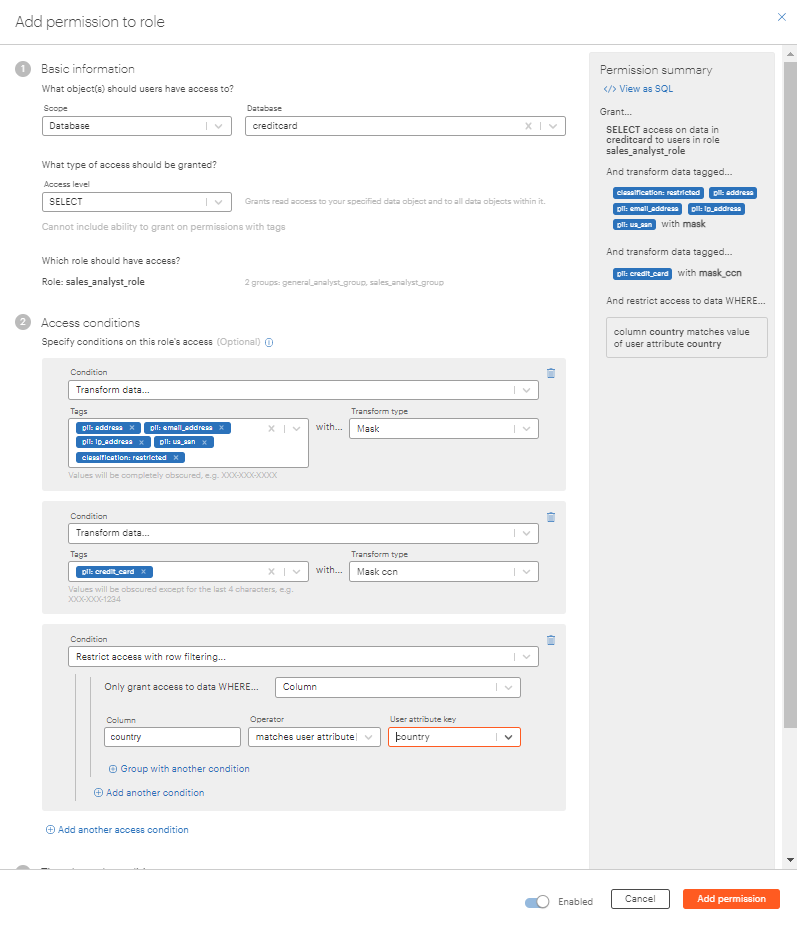
Supply values for the fields on the Add permission to role dialog as described in the following table.
Field Value and Description Scope Select Databasein the drop-down menu.Database Select the creditcarddatabase in the drop-down menu.Access level Select SELECTfrom the drop-down menu. -
Select Add an access condition to expand an Access condition section of the dialog.
-
Select Transform data in the Condition field.
-
Select the following tags in the Tags field:
classification: restricted,pii: address,pii: email_address,pii: ip_address, andpii: us_ssn. -
Select Mask in the Transform type field. The dialog should look like this:
-
Select Add another access condition to expand another Access condition section of the dialog.
-
Select Transform data in the Condition field.
-
Select the following tags in the Tags field:
pii: credit_card. -
Select Mask ccn in the Transform type field.
-
Select Add another access condition to expand another Access condition section of the dialog.
-
Select “Restrict access with row filtering” from the Condition dropdown list and Column in the "Only grant access to data WHERE..." dropdown list.
-
Type country in the Column textbox, select the matches user attribute operator from the Operator dropdown list, and select country from the User attribute key dropdown list, as shown in the screenshot below. If country does not exist in the User attribute key list, type it in and then select Create "country" underneath the list.
The dialog should look like this:
-
Select
to add the permission to the sales_analyst_role. -
Now that the permissions have changed for the Snowflake data, we must resynchronize the Snowflake connection. Select Connections from the left menu to view the connections defined in this environment.
-
Select the connection called
snowflake_datasource. The connection details appear. -
Select
in the upper right corner of the Connections page.Note: Be aware that policy synchronization may take a few moments to process. Consequently, changes in your Snowflake environment may not occur instantaneously. This is normal.
-
Either select the Open Snowflake button on the Home page of the Okera UI and log in to Snowflake as
sam_<tenant>or return to the Snowflake page you already have open (withsam_<tenant>logged in), and reload the page. The worksheet you were previously using should still be shown. -
Verify that the correct Snowflake warehouse is selected for
sam_<tenant>. The correct warehouse for this test drive isCOMPUTE_WH. To do this, locate the setting on the Snowflake worksheet title bar. This shows the selected warehouse. If the warehouse is not COMPUTE_WH, select the correct warehouse by clicking on the warehouse name and selecting the correct warehouse from the warehouse list.Note: The
COMPUTE_WHwarehouse might not be available until after you have synchronized the Okera connection the first time. -
Change the Snowflake role selected for
sam_<tenant>toOKERA_TRIAL_sam_<tenant>. To do this, locate the setting in the Snowflake worksheet title bar. This shows the selected role. If the role is not
 OKERA_TRIAL_sam_<tenant>, select the correct role by clicking on the role name and selecting the correct role from the list.The list of database objects on the left side of the Snowflake screen should now include the
OKERA_TRIAL_<tenant>database.Note: This Snowflake role is not available until after you have synchronized the Okera connection the first time. In fact, changes made in Okera policies will not be reflected in Snowflake until after you have synchronized the Okera connection.
-
On the worksheet run the following commands:
USE DATABASE OKERA_TRIAL_<tenant>; SELECT * FROM CREDIT_CARD.TRANSACTIONS LIMIT 10;The first ten records of credit card data appear. Note that the CCN, EMAIL, SSN, IP_ADDRESS, ADDRESS, FIRST_NAME, and LAST_NAME fields are now masked.
sam_<tenant>now has restricted access in Snowflake to the credit card data. Note that the data is restricted toFrance, which issam_<tenant>'s region. -
Log out of Snowflake as
sam_<tenant>and log in assally_<tenant>. -
Verify that the correct Snowflake warehouse is selected for
sally_<tenant>. The correct warehouse for this test drive isCOMPUTE_WH. To do this, locate the setting on the Snowflake worksheet title bar. This shows the selected warehouse. If the warehouse is not COMPUTE_WH, select the correct warehouse by clicking on the warehouse name and selecting the correct warehouse from the warehouse list. -
Change the Snowflake role selected for
sally_<tenant>toOKERA_TRIAL_sally_<tenant>. To do this, locate the setting in the Snowflake worksheet title bar. This shows the selected role. If the role is not OKERA_TRIAL_sally_<tenant>, select the correct role by clicking on the role name and selecting the correct role from the list.The list of database objects on the left side of the Snowflake screen should now include the
OKERA_TRIAL_<tenant>database. -
Open a worksheet and run the following commands:
USE DATABASE OKERA_TRIAL_<tenant>;
SELECT * FROM CREDIT_CARD.TRANSACTIONS LIMIT 10;
The first ten records of credit card data appear. Note that the CCN, EMAIL, SSN, IP_ADDRESS, ADDRESS, FIRST_NAME, and LAST_NAME fields are now masked.
sally_<tenant>now has restricted access in Snowflake to the credit card data. Note that the data is restricted toUSA, which issally_<tenant>'s region.
Here is a video of the steps above.