Tutorial: Managing System Tokens
This self-service tutorial guides you through a more advanced task: Managing the Okera system token, which is mandatory for cluster internal communications.
Difficulty: Intermediate
Time needed: 1 hour
Introduction
After setting up an Okera cluster and configuring it, a common challenge around operating Okera clusters is how to manage the system token that is required for internal communication between services. This short tutorial introduces you to the more intricate details of tokens, the resources provided by Okera to manage said tokens, and then presents a specific approach on how to combine these for the aforementioned purpose.
JSON Web Token Information
An Okera cluster uses a JSON Web Token (JWT) internally to authenticate remote procedure calls (RPCs) between the distinct services, which are shown in the Architecture Overview document.
JWTs are a common technology to exchange user credentials - also referred to as claims or assertions - with a PKI-based signature: a private key is used to sign the content of the token, while a matching public key is used to verify it later on. Each token, in its simplest form, comprises three parts:
- The header, defining how the token is constructed. Its format is in JSON.
- The payload, defining the claims and other token data. The format is also JSON.
- The signature, which is computed based on the content of the payload and signed with a private key.
Each of the parts is separately base64 encoded and concatenated using dots ".".
This can be seen in the following screenshot, taken from the https://jwt.io website's JWT Debugger. The different parts are color coded and their content shown on the right side.
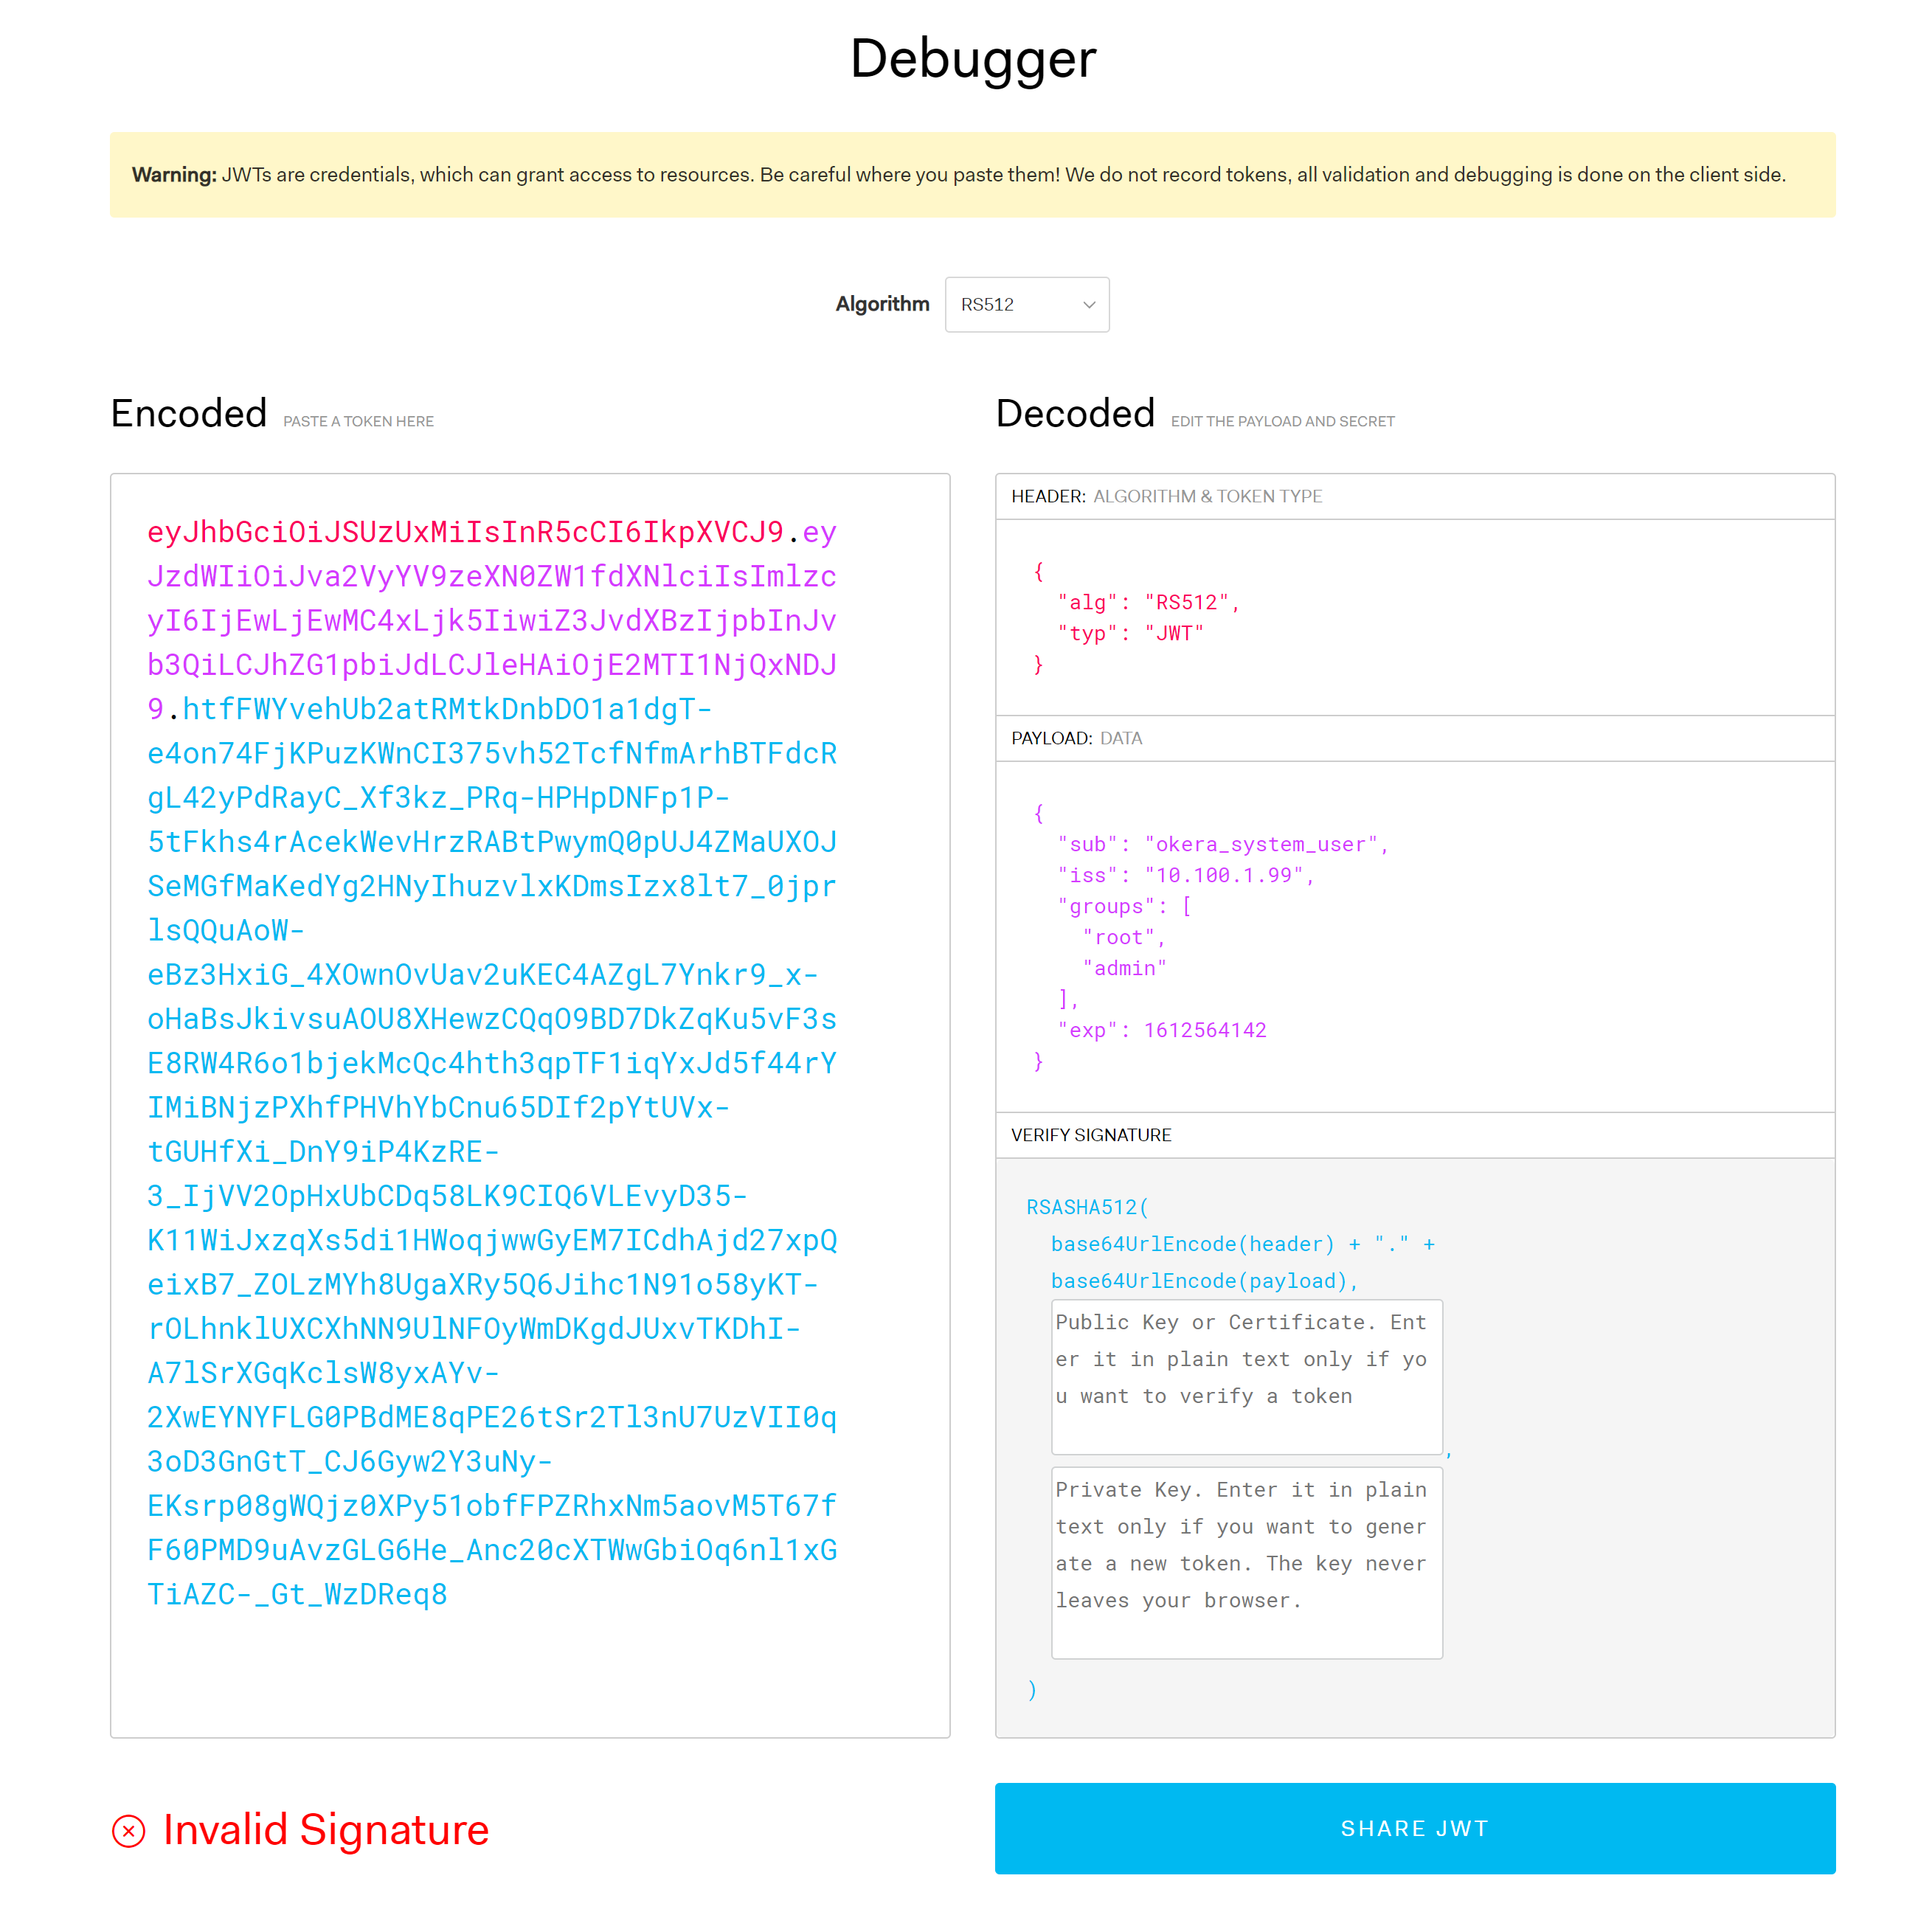
Note: Since we did not provide a public key to verify token, the debugger reports an "Invalid Signature". Also, there are more advanced features for JWTs, for example the ability to encrypt the payload. As this does not apply to Okera, we are not going to address those now.
Assuming we use the token from the screenshot, you can extract the payload using simple Linux shell tools.
Example: Extracting the payload from a JWT token
$ TOKEN=eyJhbGciOiJSUzUxMiIsInR5cCI6IkpXVCJ9.eyJzdWIiOiJva2VyYV9zeXN0ZW1fdXNlciIsImlzcyI6 \
IjEwLjEwMC4xLjk5IiwiZ3JvdXBzIjpbInJvb3QiLCJhZG1pbiJdLCJleHAiOjE2MTI1NjQxNDJ9.htfFWYvehUb2 \
atRMtkDnbDO1a1dgT-e4on74FjKPuzKWnCI375vh52TcfNfmArhBTFdcRgL42yPdRayC_Xf3kz_PRq-HPHpDNFp1P \
-5tFkhs4rAcekWevHrzRABtPwymQ0pUJ4ZMaUXOJSeMGfMaKedYg2HNyIhuzvlxKDmsIzx8lt7_0jprlsQQuAoW-e \
Bz3HxiG_4XOwnOvUav2uKEC4AZgL7Ynkr9_x-oHaBsJkivsuAOU8XHewzCQqO9BD7DkZqKu5vF3sE8RW4R6o1bjek \
McQc4hth3qpTF1iqYxJd5f44rYIMiBNjzPXhfPHVhYbCnu65DIf2pYtUVx-tGUHfXi_DnY9iP4KzRE-3_IjVV2OpH \
xUbCDq58LK9CIQ6VLEvyD35-K11WiJxzqXs5di1HWoqjwwGyEM7ICdhAjd27xpQeixB7_ZOLzMYh8UgaXRy5Q6Jih \
c1N91o58yKT-rOLhnklUXCXhNN9UlNFOyWmDKgdJUxvTKDhI-A7lSrXGqKclsW8yxAYv-2XwEYNYFLG0PBdME8qPE \
26tSr2Tl3nU7UzVII0q3oD3GnGtT_CJ6Gyw2Y3uNy-EKsrp08gWQjz0XPy51obfFPZRhxNm5aovM5T67fF60PMD9u \
AvzGLG6He_Anc20cXTWwGbiOq6nl1xGTiAZC-_Gt_WzDReq8

$ echo $TOKEN | awk -F. '{print $2}'
eyJzdWIiOiJva2VyYV9zeXN0ZW1fdXNlciIsImlzcyI6IjEwLjEwMC4xLjk5IiwiZ3JvdXBzIjpbInJvb3QiLCJhZ \
G1pbiJdLCJleHAiOjE2MTI1NjQxNDJ9
We can also decode the payload using command line tools.
Example: Decoding the payload
$ echo $TOKEN | awk -F. '{print $2}' | base64 -d
{"sub":"okera_system_user","iss":"10.100.1.99","groups":["root","admin"],"exp":1612564142}
Finally, we can convert the epoch-based timestamp, provided by the exp field, that indicates when the token is going to expire.
Example: Converting the timestamp
$ date -d @1612564142
Fri Feb  5 22:29:02 UTC 2021
Token Expiry
As with many JWTs applications, the Okera system token has an expiry time, usually specified as an epoch-based time (also called Unix time), which is the number of seconds elapsed since 00:00:00 UTC on 1/1/1970. The earlier example did show an expired token, dating back to Feb 5th 2021.
Example: An expiry time from the past
$ echo $TOKEN | awk -F. '{print $2}' | base64 -d
{"sub":"okera_system_user","iss":"10.100.1.99","groups":["root","admin"],"exp":1612564142}

$ date -d @1612564142
Fri Feb  5 22:29:02 UTC 2021
Note: Versions before Okera 2.5.0 used a hardcoded duration value of 100 days.
Eventually, the token will expire and a new one needs to be created.
Important
When the system token expires, all cluster internal communication fails. Users will not be able to log in to the Web UI anymore nor run queries through any of the available endpoints. Administrators will see the Okera pods start failing and being restarted constantly. This is due to the Kubernetes health checks failing, triggering the restarts.
Use Custom Code to Generate a System Token
You can generate a system token using one of the available JWT libraries. The JWT.io website has many listed, which can be filtered by the programming language of your choice.
The crucial parts for creating a JWT are:
-
Access to private key
You need to have access to a private key that is used to sign the JWT, matching the public key configured on the Okera cluster to verify if. Note that you can have more than one public key configured, which means you could have separate key pairs that are used for specific applications.
Note: As with all security, protecting sensitive assets, such as the private key of a PKI key pair, is of utmost importance. Okera recommends using key management services that are provided natively by your infrastructure. For instance, in AWS you could use the AWS Secrets Manager to manage your keys, and all applications and scripts source the key securely directly from that service.
-
Proper use of system token values
This one is not difficult, but has to be done properly for the token to be used within the cluster. The following table shows the various fields and they values.
Field Type Value Mandatory Notes subString okera_system_userYes The subject, aka username. Fixed value. issString <some_issuer>No The issuer of the token. Usually the cluster name. expNumber <epoch_time>Yes The expiry time of the token. Unix date, epoch-based. groupsArray <list_of_groups>Yes The user groups, should match CATALOG_ADMINS
The following Python based code shows how a JSON object is constructed to represent the JWT payload. Using the JWT library, the payload is converted into a token and signed by a given private key.
Example: Creating a system token using Python code
import json
from datetime import datetime, timedelta, timezone
from jwt import (JWT, jwk_from_dict, jwk_from_pem)
from jwt.utils import get_int_from_datetime

instance = JWT()

# Create a JSON object representing the JWT payload
message = {
    'iss': 'https://okera.example.com/',
    'sub': 'okera_system_user',
    'groups': [ 'grp1', 'grp2' ],
    'exp': get_int_from_datetime(
        datetime.now(timezone.utc) + timedelta(days=30)),
}

# Load a RSA key from a PEM file.
with open('odas_private.key', 'rb') as fh:
    signing_key = jwk_from_pem(fh.read())

# Generate the JWT and print it to the console
jws = instance.encode(message, signing_key, alg='RS512')
print(jws)
Note how the use of the timedelta function allows to compute the expiry time using simple date units, here 30 days.
As mentioned in the Okera JWT documentation, you also need to ensure that the chosen JWT signing algorithm, here RS512 must match with what is configured on the Okera cluster.
Running the above code emits the generated JWT and could be redirect (or directly written) into a file. Another option is to run a similar code in a serverless functions service, like AWS Lambda, that has access to the private key and can write the new JWT directly into the cluster's Kubernetes secret. More on this in the next section.
Update the System Token
After you have generated the JWT, you must provision it into an Okera cluster.
To use native Kubernetes tools to update the system token on running clusters, use the following process:
- Directly update the system token data in the proper Okera secret
- Restart all pods to ensure the new token is used
With Kubernetes, there are multiple ways to update objects.
You could simply delete and apply the new values, or you could patch them directly in place, among other choices.
As shown earlier, the actual token data is stored as a base64 encoded string in a field of a secret. Assuming again you have proper Kubernetes permissions, you can use the token you created above to patch the existing secret, and then initiate a pod restart.
Example: Patching the system token data and restarting the pods
$ kubectl patch secrets secrets --type json --patch "[{\"op\": \"replace\", \"path\": \"/data/SYSTEM_TOKEN_0\", \"value\": \"$(cat system.token | base64 -w 0)\"}]"
$ kubectl delete pods --all --force --grace-period=0
Of interest here is that you need to use base64 -w 0 to ensure the encoded token data is a single line string.
Verify Cluster Token
Once the token is updated and the Okera pods restarted, you should verify that the cluster is operational.
Note: As an administrator, first check that all pods are up and running, using your Kubernetes monitoring or by executing
kubectl get podson the command line.
For instance, perform the following actions:
- Log in to the Web UI and browse the datasets in the Data tab
- Use PyOkera or the REST API to send a query plan request to the cluster, or request a list of databases
- Use a configured client application to run a sample query
All of these require a working cluster and communication of various cluster internal services. Should the token update have failed, the cluster is likely to not be operational at all.