Tutorial: Using PyOkera with AWS Lambda
This self-service tutorial guides you through using Okera's native Python library, PyOkera, from within an AWS Lambda function.
Difficulty: Intermediate
Time needed: 4 hours
Introduction
Okera's approach to integration is API first, meaning we provide and implement APIs for upstream storage services, as well as downstream clients, such as data processing engines or Business Intelligence (BI) tools. One of such APIs for clients is PyOkera, our native Python library, that exposes all necessary functionality for applications to interact with one or more of our data access services clusters (Okera). For example, clients can send data definition language (DDL) statements to create databases and datasets in the shared Schema Registry, or create access rules in the accompanying Okera Policy Engine (planner).
AWS Lambda is a managed service that offers serverless programming features, which means (in a nutshell) you can write code that is hosted and executed by the service and does not require extra provisioning of compute resources (that is, a server). Lambda functions can then be executed through different means, for example an API Endpoint that provides HTTP-based network protocol support. Other means of invocations include AWS internal services, such as Alexa Skills, or using one of the provided Lambda API SDKs (for example, the AWS SDK for Java).
Combining these two functionalities enables developers to automate many different processes that are part of data governance. For instance, assuming you have existing business catalog and entitlement services, you could push updates to these services as events into a message queue or stream system (possibly using AWS SQS or Kinesis respectively) and then trigger a Lambda function that applies the changes as necessary to the Okera catalog services.
This tutorial introduces you to the necessary resources provided by Okera and AWS and then presents a specific approach on how to use them for the aforementioned purpose.
PyOkera Quick Start
While you find more details in the PyOkera documentation, it is warranted here to introduce the basic concepts of how a client written in Python is communicating with an Okera cluster. Though first we need to get PyOkera installed and verified to work, which we can do in many ways, one of which involves these steps:
-
Install PyOkera using
pipYou have an option to install PyOkera for everyone, or just for a local test inside a virtual environment, a concept provided by Python itself.
Note: You have to make sure that you have a Python of version 3.4 or later, and that
pipis the matching binary for that version of Python.Based on your choice you need to create and activate the virtual environment, and execute the
pip install pyokeracommand. -
Start Python and verify the installation
This is straight forward, as shown in the PyOkera documentation.
Putting this together may look like what is shown in the following example.
Note: The following commands were run on an Amazon EC2 VM with an AWS Linux 2 AMI as the operating system image, which is based on the
yumpackage manager. The following command installs the necessary packages:
$ sudo yum install python3 gcc-c++ python3-devel
Example: Install and verify PyOkera in a virtual environment
$ sudo pip3 install virtualenv
$ virtualenv v-env
...

$ source v-env/bin/activate
(v-env) $ pip3 install pyokera numpy
...
Successfully built pyokera bitarray thriftpy2 pycparser
Installing collected packages: six, bitarray, certifi, ply, thriftpy2, urllib3, pytz, pycparser, cffi, cryptography, jwt, click, idna, chardet, requests, presto-python-client, pyokera, numpy
Successfully installed bitarray-1.2.0 certifi-2019.11.28 cffi-1.13.2 chardet-3.0.4 click-7.0 cryptography-2.8 idna-2.8 jwt-0.6.1 ply-3.11 presto-python-client-0.7.0 pycparser-2.19 pyokera-1.5.4 pytz-2019.3 requests-2.22.0 six-1.13.0 thriftpy2-0.3.12 urllib3-1.25.7 numpy-1.17.4

(v-env) $ python
Python 3.7.4 (default, Oct  2 2019, 19:30:55)
[GCC 7.3.1 20180712 (Red Hat 7.3.1-6)] on linux
Type "help", "copyright", "credits" or "license" for more information.
>>> import okera.odas
>>> print(okera.odas.version())
1.5.4
>>> exit()

(v-env) $ deactivate
$
This confirms that we have PyOkera installed, which included compiling some native C code in the process (all automatically handled by PIP).
Service Authentication
Before we can move on, we have to also solve another issue: Service Authentication. This requires a token being generated that can be used with the Python API, sent together with every request as the Bearer token authentication header. The easiest way is to create a JSON Web Token (JWT), that is signed by a private key on the client and verified by the matching public key on the server side.
There are other options too, for example using a pre-created token that has a long lifetime, or using an external service to generate the token based on some single-sign-on (SSO) credentials. Since AWS Lambdas are running self-contained, using those two approaches have too many drawbacks, including the misuse of the token if it gets exposed, or latency issues when the external service connectivity is in trouble.
Using a private key is akin to a Kerberos keytab, or SSO token to provide long-lived credentials that can be used to generate access tokens. The permissions are verified on the server side, which means removing the matching public key there is allowing administrators to shut down any access based on the matching tokens.
Conversely, the public key must be explicitly configured for JWT Authentication to work, which requires updating the cluster configuration. There is an option to specify as many keys as needed, by listing the key and accompanying algorithm used to sign the JWTs as comma-separated values:
JWT_PUBLIC_KEY: files/jwt_pub_key.pem,s3://okera-staging/lambda/key.pub
JWT_PRIVATE_KEY: files/jwt_priv_key.pem
JWT_ALGORITHM: RSA512,RSA512
Note: You always need at least one JWT key configured for the intra-cluster communication to work. This also requires the matching private key and system token to specified.
In other words, as soon as you add a new public key for the Lambda function, you need to also explicitly specify the internally used authentication properties. The public key in the example Amazon S3 bucket shown above and the client-side signing algorithm chosen were added to enable the Lambda use that is shown later in this tutorial.
Using the PyPI provided JWT library, we can now create a JWT with a few lines of code.
Example: Create JWT using a local private key
import time
from jwt import (JWT, jwk_from_pem)
def create_jwt_token(subject):
    with open('rsa_private_key.pem', 'rb') as fh:
        private_key = jwk_from_pem(fh.read())
    now = int(time.time())
    expiry = now + 1 * 60 * 60 # 1h
    payload = {
        'sub': subject,
        'exp': expiry,
    }
    jwt = JWT()
    token = jwt.encode(payload, private_key, 'RS512')
    return token
This code loads the private key from a PKCS #8 PEM file, which is a text-based key interchange format. Then it computes a reasonable expiry time for the token, here one (1) hour, allowing for the subsequent API requests to authenticate successfully. For the subject of the JWT, the caller can hand in a string representing the non-personal account (NPA) name.
Tying this together with PyOkera, you can now use the token to invoke API calls, using a context that has authentication enabled.
Example: Calling API endpoint with token authentication
from okera import context
def get_databases():
    ctx = context()
    token = create_jwt_token("admin")
    ctx.enable_token_auth(token_str=token)
    dbs = "<empty>"
    with ctx.connect(host=localhost, port=12050) as conn:
        dbs = ", ".join(conn.list_databases())
    return dbs
Lastly, you will only see what you are authorized to see, that is in this example, only the databases you have been granted access too. This is one of the core tenets of Okera, secure authentication first, then authorization based on the subject, and finally logging all of this in the system-wide audit trail.
Secrets
Before we can move on to the AWS Lambdas, we need to decide where we keep the pertinent information to make the above code reusable. This includes the private signing key, as well as the NPA name, the Okera hostname and port and more. There are again many options, two of which are:
Use environment variables
In Python you can use the os package to get the values for known environment variables (envvars for short).
For example:
import os
with ctx.connect(host=os.environ['planner_host'],
        port=int(os.environ['planner_port'])) as conn:
    dbs = ", ".join(conn.list_databases())
This changes the earlier code to get the Okera hostname and port from envvars instead.
Use shared key/value manager
Another option is to store the values in a key/value store, typically one shared across many applications. An example is AWS DynamoDB, or HBase and Cassandra. Overall this makes access a bit more complex inside the code, and we are dependent on another service again.
This leads us to scrutinize the variables we need more, where there are two categories: public and sensitive data. The former includes the shown Okera hostname and port, while the latter includes the private key. It seems we need another way to store some of the variable data safely. With AWS, there two options regarding use with Lambdas: Security Manager and encrypted environment variables.
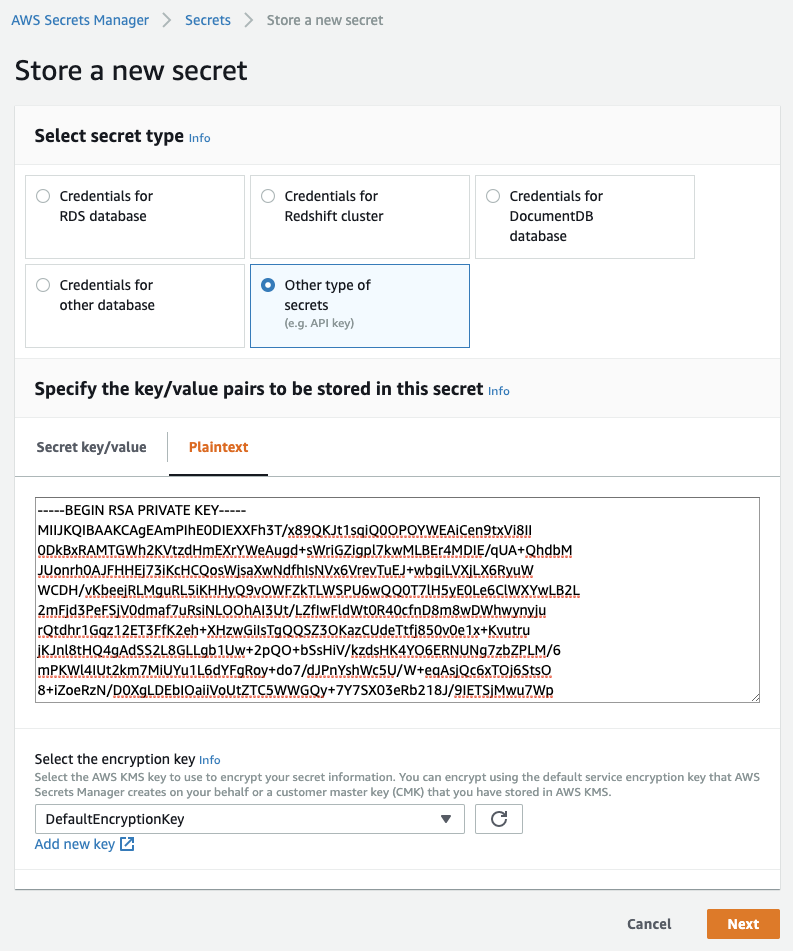
Security Manager
AWS has a service that stores keys and passwords safely, with the ability to rotate such keys on specified intervals. The UI is quite straight forward and allows us to copy&paste the PKCS #8 PEM key content directly into the provided plain text editor.
|
Alternatively, you can use the following AWS command-line call to upload the key into a new secret:
$ aws secretsmanager create-secret --name PrivateKey-ODAS123 \
  --secret-string file:///home/ec2-user/okera-1.5.0/.auth/id_rsa
{
    "VersionId": "a60149f0-cfac-40fb-9f11-19b645141a8f",
    "Name": "PrivateKey-ODAS123",
    "ARN": "arn:aws:secretsmanager:us-west-2:xxxxxxxxxxxx: \
      secret:PrivateKey-ODAS123-xxxxxx"
}
The Secret Manager also provides you with example code in different programming languages, showing how to access a secret from code. We will use this in the full example shown below.
Important though is that the user or machine issuing the call must have the proper GetSecretValue permissions assigned, or else the call to retrieve the private key will fail.
For instance, using the ARN returned by the CLI call (or listed on the UI page for the secret in the AWS Secret Manager) we can add the following permission to the machine or Lambda policy, restricting it to access only the secret we created earlier.
{
    "Version": "2012-10-17",
    "Statement": [
        ...
        {
            "Action": [
                "secretsmanager:GetSecretValue"
            ],
            "Resource": [
                "arn:aws:secretsmanager:us-west-2:xxxxxxxxxxxx: \
                  secret:PrivateKey-ODAS123-xxxxxx"
            ],
            "Effect": "Allow",
            "Sid": "GetSecretValueRestricted"
        }
    ]
}
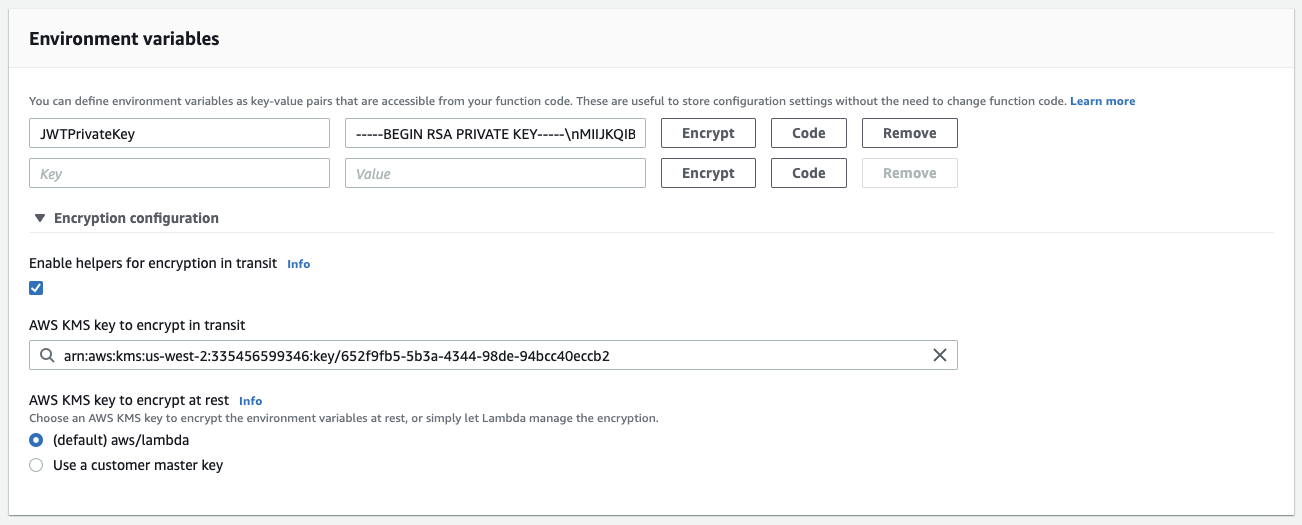
Encrypted Environment Variables
The alternative to using a secret is using the environment variables feature offered by the Lambda service itself. We can paste the key into the edit field, while replacing newlines with some other character.
Note: The simple edit field is not suitable for multiline text. We avoid this issue by replacing the newlines (0x10) with
\ncharacters, which we later on could re-replace again in the Lambda code.
|
The advantage of the envvars in Lambda is that they support encrypting the values too.
This needs to be enabled in the encryption settings (see "Enable helpers for encryption in transit"), and then clicking the "Encrypt" button next to the envvar entry.

|
The "Code" button gives us access to examples on how to use these envvars from common programming languages. Akin to the Secret Manager, the user or machine trying to decrypt such an envvar need to have extra permissions to be able to access the AWS KMS service and retrieve the specified encryption key.
Because the Secret Manager is able to rotate keys and provides better support for plain text keys, we opt for choice #1, that is, using the Secret Manager instead of the Lambda encrypted envvars. We still use the envvars later on, but only for more simple values.
Basic Lambda Function
Now that we can talk to an Okera cluster and have decided where to store the key, we can put this all together and create a simple AWS Lambda function that retrieves the list of databases from an Okera cluster.
import json
import time
import os

import boto3
import base64
from botocore.exceptions import ClientError

from jwt import (
    JWT,
    jwk_from_pem,
)

import okera.odas
from okera import context


def get_key_from_secret():
    secret_name = os.environ['jwt_private_key_secret_id']
    region_name = os.environ['boto_region']

    session = boto3.session.Session()
    client = session.client(
        service_name='secretsmanager',
        region_name=region_name
    )

    try:
        get_secret_value_response = client.get_secret_value(
            SecretId=secret_name
        )
    except ClientError as e:
        if e.response['Error']['Code'] == 'DecryptionFailureException':
            raise e
        elif e.response['Error']['Code'] == 'InternalServiceErrorException':
            raise e
        elif e.response['Error']['Code'] == 'InvalidParameterException':
            raise e
        elif e.response['Error']['Code'] == 'InvalidRequestException':
            raise e
        elif e.response['Error']['Code'] == 'ResourceNotFoundException':
            raise e
    else:
        key = get_secret_value_response['SecretString']
        return key


def create_jwt_token(subject):
    private_key = get_key_from_secret()
    if not private_key:
        raise ValueError('Key empty')
    now = int(time.time())
    expiry = now + 1 * 60 * 60 # 1h

    payload = {
        'sub': subject,
        'exp': expiry,
    }

    jwt = JWT()
    token = jwt.encode(payload, jwk_from_pem(private_key.encode()),
            os.environ['jwt_algorithm'])
    return token


def get_databases():
    ctx = context()
    token = create_jwt_token(os.environ['odas_user'])
    ctx.enable_token_auth(token_str=token)
    dbs = "<empty>"
    with ctx.connect(host=os.environ['planner_host'],
            port=int(os.environ['planner_port'])) as conn:
        dbs = ", ".join(conn.list_databases())
    return dbs


def lambda_handler(event, context):
    dbs = get_databases()
    return {
        'statusCode': 200,
        'body': json.dumps('Hello from Lambda! Okera: ' +
          okera.odas.version() + '. Databases: ' + dbs)
    }
These lines of Python code are from the PyOkera, Secret Manager, and JWT examples, with little modifications.
The lambda_handler() function is calling get_databases(), which in turn first creates a JWT using the signing key from the secret, and then calls the PyOkera function to list the databases the associated user can see.
We use environment variables as much as possible, so that the Lambda code is flexible and can be reused if needed.
Next is to package the function code and its dependencies up into an archive that can be submitted as a Lambda function. For that we can follow the Python Deployment Package documentation, which uses the virtual environment approach discussed earlier.
First, store the function's Python code shown above as function.py in the directory where you created the virtual environment and tested PyOkera.
Then run the commands as explained in the AWS documentation to package up the environment and the function code:
$ cd v-env/lib/python3.7/site-packages/
$ zip -r9 ${OLDPWD}/function.zip .
  adding: easy_install.py (deflated 17%)
  adding: pkg_resources/ (stored 0%)
  adding: pkg_resources/__init__.py (deflated 73%)
  ...
  adding: six.py (deflated 76%)
  adding: six-1.13.0.dist-info/ (stored 0%)
  ...
  adding: bitarray/ (stored 0%)
  adding: bitarray/__init__.py (deflated 61%)
  adding: bitarray-1.1.0.dist-info/ (stored 0%)
  ...

$ zip -g function.zip function.py
  adding: function.py (deflated 61%)
After these commands you should have the following in your directory.
$ ls -lh
total 39M
-rw-rw-r-- 1 ec2-user ec2-user 2.2K Dec  5 16:39 function.py
-rw-rw-r-- 1 ec2-user ec2-user  39M Dec  8 21:59 function.zip
drwxrwxr-x 2 ec2-user ec2-user    6 Dec  5 11:37 python
drwxrwxr-x 5 ec2-user ec2-user   56 Dec  4 13:44 v-env
If you verify the content of the archive, you should find the function code file at the top level and each installed package as a separate directory with their respective content.
$ unzip -t function.zip
Archive:  function.zip
    testing: easy_install.py          OK
    testing: pkg_resources/           OK
    ...
    testing: numpy/                   OK
    testing: numpy/LICENSE.txt        OK
    testing: numpy/_distributor_init.py   OK
    testing: numpy/setup.py           OK
    ...
    testing: function.py              OK
No errors detected in compressed data of function.zip.
Now we can create the AWS Lambda function, which the documentation is using the AWS CLI tool again. This assumes you have previously created the function in the UI.
$ aws lambda update-function-code --function-name GetDatabases \
    --zip-file fileb://function.zip
If you want to create a new function, the command looks slightly more elaborate, adding the necessary service settings, and the environment variables for our function code.
$ aws lambda create-function --function-name GetDatabases \
    --zip-file fileb://function.zip \
    --role okera-lambda-role \
    --environment Variables="{ \
        planner_host=10.1.1.10, \
        planner_port=12050, \
        jwt_private_key_secret_id=PrivateKey-ODAS123, \
        boto_region=us-west-2, \
        jwt_algorithm=RS512, \
        odas_user=public_user}" \
    --handler lambda.handler \
    --runtime python3.7
Using the UI, creating a new Lambda function is quite straight forward, involving the following steps.
-
Create Lambda Function
Go to the Lambda console in your region and select the "Create Function" option on the top of the screen. On the "Create Function" wizard page, select the "Author from scratch" option.

Give the function a name, such as "OkeraGetDatabases". Select "Python 3.7" from the list of runtime options. Under "Permissions" select a predefined role or let the wizard create one for you.
Note: Recall that you will need to add extra permissions to access the Secret Manager later on. AWS has an info on that page asking not to modify the auto-created role, which means you should sooner or later copy one of the auto-created ones and modify it accordingly.
Click on "Create function" to complete the wizard and get redirected to the function's UI page.
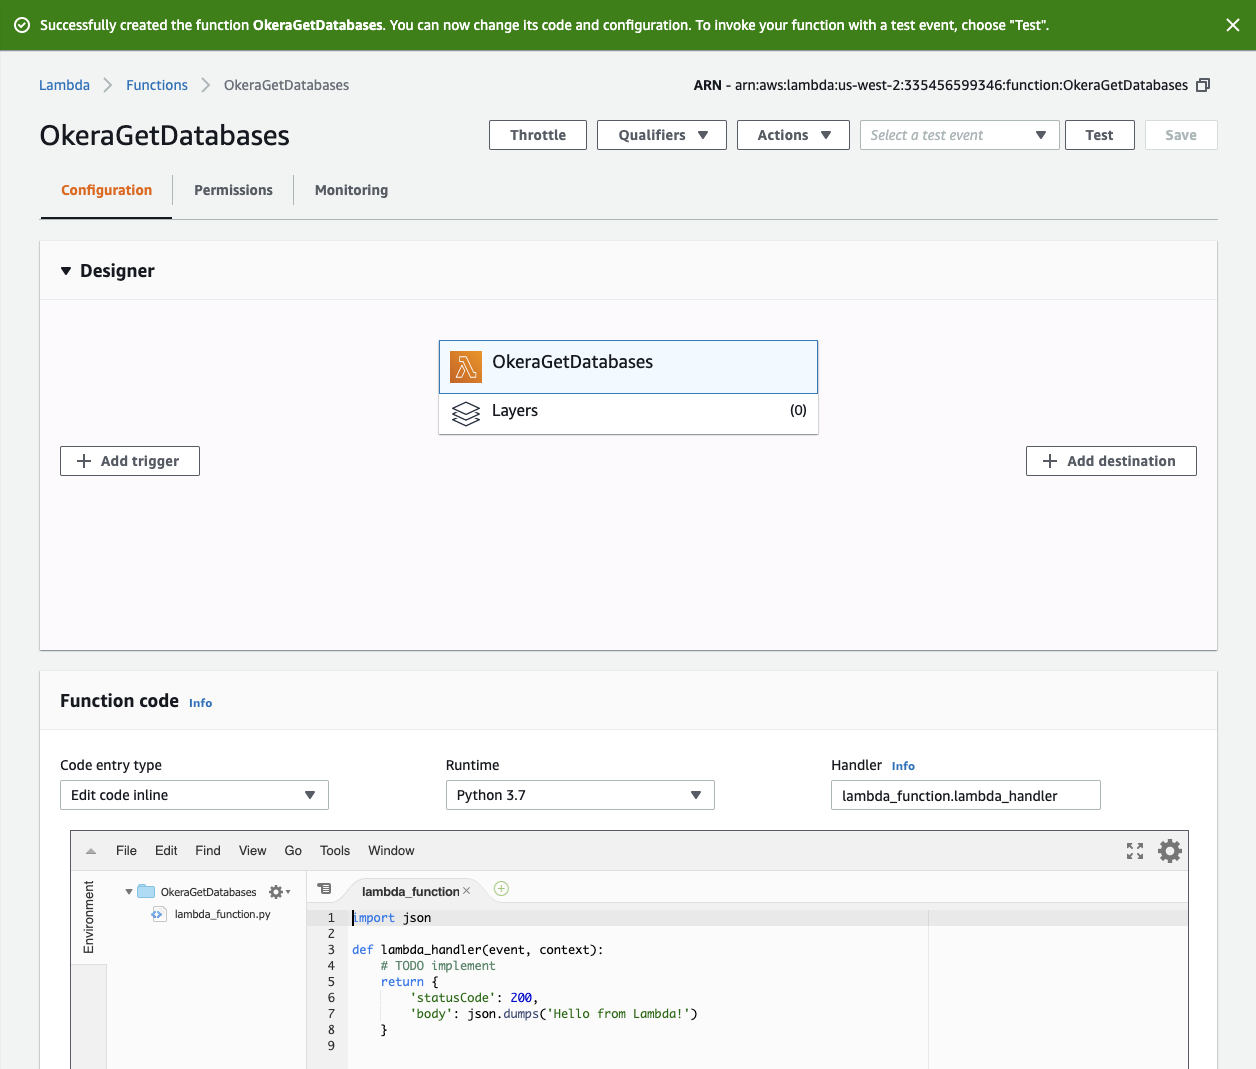
-
Modify Lambda Function Settings
In the "Function code" section, select "Upload a .zip file", "Python 3.7" as the runtime, and
function.lambda_handleras the handler name. Then click the "Upload" button and choose thefunction.ziparchive created earlier.
In the "Environment Variables" section, add all the necessary key/value pairs for the envvars used in the code.
In the "Execution role" section, replace or edit the role to include the restricted
GetSecretValuepermissions.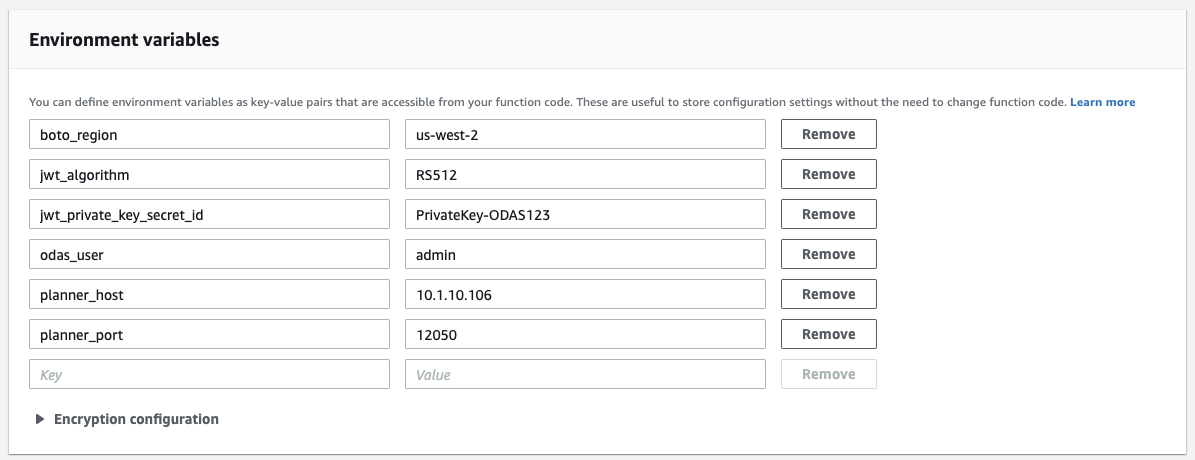
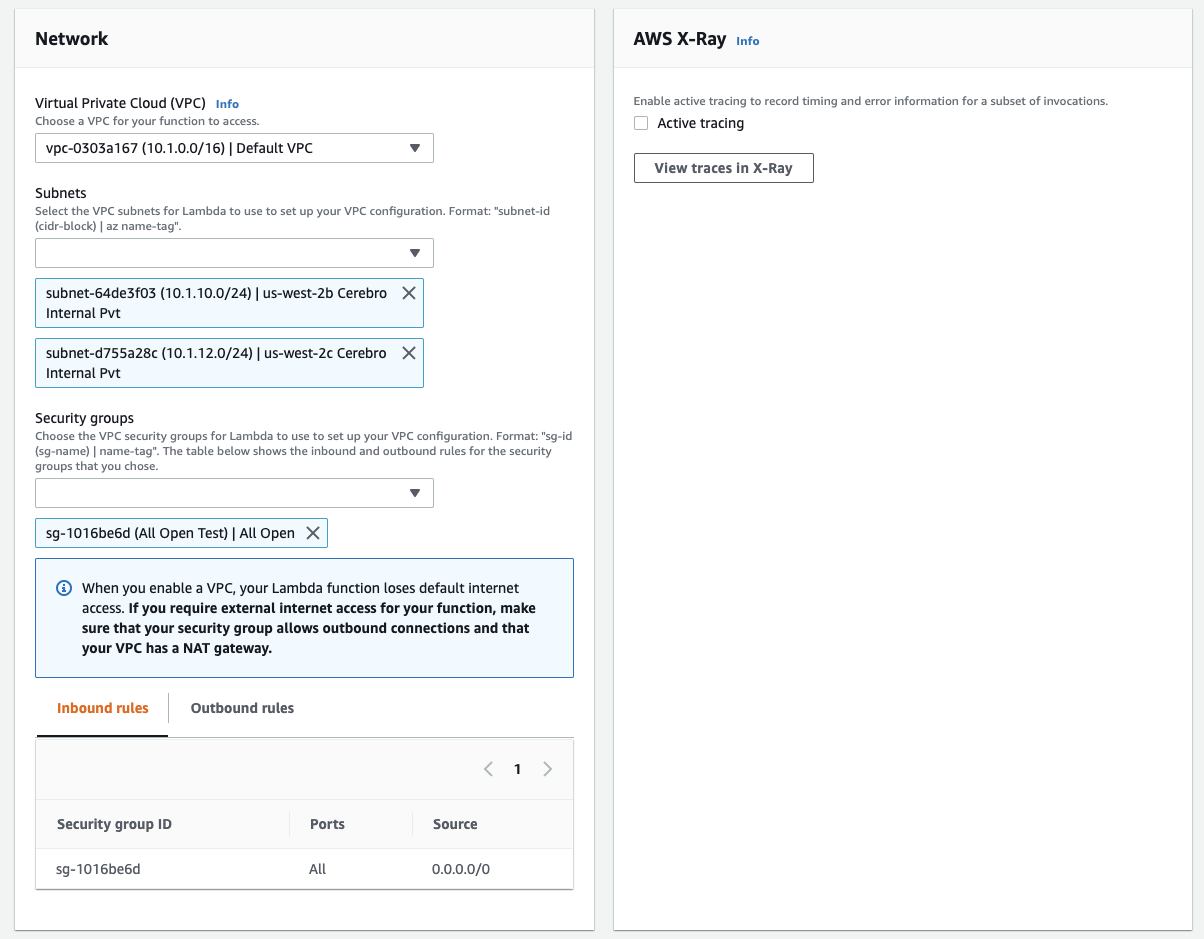
In the "Network" section, configure the proper VPC and subnet that allows for the Lambda to be able to talk to the Okera service endpoints.
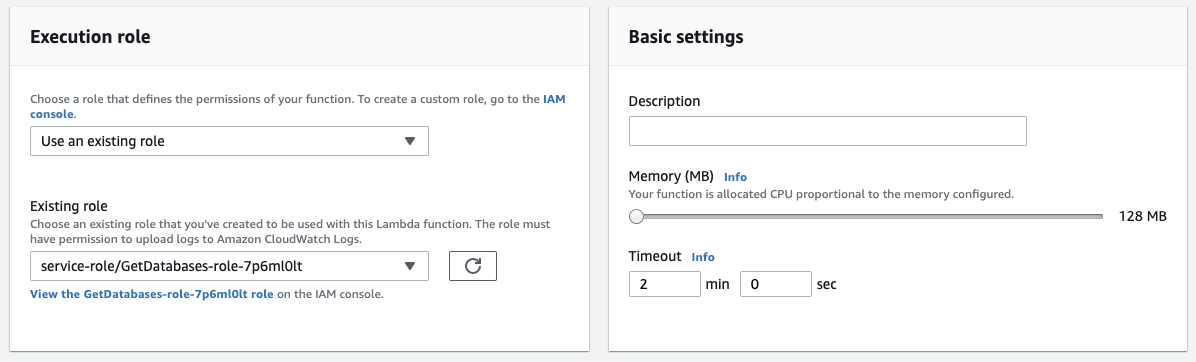
Click the "Save" button in the top right corner of the screen. This will upload the archive and persist all the settings entered.
If all changes are correct and the Lambda saved, you can click on the "Test" button next to "Save", which will open up a dialog to configure a test event.

|
Since we have no input to react to in our Lambda, just leave "Create new test event" selected and keep "Hello World" as the template name, give the event a name like "VoidTest", and save it. Now click the "Test" button again, which will call the Lambda function with the event we just created.
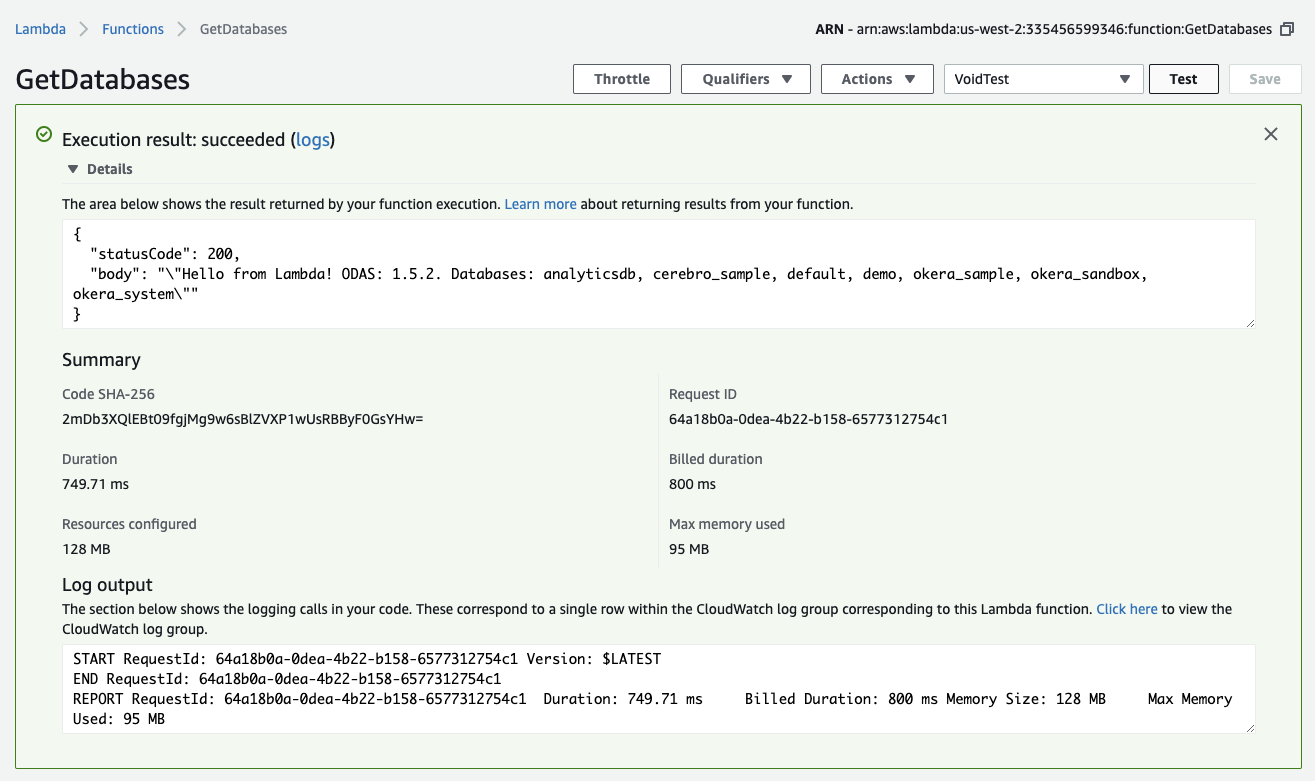
|
You should see something akin to what is shown above, that is, a green box that confirms the test returning successful, with the output listing the expected databases.
Tip
If the box is red instead, it means the function returned unsuccessful.
Use the "logs" link next to the "Execution result" to open the CloudTrail service UI, giving you access to the captured events for the recent function invocations.
You can use simple print("...") statements in the Lambda's Python code to emit logging information that you can inspect in the CloudTrail UI.
Adding RESTful Access
One additional, yet optional, step is to add an API Gateway to our Lambda, which enables RESTful access to function. Click on the "Add trigger" button in the main section of the Lambda function UI, select "API Gateway" from the list of choices. Select "Create a new API" and "REST API" from the options, then choose which security option you want to use. For testing, we select "Open" from the dropdown list, and leave the rest of the settings all as-is, clicking on the "Create" button.
This brings you back to the main function UI page, which now also lists the newly created API Gateway connected to the function. Selecting the box in the UI for the API Gateway shows the details of the REST endpoint, including its URL.
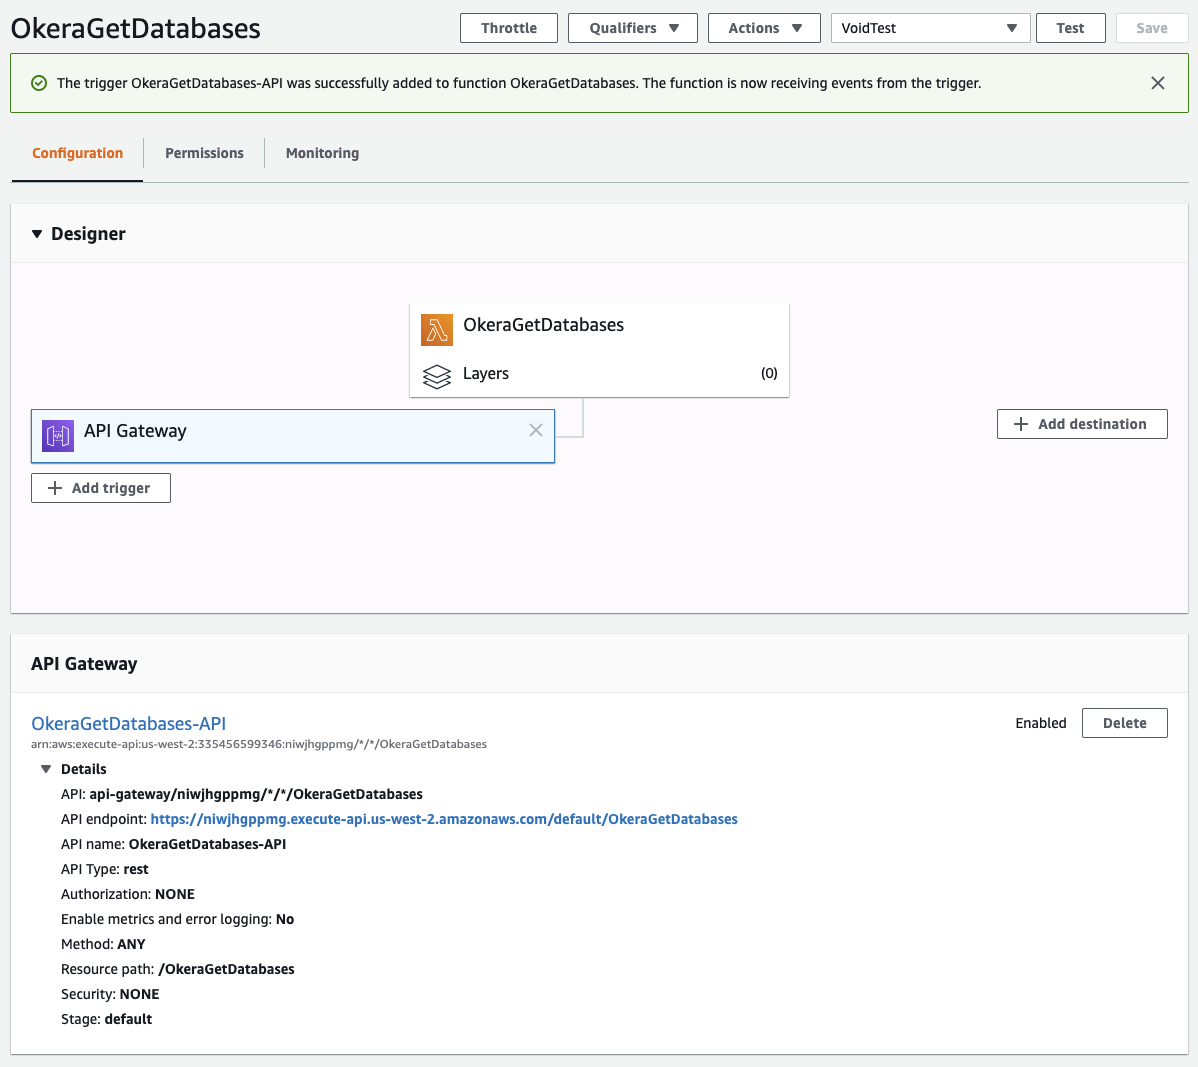
|
Once you click on the link, you can see the result of the Lambda in your web browser.

|
Using Lambda Layers
One thing that happened from initially creating the Lambda function to replacing it with our function.zip archive is that the online editor stopped to show any code, but this message instead.
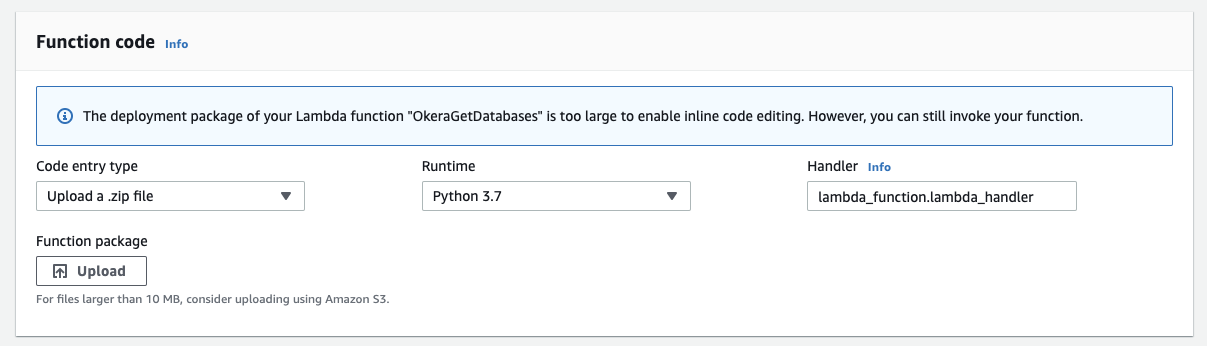
|
The inherent issue is that we built a single archive with our function code and all dependent Python libraries and packages.
From the $ ls -lh command shown earlier you can see that our archive is already close to 40 MB in size, and that is in its compressed form.
Eventually, you may reach the maximum allowed size of a Lambda function, which is 50 MB for direct uploads.
This can be circumvented for a little while using Amazon S3 as the location of the archive, and choose that as the location for the function code.
Yet, eventually, the archive may exceed what you need to use in the Lambda, and then you are in trouble.
That is where AWS Lambda Layers come in. These are separate archives for sets of bundled up functionality. For instance, NumPy is one of the libraries already available from AWS as a layer, which means we do not need to package it in our archive.
The best approach using layers then is this: package PyOkera with all basic libraries (excluding NumPy) as a new, custom layer, and then use the bare function Python code file with NumPy and PyOkera as separate layers.
Packaging PyOkera as a layer requires adding it to the base Lambda stack, which requires some coercing. Following some advice that can be found online, you can use a Docker image locally that mirrors the Lambda setup closely enough. With that, the steps to package a layer are:
-
Create a Python
requirements.txtfileAdd these lines to the above file, which defines the PyOkera version to use, along with its depend libraries and their respective versions:
bitarray==1.1.0
six==1.13.0
thriftpy2==0.3.12
pyokera==1.5.2
Note: Usually only the last line is needed, as Python will load the dependent packages using the Python Package Index (PyPI) information.
-
Create packaging script
get_layer_packages.shThis script should contain these commands:
#!/bin/bash
export PKG_DIR="python"
rm -rf ${PKG_DIR} && mkdir -p ${PKG_DIR}
docker run --rm -v $(pwd):/foo -w /foo lambci/lambda:build-python3.7 \
  pip install -r requirements.txt -t ${PKG_DIR}
The trick here is that PIP is run inside the Docker image mirroring the Lambda environment, but the target for PIP is set to a machine-local directory, that is, outside of the image. This means that after running the script, we have all required packages in the
pythondirectory where the script was run. -
Run the packing script and archive the layer files
The next two commands execute the above script and then create a ZIP archive that contains all the necessary package files:
$ ./get_layer_packages.sh
$ zip -r PyOkera-Python37.zip .
The following example show the shell commands together.
Example: Creating the PyOkera Lambda layer
$ mkdir lambda
$ cd lambda

$ cat <<EOF >> requirements.txt
bitarray==1.1.0
six==1.13.0
thriftpy2==0.3.12
pyokera==1.5.2
EOF

$ cat <<EOF >> get_layer_packages.sh
#!/bin/bash
export PKG_DIR="python"
rm -rf ${PKG_DIR} && mkdir -p ${PKG_DIR}
docker run --rm -v $(pwd):/foo -w /foo lambci/lambda:build-python3.7 \
  pip install -r requirements.txt -t ${PKG_DIR}
EOF
$ chmod +x get_layer_packages.sh

$ ./get_layer_packages.sh
Unable to find image 'lambci/lambda:build-python3.7' locally
build-python3.7: Pulling from lambci/lambda
2706655b1657: Pull complete
8264dca81530: Pull complete
...
Successfully built bitarray thriftpy2 pyokera pycparser
Installing collected packages: PyJWT, bitarray, six, ply, thriftpy2, certifi, urllib3, pytz, pycparser, cffi, cryptography, jwt, idna, chardet, requests, click, presto-python-client, pyokera
Successfully installed PyJWT-1.7.1 bitarray-1.1.0 certifi-2019.11.28 cffi-1.13.2 chardet-3.0.4 click-7.0 cryptography-2.8 idna-2.8 jwt-0.6.1 ply-3.11 presto-python-client-0.7.0 pycparser-2.19 pyokera-1.5.2 pytz-2019.3 requests-2.22.0 six-1.13.0 thriftpy2-0.3.12 urllib3-1.25.7

$ ls -l
total 16
-rwxr-xr-x   1 larsgeorge  staff   195B Dec  5 12:38 get_layer_packages.sh
drwxr-xr-x  41 larsgeorge  staff   1.3K Dec  5 12:43 python
-rw-r--r--   1 larsgeorge  staff    74B Dec  5 12:40 requirements.txt

$ ls -l  python
total 1744
drwxr-xr-x   8 larsgeorge  staff   256B Dec  5 12:43 Click-7.0.dist-info
drwxr-xr-x  10 larsgeorge  staff   320B Dec  5 12:43 PyJWT-1.7.1.dist-info
drwxr-xr-x   3 larsgeorge  staff    96B Dec  5 12:43 __pycache__
-rwxr-xr-x   1 larsgeorge  staff   834K Dec  5 12:43 _cffi_backend.cpython-37m-x86_64-linux-gnu.so
drwxr-xr-x   4 larsgeorge  staff   128B Dec  5 12:43 bin
drwxr-xr-x   6 larsgeorge  staff   192B Dec  5 12:43 bitarray
drwxr-xr-x   7 larsgeorge  staff   224B Dec  5 12:43 bitarray-1.1.0.dist-info
...
drwxr-xr-x  16 larsgeorge  staff   512B Dec  5 12:43 urllib3
drwxr-xr-x   8 larsgeorge  staff   256B Dec  5 12:43 urllib3-1.25.7.dist-info

$ zip -r PyOkera-Python37.zip .
  adding: requirements.txt (deflated 9%)
  adding: python/ (stored 0%)
  adding: python/jwt/ (stored 0%)
  adding: python/jwt/jws.py (deflated 63%)
  ...
  adding: python/requests-2.22.0.dist-info/INSTALLER (stored 0%)
  adding: python/requests-2.22.0.dist-info/METADATA (deflated 57%)
  adding: get_layer_packages.sh (deflated 22%)

$ ls -lh
total 13008
-rw-r--r--   1 larsgeorge  staff   5.9M Dec  5 14:21 PyOkera-Python37.zip
-rwxr-xr-x   1 larsgeorge  staff   195B Dec  5 12:38 get_layer_packages.sh
drwxr-xr-x  40 larsgeorge  staff   1.3K Dec  5 14:14 python
-rw-r--r--   1 larsgeorge  staff    61B Dec  5 14:14 requirements.txt
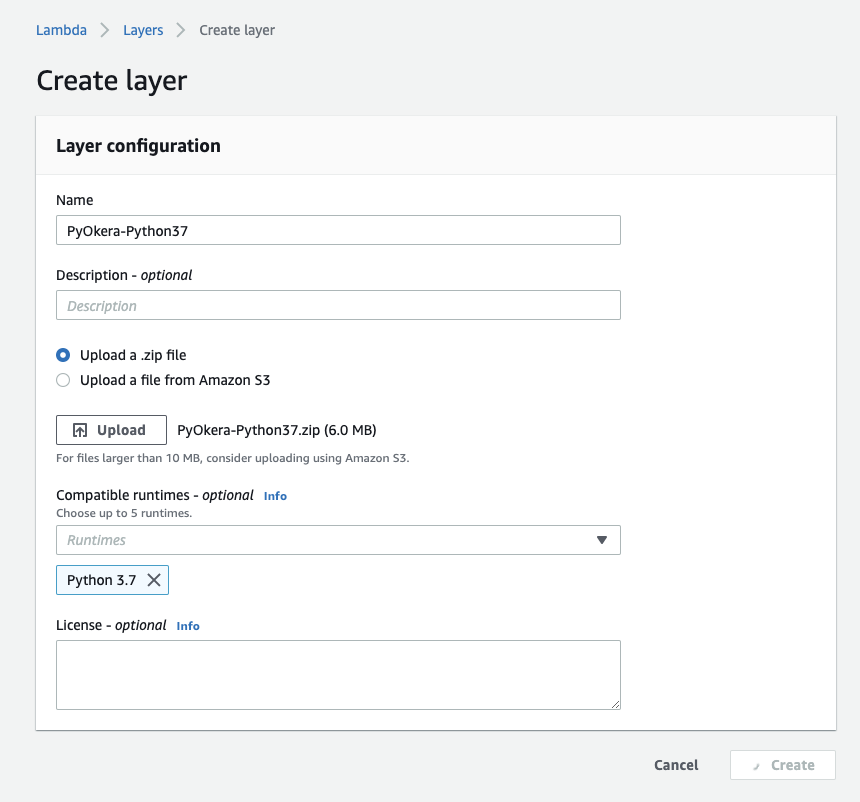
This generated the PyOkera layer archive, which is about 6 MB in size. We now use the AWS Lambda UI to create a new layer while uploading the archive:
|
You need to
- navigate to the main AWS Lambda page,
- click on the "Layers" link,
- click on "Create layer",
- and enter the details as shown in the screenshot.
Note: There is also an AWS CLI command to create and upload the layer. Using the UI is convenient, but for more automated scripting or terminal oriented users, the command-line tool is equally powerful.
Once the layer is created, navigate back to the function from the AWS Lambda main page. Click on the "Layers" box in the "Designer" section.
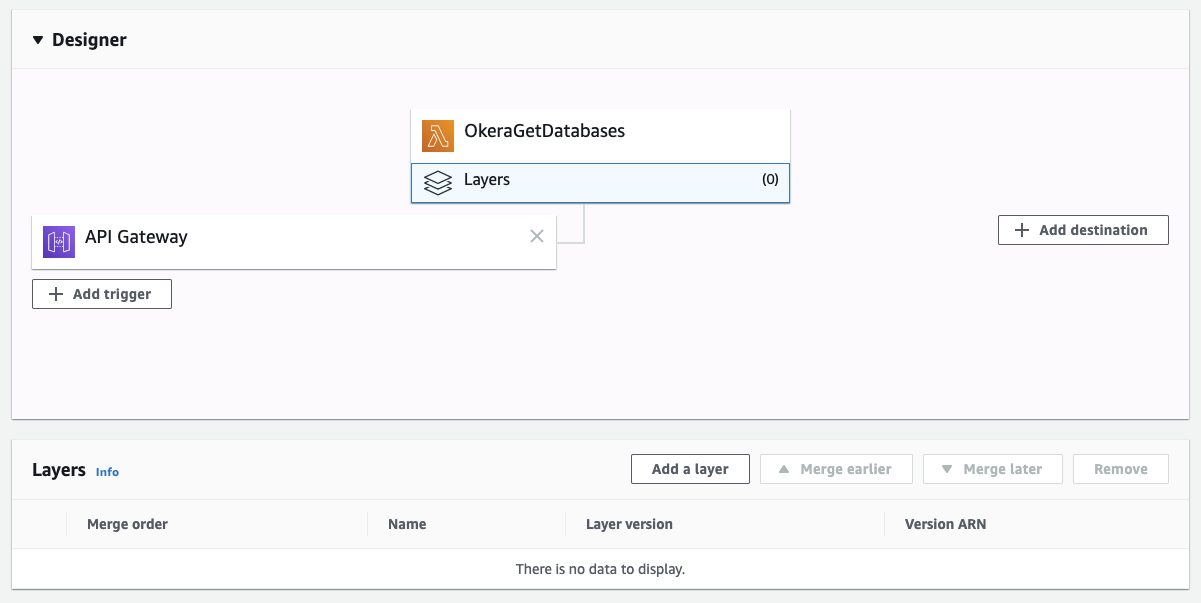
|
Then click on the "Add a layer" button, which opens a dialog that has the built in and custom layers in it.
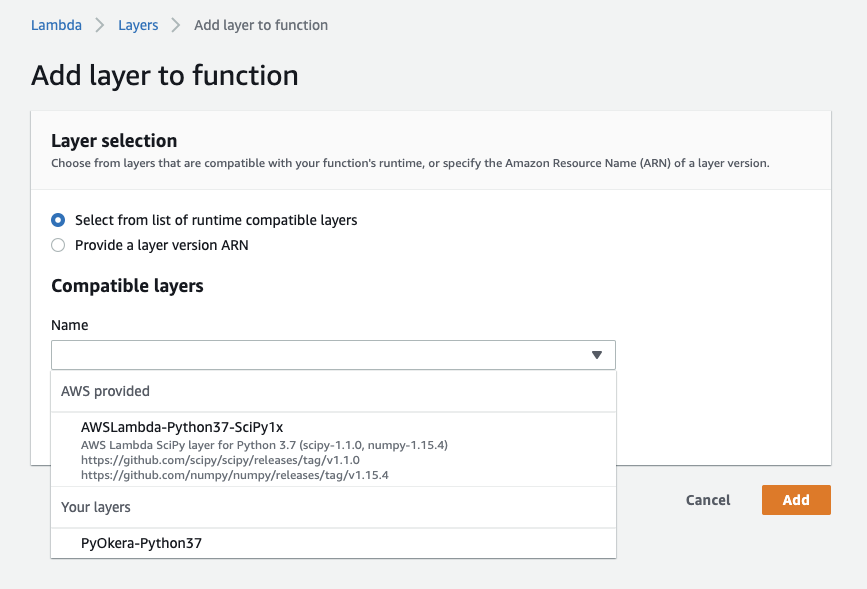
|
Select NumPy first, then click on "Add a layer" again and select the PyOkera layer. Each layer has a version number, select the one you want to use, usually the latest.
|
Finally, we also have to replace the heavier function archive we uploaded earier which one that just contains the function code. On the command-line, where you previously did package the function code, run the following.
$ zip function-only.zip function.py
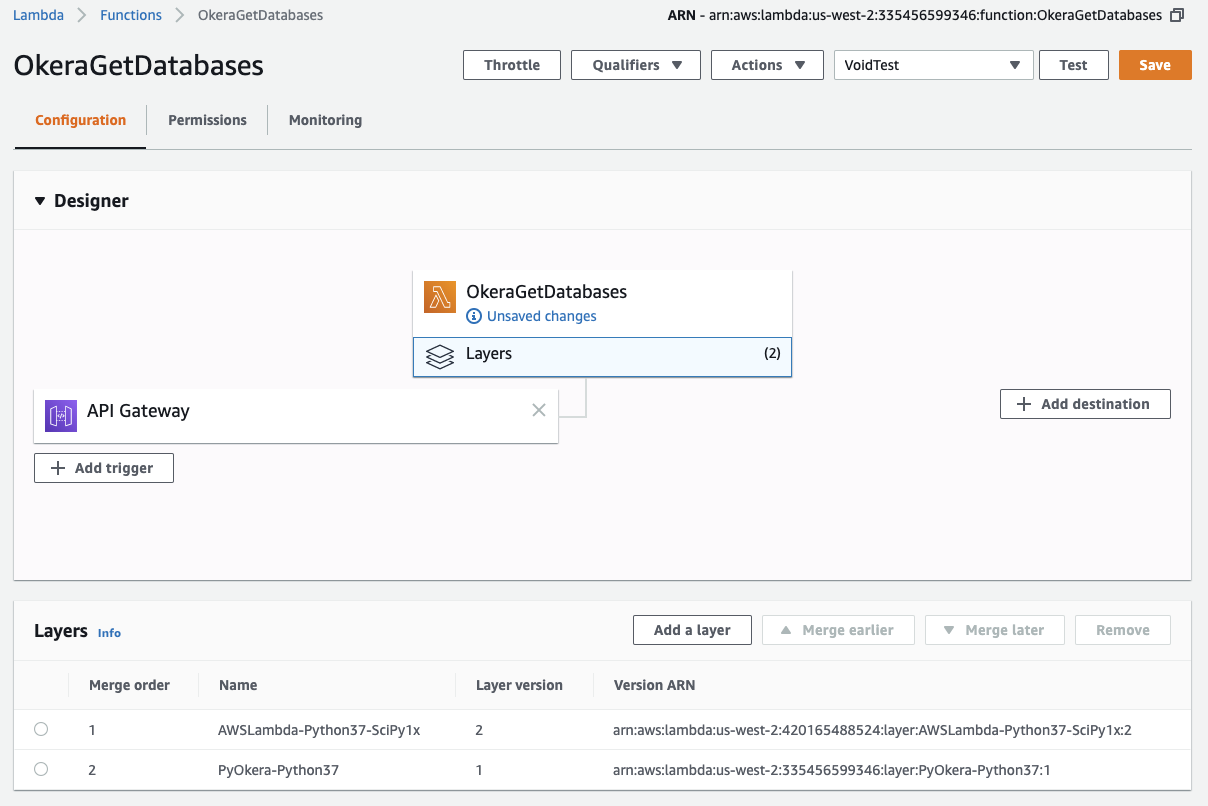
Now click on the "OkeraGetDatabases" box in the "Designer" section and select the newly created ZIP archive as the one to be uploaded, then press the "Save" button in the top right corner.
What you then see is that the code editor is available again, and that you have two layers configured.
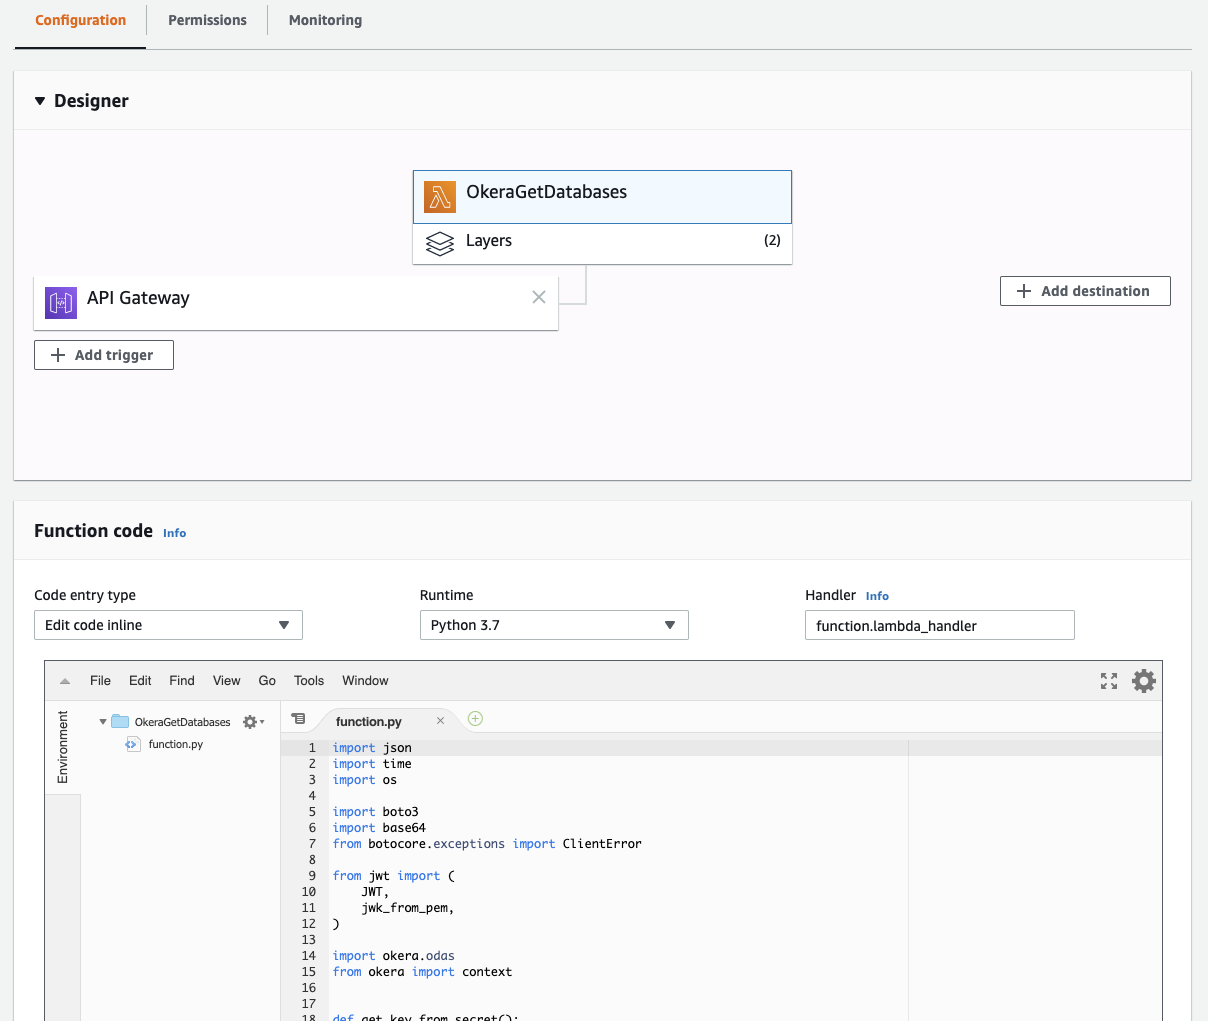
|
Use the "Test" button once more to verify that the Lambda is still working as expected.
Summary
You have learned how to package up PyOkera in multiple ways and use it with the AWS Lambda service. Okera recommends the layer approach, while still eventually limited to a maximum allowed size, it is the cleanest approach to creating Lambdas that use PyOkera.
With the same steps you can now create other PyOkera based Lambdas that can be triggered by changes in your related management systems, for example, for entitlements or in your enterprise wide business catalog. These Lamdbas could create or alter tables, or issue group and/or role based policies for automated access control.