Create a Snowflake Connection
Important
If you are using Okera's policy synchronization mechanism for Snowflake policy enforcement, you must configure your Snowflake environment before you create your Snowflake connection in Okera.
To create a Snowflake connection, complete the following steps:
-
Select Connections from the Okera UI menu. The Connections page appears.
-
Select
 . The Create new connection dialog appears.
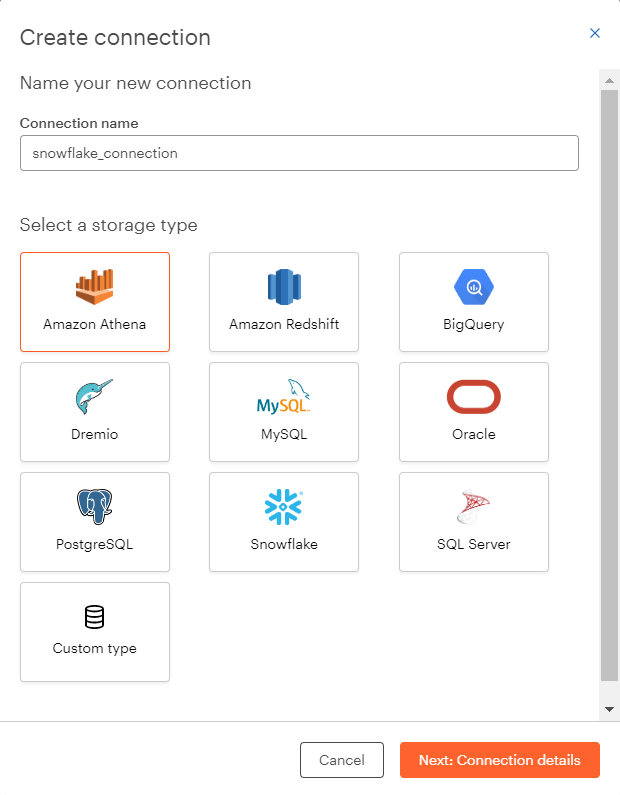
-
Specify a unique name for the connection in the Connection name box, select the Snowflake button under Select a storage type and then select the Next: Connection details button. The Create new Snowflake connection dialog appears.
-
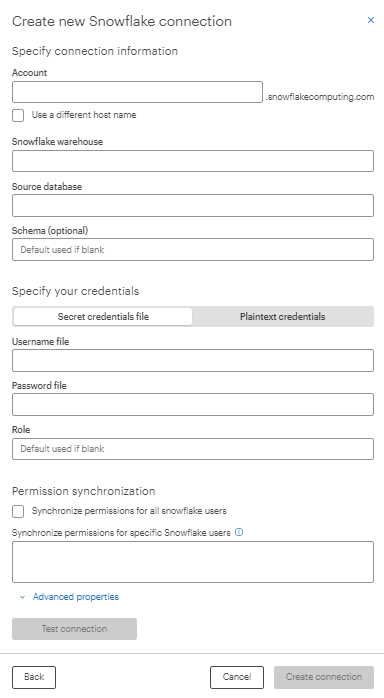
Provide values for these fields on the dialog:
Warning
Pay careful attention to case and special characters when setting up Snowflake policy synchronization. Make sure the case of a Snowflake object matches the case used in your Snowflake environment. See Limitations and Case Considerations.
-
Account: Your Snowflake account name can be found in your Snowflake URL
<accountname>.snowflakecomputing.com. -
Snowflake warehouse: The Snowflake warehouse you wish to connect to. A warehouse name is required.
-
Source database: The name of the Snowflake database for the connection.
-
Schema: The name of the Snowflake schema in the database for the connection. If none is specified, the default is used. The default schema is the schema assigned to the user in Snowflake when the user was defined.
Note: Snowflake tables should only be registered once in an Okera-synced cluster.
-
Select whether you will provide plaintext or secure credentials. Select Plaintext credentials to specify plaintext credentials; select Secret credentials file to specify a path to the secrets credentials file. Okera recommends that you always use secure credentials.
If you use secure credentials, specify the credentials as described below:
-
Username file: Link to your Snowflake username secrets file. For more information, see Providing Secure Credentials. If you are using Snowflake policy synchronization, this user should be the secrets file for the Snowflake user assigned to Okera's Snowflake role (
SERVICE_OKERA_ROLE). By default, this is the secrets file for the Snowflake userSERVICE_OKERA_USER. See Step 3. Tailor the Script. -
Password file: Link to your Snowflake username secrets file. For more information, see Providing Secure Credentials.
-
-
Role: If you are using Snowflake with Okera's policy synchronization enforcement, specify the Snowflake role created for Okera to use for the connection (by default
SERVICE_OKERA_ROLE). A role specification in the connection definition is required. See Step 3. Tailor the Script. If you are using Snowflake with pushdown processing, this field is not present. -
Permission synchronization: Select the Synchronize permissions for all Snowflake users checkbox if you want this connection synchronized for all Snowflake users. If you only want the connection synchronized for specific list of users, specify either a comma-separated list of Snowflake users (with no spaces) or a Snowflake tag (with an
onorofftag value). You cannot specify both a tag and list of user names in a single connection.Only one tag can be specified per connection. The syntax for specifying a tag name is
tag:<tag-name>:<on or off>. For example,tag:OKERA_UDFS.PUBLIC.OKERA_POLICY_SYNC_TAG:on. To learn how to set up tags for Snowflake users, see Tag Users in Snowflake.Policies are synced for Snowflake users with the specified usernames or with the Snowflake tag on or off as specified. Quotes are not required around user or tag names, but the case of these names must match the case of the names in Snowflake. For more information, see Limit Synchronized Users and Limitations and Case Considerations.
-
Advanced properties: Specify any of the optional advanced Snowflake connection properties described in Advanced Snowflake Connection Properties.
-
-
Test the connection to see if it works. If problems occur, verify that the Snowflake objects have been specified correctly and that the correct case has been used in the connection definition.
After the connection test runs successfully, create a crawler to register the data for the connection. See Create and Run a Crawler and Register Datasets.